
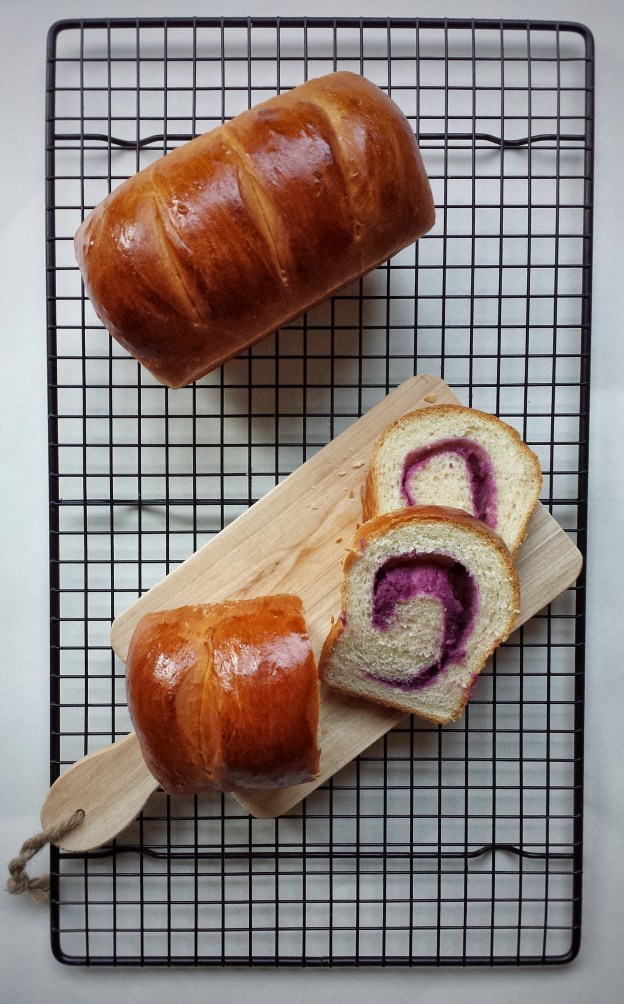
I love to make bread ! Yes, it takes time and patience, but it’s totally worth it. The smell of fresh bread is just so satisfying ! It makes your home feels……more homey ?! …..Does this even make sense?? I used to make the dough in a mixer, but not anymore. Mixing it with hand is actually easier, and your dough will be more even. I was really pleased with how this bread turned out. It’s sweet, tasty and it’s in my favourite colour… purple !
Two years ago, when my daughter was in grade 2, her teacher invited a chef/educator to teach the kids about food and how to make bread from scratch. I was one of the volunteer parents and that class was so fun ! The kids were super cute and hilarious. Some of them, like my daughter, jumped right into the “mess” , others were not too sure, frowning and saying “eew ! ” and “that’s gross !” the whole time. But at the end, when they tasted their own bread, they were all very delighted ! I think teaching kids about food and cooking at a young age is very important. It helps them (and ourselves) develop skills and healthy eating habits which hopefully last a lifetime. I have to admit, I am not doing enough. There were times when I should have cooked, but ended up just ordering take-out or “cooking” some frozen food. Well, as I told my kids, I am always teaching them and learning with them at the same time……So, mommy needs to do some more homework and learn how to cook healthier and more delicious meals!
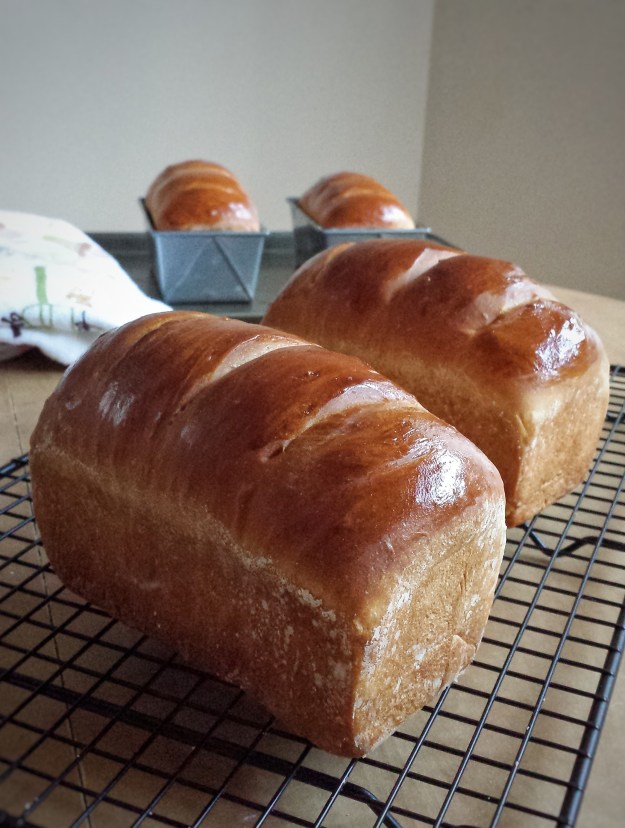
Makes 4 mini loaves (dimensions of pan: 5.75 x 3.25 x 2.25 inches)
For the yam paste
- 4 medium purple yam
- 60 mL milk
- 30 mL condensed milk
- Preheat oven to 400°F
- Wash and cut yams in halves
- Bake on a tray lined with parchment paper for about 45 minutes until fork tender
- Cool and peel skin off
- In a food processor or blender, blend yam, milk and condensed milk into a paste
- Keep in fridge until ready to use


For the bread dough
- 540 g bread flour
- 4 g instant yeast
- 5 g granulated sugar
- 250 mL milk
- 60 mL honey
- 1 egg
- 30 mL vegetable oil
- 3 g salt
You will also need 1 egg for brushing top of bread
- Dissolve sugar in warm milk, add yeast and let sit for about 5 minutes until frothy
- Put flour and salt in a big mixing bowl, gradually mix in 1 egg, yeast mixture, honey and oil with hands until dough starts to form
- Transfer to a floured surface, knead until smooth and stretchy
- Cover with plastic wrap and let rise until double in size, about 1-2 hours (You can speed up the process by putting it in a not-heated oven with a small pot of hot water on the lower rack. The moist and warm environment makes the dough rise quicker)
- Punch air out, cut dough into 4 equal pieces (about 250g each)
- Roll each dough flat, spread a layer of yam paste on top
- Roll doughs up with yam paste inside


- Seal openings by pinching edges together
- Place each dough separately in lightly greased and floured mini loaf pans
- Cover with plastic wrap and let rise again for another hour
- Preheat oven to 350ºF
- Score top of doughs with knife or scissors
- Brush top with egg wash


- Bake for about 20 – 25 minutes until golden


Tools that I used

Chicago Metallic 59440 Commercial II Non-Stick Mini Loaf Pans, Set of 4
You can get the mini loaf pans through the Amazon website by clicking the above link. I will receive a small compensation if you purchase the item.


Beautiful! Simply amazing bread
LikeLiked by 1 person
Thanks! Purple is my favourite colour! 😊
LikeLike
Ohh purple is my fav colour as well! What a fun take on homemade bread… Sure it is as delicious as it looks 🙂
LikeLiked by 1 person
Thanks Meaghan! 😊
LikeLike
That colour is just gorgeous!… I love that the class had the opportunity to have hands on experience with bread making. Sometimes it seems that real life skills are being forgotten as technology takes over. And how sad for future generations, if life doesn’t include the occasional (from scratch) homemade loaf of bread or chocolate chip cookie.
LikeLiked by 1 person
Thanks! And yes believe me, technology (screen time) has taken over in my house ….😞 It’s so important and nice to go back to the basics!
LikeLike
What a beautiful bread! I love making my own bread, too. It would be nice to see more experiences for kids like the one your daughter had at school. If they are exposed to things like bread making early, they won’t be so intimidated later. Thanks for sharing.
LikeLiked by 1 person
Totally agree, kids ,or even adults, these days are technology smart but many of them don’t know the basics. Teaching the kids to appreciate food and to cook is so important.
LikeLike
This bread turned out absolutely fabulous! Such a beautiful brown top and purple centre. Absolutely I believe in teaching kids at a young age…some of my first memories are of helping my mom punch down her bread dough.
LikeLiked by 1 person
Thanks Bernice! My best memories in the kitchen were making dishes and puddings with my mom during Chinese New Year and……washing dishes every night, as my older brother would always “kindly” leave them for me!! 😁
LikeLike
First of all, let me say that that is one of the most beautiful loaves of bread I’ve seen in a long time. From that gorgeous yam center to the fantastically golden top, it’s a real work of art. Makes me realize that I need to make more bread! Second, I completely agree with you about the value of teaching kids about making food, not to mention where it comes from. There are few things so important to our health, our enjoyment, and our planet. Lovely post – and truly lovely recipe. Cheers.
LikeLiked by 1 person
Thanks Sean ! My original plan was to make a swirl roll, (like a bagel that’s twined). The doughs looked pretty good, but after rising and baking, they were kind of distorted. So I made loaves instead. I was very pleased with how they came out! 😊
LikeLiked by 1 person
This is so lovely. The surprise when you cut it open and find this gorgeous colour… oh, I must make it!
LikeLiked by 1 person
Thanks Annika! I was really how it turned out too! 😊
LikeLike