Monthly Archives: October 2016

Matcha (Green Tea) Mochi 

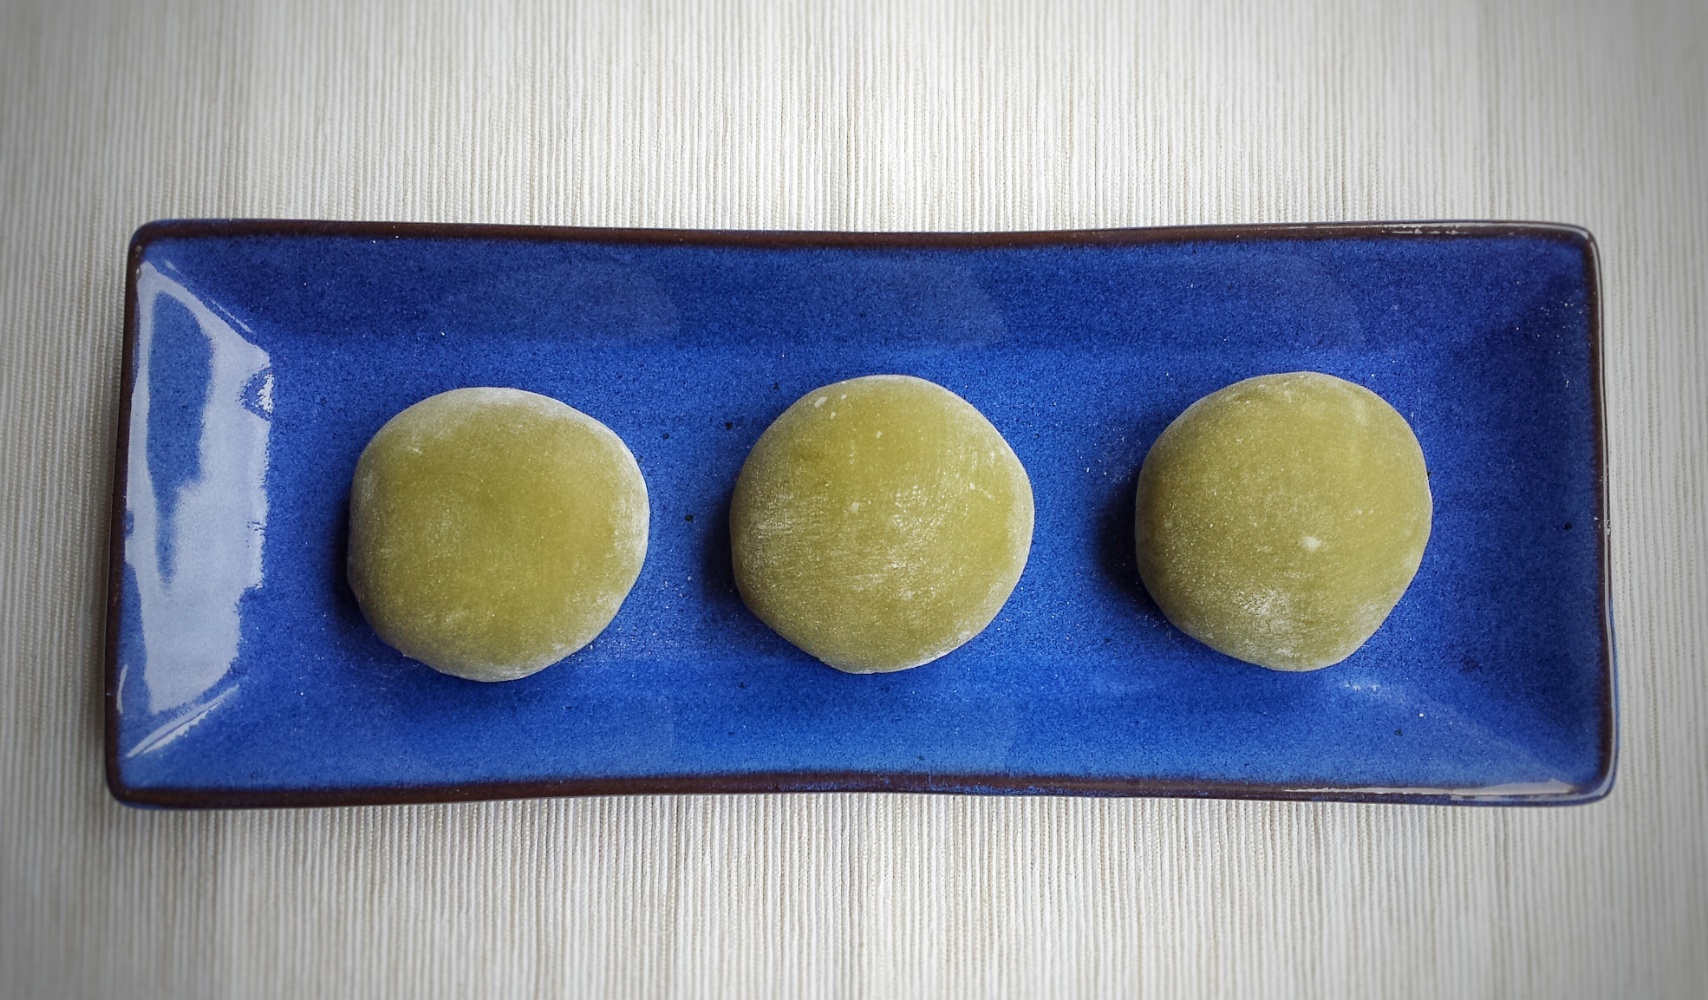
Mochi is one of my favourite desserts ! It’s sweet, soft, chewy….. just delicious. Traditionally, it is made by steaming a short-grain rice called mochigome, then it is mashed and pounded with wooden mallets in a mortar. I saw a video on YouTube on the fastest mochi maker in Japan. Wow !  It sure takes some serious skills and labour ! (Here is the link if you are interested https://www.youtube.com/watch?v=tmSrULDVRPc).

Of course I don’t have those skills and tools. This recipe uses sweet rice flour and is very simple. The red bean paste matches so well with the green tea flavour.  With a cup of green tea, I feel like I am in Japan……I wish ! 

Makes about 8-10 pieces

  • 150 g sweet red bean paste (coarse or fine)
  • 180 g sweet rice flour (mochiko)  
  • 1 teaspoon matcha powder
  • 60 g granulated sugar 
  • 300 mL water
  • 1/4 cup potato starch (for dusting) 
  1. Scoop red bean paste with a teaspoon into small balls (about 1/2 inch) 
  2. Place in freezer for about 15 minutes 
  3. Mix together sweet rice flour, matcha powder and sugar in a large microwavable bowl 
  4. Add water, mix well 
  5. Microwave on high for 1+1/2 minutes, remove and stir, then microwave on high again for about one more minute (each microwave oven is different, you may need to adjust the time) 
  6. Cool slightly for about 5 minutes 
  7. Place a piece of parchment paper on work surface and dust generously with potato starch 
  8. When dough is still fairly warm, spoon about 1-2 tablespoons each onto dusted parchment paper (dough is very sticky)
  9. Put a red bean paste ball in the middle, wrap and seal by pinching the edges together 
  10. Dust with more potato starch if needed to prevent sticking (you can dust off the extra with a pastry brush when mochi is cooled
  11. Place seal side down on a tray lined with parchment paper  
  12. Cool and serve. You can keep them in an air-tight container for up to 2 days at room temperature 

Matcha (Green Tea) Mochi


Advertisement

Gingerbread Buttermilk Pancakes 

It’s not Christmas yet, but I am already craving for gingerbread cookies !  Not the overly sweet icing or the candy decorations on top, but the actual cookies.  The spices, the molasses, they just taste so good.  But it seems a little too early to make Christmas cookies ?! So, to satisfy my craving, I put these wonderful flavours into pancakes ! And of course, I have to serve them with maple syrup ! With a cup of coffee, it’s the best breakfast on a cold windy day!

img_20161016_141313.jpg

I asked my daughter to draw me a gingerbread man and this is what she came up with……
Oh No ! Mr.Gingerbread Man is getting worried that he is going to be eaten soon !

Makes about 4-6 pancakes 

  • 180 g all-purpose flour
  • 1 teaspoon baking powder 
  • 1/2 teaspoon baking soda 
  • 1/4 teaspoon salt
  • 2 teaspoons ground ginger 
  • 1 teaspoon ground cinnamon 
  • Pinch of ground cloves 
  • Pinch of ground nutmeg 
  • 1 egg
  • 1 cup buttermilk
  • 2 tablespoons unsalted butter, melted
  • 2 tablespoons fancy molasses 
  1. Sift and mix together all dry ingredients
  2. Whisk in egg and other wet ingredients, mix until blended
  3. Pour batter onto a lightly oiled non stick pan or griddle over low to medium heat
  4. Cook about 1-2 minutes until bubbles begin to form on top
  5. Flip pancake over and cook for about 1-2 more minutes until lightly brown
  6. Serve warm with butter and maple syrup 


Gingerbread Buttermilk Pancakes

Pumpkin Cheesecake with Maple Caramel Sauce 

Fall

October is a busy baking month for me. Thanksgiving, my daughter’s birthday, bake sale, Halloween…. all of them are happening this month. I am not complaining, in fact, I am enjoying it . Apples, pumpkins, corn, the spices, the Halloween decorations ….the aroma, the colours, the fun, I love them all ! For this Thanksgiving, I made a pumpkin cheesecake topped with maple caramel sauce. It is crunchy, creamy, sweet and a little spicy…..just delicious ! And it’s fairly easy to make ! It’s a great alternative to pumpkin pie.

Makes one 6-inch cake

For the crust

  • 120 g ginger snaps
  • 3 tablespoons unsalted butter, melted

For the fillings

  • 250 g soft cream cheese
  • 120 g granulated sugar
  • 1 tablespoon all-purpose flour
  • 1 teaspoon ground cinnamon
  • 1 teaspoon ground ginger
  • Pinch of ground nutmeg
  • Pinch of ground cloves
  • 1/4 teaspoon salt
  • 120 g pumpkin puree (homemade or canned)
  • 2 eggs
  • 1 teaspoon pure vanilla extract

For the maple caramel

  • 120 ml maple syrup
  • 15 g unsalted butter
  • 60 mL heavy or whipping cream

Pumpkin Cheesecake

To prepare the crust

  1. Crush ginger cookies into fine crumbs
  2. Mix crumbs with melted butter, press firmly into bottom of a spring-form pan or a cake ring (if you use a cake ring like I did, you have to wrap the bottom with parchment paper as it is bottomless)
  3. Bake for about 10 minutes, let cool

To prepare the cheesecake

  1. When crust is cooled, wrap bottom of cake pan with 2 layers of aluminium foil and place on a rimmed baking tray
  2. Turn oven down to 325ºF
  3. Using an electric mixer with the paddle attachment, beat cream cheese and sugar until smooth
  4. Add flour, spices, salt,pumpkin puree and vanilla
  5. Add eggs, one at a time, mix until just blended, do not overmix
  6. Pour batter on top of crust and place the baking tray into the oven
  7. Pour about one inch of hot water into baking tray and bake for about 40-45 minutes (the top should be a little jiggly, do not overbake)
  8. Turn oven off, leave cheesecake inside oven with door ajar for another hour to cool gradually
  9. Take cake out, let cool at room temperature completely, then refrigerate for at least 3-4 hours

To prepare maple caramel

  1. Melt butter in a non-stick pan over medium heat
  2. Add maple syrup, when boil, turn heat down and simmer for about 3 minutes until thicken
  3. Add cream, stirring occasionally and continue to simmer until thick

When cheesecake is set, serve with maple caramel and whipped cream

Pumpkin Cheesecake

Halloween Cake Pops

My daughter borrowed a book about Halloween treats from the library last week, there were so many great ideas we want to try. After looking through the book and “researching” on the internet, we decided to make cake pops !  So we went to the store and bought all we need…..cake pop sticks, chocolate, coating wafers, licorice sticks, sprinkles…..and we also picked up some sour candies, dried fruits, peppermint paddies….. oops, I guess we got a little too much ! Oh well, we had a lot of fun shopping and making them, that’s all that matters, right?! The coating wafers tend to be very sweet, so I used less sugar for the cake and dark chocolate for the frosting. They turned out really tasty and fudgy like brownies. My son, who doesn’t have a sweet tooth, said these cake pops are “boss” !

For the cake

  • 135 g self-rising flour (about 3/4 cup)
  • 25 g unsweetened cocoa powder
  • 60 g unsalted butter
  • 60 g granulated sugar
  • 1 egg
  • 1/2  teaspoon pure vanilla extract
  • 90 mL boiling water

For the chocolate frosting 

  • 60 g unsalted butter
  • 100 g icing sugar
  • 1/2 teaspoon pure vanilla extract
  • 60 g dark chocolate (70%)

For the coating

  • Chocolate or candy moulding wafers (You will need about 300 g of wafers to coat 6 cake pops)
  • Sprinkles, licorice, and or other decorations of choice 

Makes about 20 cake pops 

To make the cake

  1. Preheat oven to 350ºF
  2. Sift together self-rising flour and cocoa powder
  3. Using an electric mixer with the paddle attachment, cream butter and sugar until fluffy
  4. Add egg and vanilla
  5. Add flour mixture in 2 parts, mix until blended
  6. Gradually stir in boiling water, batter will be slightly runny
  7. Bake in a 9 inch x 5 inch loaf pan, lined with parchment paper, for about 20 minutes 
  8. Let cake cool completely

To make the frosting

  1. Melt dark chocolate in a bowl over a pan of simmering water, let cool slightly
  2. Using an electric mixer with paddle attachment, cream butter and icing sugar
  3. Add in vanilla and melted chocolate, mix until smooth

To prepare the cake balls

  1. When the cake is completely cooled, break the cake into fine crumbs with hands
  2. Gradually add frosting, a couple of tablespoons at a time, mix until you can roll mixture into balls
  3. Roll cake mixture into small balls, place on a cookie sheet lined with parchment paper, cover with plastic wrap and put in fridge for at least about 30 minutes

Halloween Cake Pops


 To assemble the cake pops

  1. Melt candy melts or chocolate in a bowl over a pot of simmering water 
  2. Dip cake pop sticks into coating about 1 inch deep
  3. Insert coated sticks into cake balls 
  4. Dip into coating, covering the whole cake pop (since it’s a chocolate cake, you may need to do 2 coatings if using white coating)
  5. Gently tap off excess coating
  6. Decorate while coating is still wet, then let dry (alternatively, you can draw on them when they are dry using edible markers)

Coconut Flour Chocolate Chip Cookies (Gluten-free)

Our family is very lucky. None of us have any food allergies, intolerance, special diet or restrictions.  I do have many friends or their kids who cannot eat nuts, shell-fish, dairy or gluten. Cooking or eating out can be very challenging for them.  These restrictions, however, have given me opportunities to try new ingredients. This is my first time using coconut flour to bake. It is gluten-free, high in fibre and protein, and low in carbohydrates. It is very absorbent, so you cannot make a cup-to-cup substitution with grain-based flour. For every cup of all-purpose flour, you only need about 1/4-1/3 cup of coconut flour. You would also need more eggs, about 2 eggs per 1/3 cup of coconut flour. These cookies are soft, chewy and much healthier than regular chocolate chip cookies. So we can eat more and feel a little less guilty! 

Makes about 12-14 cookies 

  • 40 g coconut flour (about 1/3 cup)
  • 60 g brown sugar 
  • Pinch of salt 
  • 2 eggs, lightly beaten 
  • 60 mL coconut oil, melted
  • 1 teaspoon pure vanilla extract 
  • 50 g semi-sweet chocolate chips 
  1. Preheat oven to 350ºF
  2. Mix together brown sugar, eggs, coconut oil and vanilla 
  3. Add coconut flour and salt, stir until dough is formed (Mixture may look very runny at the beginning, but as you stir, the coconut flour will absorb the liquid)
  4. Stir in chocolate chips
  5. Roll dough into one inch balls, place on baking sheets lined with parchment paper, then gently flattened each ball (these cookies don’t really spread, they remain pretty much the same shape before and after baking)
  6. Bake for about 12 minutes 

Coconut Flour Chocolate Chip Cookies