Tag Archives: food blog

Berries and Tofu Smoothie Bowl (Vegan)

Over the past year, I have been trying to eat less meat and more plant-based proteins. I was never a big meat eater, so the transition was pretty easy. To me, the change has been beneficial, especially for my gut. I have a lot less indigestion and heartburn. Trying to cooperate these ingredients in recipes has been fun too. Tofu is my favourite, I mostly use it in savoury dishes or soups, but I can also make it into a simple and nutritious sweet treat, like this smoothie bowl ! You can use any berries and toppings of your choice. For a thicker smoothie, freeze some of the berries first. Look at the beautiful and vibrant colours ! It’s definitely a treat for your eyes and your tummy !  

Makes one serving

  • 150 g mixed berries (I used fresh raspberries, frozen blueberries and blackberries)
  • 150 g soft tofu
  • 1 tablespoon of maple syrup to sweeten (optional)
  • Toppings of choice (other fruits, seeds and nuts)

Blend all ingredients together then add toppings 

Advertisement

Vanilla Cake with Blueberry Cream Cheese Frosting

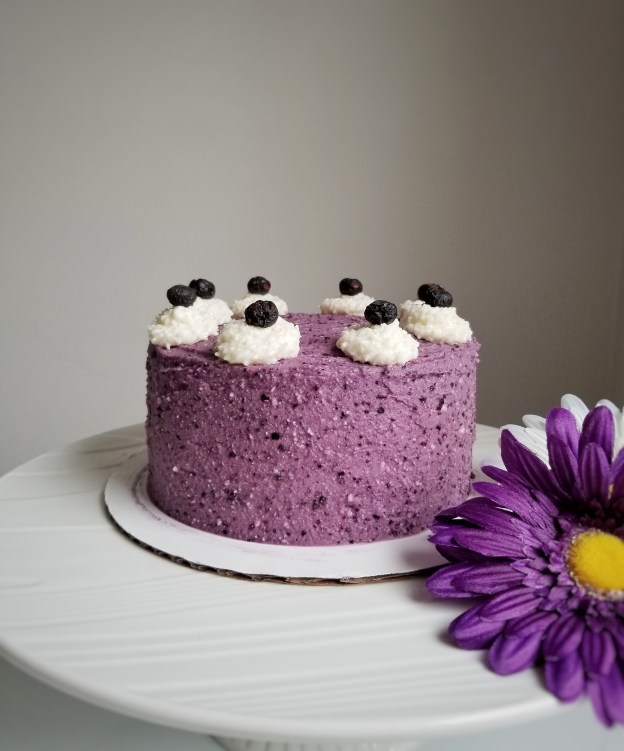
Sorry! I was one day late for my Mother’s Day post ! Well, but I think we can treat our moms (and myself) any time of the year, and we should ! It doesn’t have to be just Mother’s Day, right ? This cake is very simple, and the blueberries give it a stunning, beautiful color that you don’t need to do much decorations ! I added some freeze-dried blueberries.  If you cannot find them, just add a little more puree to enhance the blueberry flavour. (Just a little otherwise the frosting may become watery). The cream cheese frosting is quite soft, so you should keep it in the fridge until serving. I use vanilla cake as I find it very versatile. You can pretty much pair it  with any flavour, berries, citrus, caramel, chocolate,etc. Once you have a good recipe, you are set and good to go. You can also use this recipe to make cupcakes, just decrease your baking time to about 18-20 minutes. 

I hope all moms had a good Mother’s Day yesterday ! I got a nice surprise from my daughter. She made me some Blueberry Chocolate Bark !  How sweet !

Makes one 6 inch cake

For the vanilla cake

  • 300 g cake and pastry flour
  • 6 g baking powder
  • 3 g baking soda
  • 2 g salt
  • 180 g granulated sugar
  • 2 eggs
  • 180 mL buttermilk
  • 120 mL milk
  • 10 mL pure vanilla extract
  • 100 g unsalted butter (melted)
  • 100 mL vegetable oil
  1. Preheat oven to 350ºF
  2. Line the bottom of two 6 inch round cake pans with parchment paper, lightly oil and flour the sides
  3. Sift together flour, baking powder, baking soda and salt, set aside
  4. Whisk together eggs and sugar until pale
  5. Mix in milk, buttermilk, vanilla, butter and oil (it’s ok if batter is lumpy, the butter may just be solidifying)
  6. Add the wet ingredients into the dry ingredients, mix until just cooperated.
  7. Pour batter into the cake pans and bake for about 40 minutes
  8. Cool completely  before assembling

Tips:

To keep the cake moist and evenly baked, you can bake them in a hot water bath. You can also use cake strips, which you soak in water for a few minutes, squeeze out excess, wrap it around the cake pans and bake.

For the frosting

  • 270 g unsalted butter (soften)
  • 225 g soft cream cheese
  • 120 g icing sugar
  • 45 g blueberry puree (store bought or homemade) 
  • 20 g freeze-dried blueberry powder (optional)
  1. To make the puree, blend fresh or frozen blueberries (you may need more than 45 g of whole blueberries) 
  2. To make the blueberry powder, grind freeze-dried blueberries with food processor until fine
  3. Beat together butter and cream cheese until smooth
  4. Sift in icing sugar, beat until light and smooth
  5. Add blueberry puree and powder, mix well
  6. Refrigerate until use

To assemble

  1.  Trip top of cakes to flatten
  2. Layer cakes with frosting in between
  3. Coat side and top of cake with more frosting
  4. Decorate as desired
  5. Keep in fridge until ready to serve


You can get the cake strips through the Amazon website by clicking the link below. I will receive a small compensation if you purchase the item. 


Wilton Bake Even Cake Strips, 2 Pieces
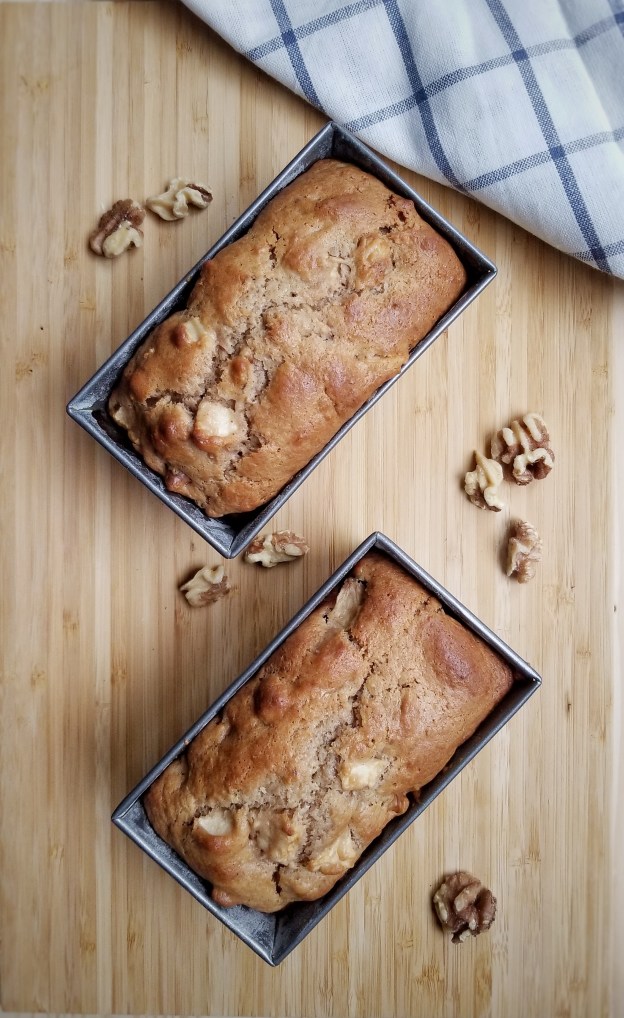
Lemon Coconut Muffins

My friends often ask me how I come up with recipe ideas. Most of the time is seasonal, like using berries in the summer and pumpkin in the fall. Sometimes it’s just sort of random and use whatever I have at home. The other day, I was cleaning up my pantry, I found a bag of shredded coconut, some coconut oil and a few leftovers that I’ve only used once or twice ! Then I remembered I had  some coconut milk in the fridge too ! (Wow…didn’t realize I love coconut so much…..) So, I came up with these very “coconuty” muffins ! I added some lemon juice and zest to add fresshness and balance the flavour, and I just love that golden crust on top ! So, if you have some extras lying around, don’t waste them ! Create your own recipes ! You may come up with something really delicious ! You never know !  

Makes about 8-10

  • 200 g all-purpose flour
  • 3 g baking powder
  • 3 g baking soda
  • pinch of salt
  • 1 egg
  • 100 g granulated sugar
  • 120 mL unsweetened coconut milk
  • 80 mL buttermilk
  • 60 mL coconut oil, melted and slightly cooled
  • 5 mL pure vanilla extract
  • 30 mL lemon juice
  • Zest of a small lemon
  • 30 g unsweetened shredded coconut + more to sprinkle on top
  1. Preheat oven to 350ºF
  2. Sift together flour, baking powder, baking soda and salt, side aside
  3. In a separate bowl, whisk together sugar and egg
  4. Mix in coconut milk, buttermilk, melted coconut oil, vanilla extract and lemon juice
  5. Add wet ingredients into dry ingredient, mix until just blended
  6. Stir in lemon zest and shredded coconut
  7. Spoon batter into muffin tins lined with lightly greased muffin cups, about 3/4 full
  8. Sprinkle top with more shredded coconut
  9. Bake for about 18-20 minutes

Caramel Brownies

Compared to many parts of Canada, our winter in Vancouver has been very mild…..until 2 days ago ! A snow pile just dumped onto us in a matter of hours ! Seriously, I was still jogging in the morning at 9 am, it was cold, but no snow. Three hours later, everywhere was covered in white ! I guess it’s our turn to experience this cold snowy winter ! And what does a baker do when it snows ? Bake of course ! So I made these brownies and also had time to decorate a whole bunch of Valentine’s cookies ! The snow has made me more productive !

I like my chocolate desserts very chocolaty, and I mean VERY……And this brownie is not only chocolaty, but also soft, fudgy and chewy ! Who can say no to that ? Especially if you are making it for your Valentine’s ! Make sure you don’t overbake, in fact, a good brownie is often slightly underbaked. It’s best to serve them warm, reheat in the oven for a few minutes if you need.

Happy Valentine’s Day !

Makes about 10 – 12 brownies
For the batter

  • 180 g unsalted butter
  • 180 g semi-sweet chocolate
  • 40 g unsweetened cocoa powder
  • 2 eggs
  • 240 g granulated sugar
  • 5 ml vanilla extract
  • 135 g all-purpose flour
  • 2 g baking powder
  • 2 g salt
  • 10-12 caramel candies

For the caramel sauce

Melt together 30 caramel candies (about 240 g) and 1/2 cup of whipping cream in a non-stick pot over low heat until well blended, stirring frequently

  1. Preheat oven to 350ºF
  2. Sift together flour, baking powder and salt
  3. Melt butter, chocolate and cocoa powder in a bowl over a pot of simmering water, let cool for about 5 minutes
  4. Whisk together eggs, sugar and vanilla until pale
  5. Mix in chocolate mixture
  6. Add flour mixture and mix until blended, the batter can be quite thick
  7. Spoon half the batter into lightly-greased silicone molds, place a caramel candy in the middle, cover with remaining batter and bake for about 20 minutes
  8. Cool slightly, drizzle with caramel sauce and serve warm

Mini Apple Walnut Loaves

When my kids were younger and were still in Scouts, we used to sell apples to raise money every September. It takes quite a bit of courage for a 6 and a 9-year-old to go up to strangers and ask for donations. It was such a good experience and I was so proud of them. Now that their interests have changed and we are no longer in Scouts, I really miss those years of fund-raising, camping, hiking and all the other activities that we have done….  

Fall is the apple season and there are so many different kinds of apple. Gala is my favourite ! It’s not too big, it’s sweet and has the perfect texture for eating or baking. And I made these mini loaves with walnuts the other day. They taste best when warm….and even better with a scoop of vanilla ice-cream ! I like to make them in mini loaves as you don’t need to bake them as long and can freeze them very easily for later.  

Makes 4 mini loaves (dimensions of pans: 5.75 x 3.25 x 2.25 inches)

  • 360 g all-purpose flour
  • 10 g baking powder
  • 4 g baking soda
  • 2 g salt
  • 3 g ground cinnamon
  • 100 g granulated sugar
  • 100 g demerara or brown sugar
  • 2 eggs
  • 180 mL vegetable oil
  • 150 g sour cream
  • 10 mL pure vanilla extract
  • 400 g diced apples, about 3-4 apples (I used Gala, washed, peeled and cored)
  • 120 g coarsely chopped walnuts
  1. Preheat oven to 350°F
  2. Lightly oiled and floured 4 mini loaf pans
  3. Sift together flour, baking powder, baking soda, salt and cinnamon, set aside
  4. Whisk together eggs and sugars until frothy, mix in oil, vanilla and sour cream
  5. Add wet ingredients into dry ingredients, mix until just cooperated
  6. Stir in apples and walnuts
  7. Pour batter into 4 loaf pans and bake for about 35-40 minutes


Tools that I used 

Chicago Metallic 59440 Commercial II Non-Stick Mini Loaf Pans, Set of 4

You can get the mini loaf pans through the Amazon website by clicking the above link. I will receive a small compensation if you purchase the item. 

Blackberry Cream Cheese Puffs

This is the third recipe of my berry series ! The stars this time are blackberries ! They tend to be more tart than other berries but are equally delicious. And instead of a muffin or a pie, I want to make something more fun. My daughter has been asking me to make cream puffs, so why don’t I put the two together ?! Blackberry and cream cheese go so well together. And WOW ! It turned out with such a pretty colour! Choux pastry is so magical, it turns into light and airy puffs without any leavening agents. And you can fill the puffs with any flavour of cream or custard, even just a spoon of whipped cream. Be sure to eat them immediately for best tasting…..but hey, they are so yummy and I guarantee they are not going to last ! 

 Makes about 10-12 puffs 

For the fillings

  • 100 g fresh blackberries
  • 250 g soft cream cheese
  • 60 g icing sugar, sifted
  1. Puree blackberries with a blender, strain through a fine mesh to remove seeds, should yield about 60 g of puree
  2. Beat cream cheese until fluffy, add icing sugar, beat until smooth
  3. Add blackberry puree, mix until blended
  4. Store in refrigerator until use 

For the choux pastry puffs

  • 200 mL water
  • 90 g unsalted butter
  • 2 g salt
  • 30 g  granulated sugar
  • 120 g all-purpose flour
  • 3 eggs
  1. Heat together water, butter, salt and granulated sugar in a pot over medium heat until just starting to boil
  2. Turn heat down to low, add flour all at once
  3. Stirring constantly, cook until a thin film of paste formed at the bottom of the pot or about 5 minutes if using a non-stick pot
  4. Transfer paste to a bowl and cool down
  5. Meanwhile, preheat oven to 350ºF and prepare piping bag with desired piping tip
  6. Add eggs to paste, one at a time and mix well after each addition
  7. Transfer to piping bag and pipe onto baking sheets lined with parchment paper 
  8. Bake at 350ºF  for about 15-20 minutes until starting to brown, turn heat down to 325°F and bake for another 25-30 minutes until golden (if puffs are under baked, they will collapse after taken out)
  9. Turn heat off, leave puffs inside oven for about 10 minutes with oven door ajar
  10. Take puffs out, let cool  

To assemble

  1. Cut puffs in halves with a serrated knife, spoon or pipe blackberry fillings in middle
  2. Dust with icing sugar and serve immediately 

Blueberry Cheesecake Ice Cream 

Our summer has been pretty hot, I am not complaining, it’s been great ! And nothing is better than having a bowl of ice cream on a hot summer day…..and it’s homemade ! Blueberries are in season, so why not make good use of them ! This recipe is really simple, yet flavourful. No kidding, it’s probably the best ice cream I have ever made ! It looks amazing too ! I am so glad I bought the ice cream machine, trust me, it’s totally worth it !  Oh, here are some extra tips …….

  • Don’t skim on the dairy if you want your ice cream to be rich and creamy, use full fat
  • Make sure your mixture is very cold before putting into the ice cream machine
  • Don’t mesh all of the blueberries when making the compote if you want some “blueberry crunch” in your ice cream

Hope you will give this a try and have a great summer !

Makes about 1 L

  • 150 g blueberries 
  • 30 g granulated sugar (adjust if needed)
  • 10 mL lemon juice 
  • 250 g soft cream cheese 
  • 250 mL whipping cream
  • 250 mL full-fat milk 
  • 180 g granulated sugar 
  1. To make the blueberry compote, cook blueberries, 30 g of sugar and lemon juice over medium heat 
  2. Turn heat down when liquid starts to bubble 
  3. Gently mesh blueberries with back of wooden spoon and cook until slightly thicken 
  4. Let cool then refrigerate until use 
  5. Blend cream cheese, whipping cream, milk and sugar together for a few minutes until smooth 
  6. Refrigerate for about 2 hours or until mixture is very cold
  7. Pour into ice cream maker and churn according to manufacturer’s instructions 
  8. Spoon and swirl blueberry compote into ice cream 
  9. Freeze until serve 

Fruit Pizza (For Canada Day) 

​Summer is here and that means…..lots of berries ! I love to eat them fresh, but also like to use them to make pies, tarts, ice cream, etc…….Just thinking about it makes me soooo excited ! To start off my “berries season”, I made this simple fruit pizza ! It’s basically a giant cookie, top with cream cheese and fruits ! I picked strawberries and raspberries just in time to celebrate Canada Day, but you can also use blueberries, blackberries, even kiwi and banana. It is so easy to put together and I think it is a nice, refreshing dessert for your summer backyard BBQ. Have a Happy Canada Day !  

Makes about four 7″ pizzas

For the “pizza” dough

  • 170 g all-purpose flour 
  • 170 g cake and pastry 
  • 3 g baking soda 
  • 2 g salt
  • 120 g unsalted butter, at room temperature
  • 180 g granulated sugar 
  • 1 egg
  • 5 mL pure vanilla extract 
  • 30 mL lemon juice 
  • Zest of 1 small lemon 

For the toppings

  • 250 g soft cream cheese
  • 60 g icing sugar
  • Fruits of choice 
  1. Preheat oven to 325°F
  2. Sift together flours, baking soda and salt, set aside 
  3. Using an electric mixer with the paddle attachment, cream together butter and sugar until fluffy 
  4. Add 1 egg, vanilla, lemon juice and lemon zest, mix until blended 
  5. Mix in flour mixture, 1/3 at a time until just cooperated (do not over mix)  
  6. Transfer to a lightly floured surface and knead until dough is formed (dough can be stored in fridge or freezer for later use)
  7. Roll out to about 0.5 cm in thickness 
  8. Cut into large circles using a plate or a cake ring (You can collect the dough scraps all together and re-roll, cover unused dough with a damp cloth or plastic wrap)
  9. Place on cookie sheets lined with parchment paper 
  10. Bake for 10-12 minutes, let cool
  11. Beat together cream cheese and icing sugar until smooth
  12. Just before serving, spread cream cheese on top of giant cookies, top with fresh fruits  


Strawberry Mousse Cake

I first made this cake for my son’s 13th birthday last year. He specifically wanted a strawberry cake. It came out alright…but the cake was slightly dry and the mousse layer was too thick…..

My son’s birthday cake

I have been wanting to remake and “upgrade” it ever since, but never had a chance. It’s Mother’s Day, so I thought this is the perfect time! I added a jelly glaze on top to brighten both the colour and flavour. Each of the three layers has a different texture but they match very well together. It looks much prettier than last time too! I can now share it with my mom and my family. Happy Mother’s Day to all our moms! I wonder what my kids are doing to surprise me this year…….

Makes one 6 inch cake

For the cake

  • 2 eggs, separated
  • 75 g granulated sugar
  • 75 g cake and pastry flour, sifted
  • 2 g baking powder
  • 1 g salt
  • 5 mL pure vanilla extract
  • 5 mL fresh lemon juice
  • 30 mL vegetable oil

For the mousse and jelly glaze

  • 400 g fresh strawberries, washed and hulled
  • 160 g granulated sugar
  • 10 mL fresh lemon juice
  • 250 mL cold whipping cream
  • 4 x 1 g gelatin sheets

To make the cake

  1. Preheat oven to 350°F
  2. Sift together flour, baking powder and salt, set aside
  3. Whisk together egg yolks and 60 g of sugar until pale
  4. Mix in vanilla and oil, then gently fold in flour mixture
  5. In a separate bowl, make a meringue by whisking together egg whites and lemon juice until frothy
  6. Slowly add in 15 g of sugar, whisk until medium peak
  7. Gently fold meringue into flour mixture
  8. Pour batter into a lightly-greased 6 or 7 inch cake pan, lined with parchment paper at the bottom (see notes)
  9. Bake for about 20 minutes
  10. Let cool, then trim top and side of cake

Notes : I baked my cake in a 7 inch springform pan and trimmed it to fit into a 6 inch cake ring. You can just bake and assemble your cake in the same pan.

To make the mousse and jelly glaze

  1. For the mousse, place a large mixing bowl in the freezer for about 15 minutes
  2. Soak 3 gelatin sheets (1 g each) in cold water for a few minutes
  3. Blend strawberries and strain seeds out through a mesh
  4. Add sugar and lemon juice, and cook over medium heat until sugar is dissolved
  5. Set aside half of the puree for the glaze
  6. Drained gelatin and add to remaining puree, stir until dissolved, let cool
  7. Whisk whipping cream in the cold mixing bowl until stiff peak
  8. Fold in strawberry gelatin mixture until just blended
  9. Pour on top of cake, smooth with a spatula and refrigerate for at least 3-4 hours until set
  10. For the jelly glaze, soak 1 gelatin sheet in cold water for a few minutes
  11. Reheat the saved strawberry puree over medium heat
  12. Add drained gelatin and stir until dissolved
  13. Let cool, pour on top of mousse layer and refrigerate for another 3-4 hours until set
  14. Release cake from pan or ring and decorate as desired

Homemade Pop Tarts

My daughter loves to read ever since she was very young, and she loves all kinds of books…novels, science, history, comics and even cook books ! So, a lot of times, our bedtime reading will include looking at recipes, sweet or savoury, and deciding what we should try. Pop tarts was one of them that’s on the top of our list. It’s easy, colourful, fun and of course, super yummy ! Personally, I like them without the sprinkles, but my daughter will definitely disagree. She had so much fun putting on the glaze and the sprinkles….yeah, might be just a little too much…..    

Makes about 6 tarts

For the crust

  • 360 g all-purpose flour
  • 20 g granulated sugar
  • 2 g salt
  • 240 cold unsalted butter, cut into small pieces and chilled
  • 2 eggs
  • 30 ml milk
  • 5 ml pure vanilla extract

For the glaze 

  • 120 g icing sugar 
  • 30-45 ml milk

Other ingredients

  • Fruit jam of choice (I used raspberry)
  • 1 egg white for brushing
  • 30 g vanilla sugar or granulated sugar 
  • Sprinkles for decorating
  1. To make the glaze, mix together icing sugar and milk until smooth, set aside
  2. To make the crust, put flour, sugar and salt in a large mixing bowl
  3. Rub in chilled butter with fingers until butter is pea-sized
  4. Mix in eggs, milk and vanilla
  5. Gently press dough together, do not knead
  6. Wrap with plastic wrap and refrigerate for at least an hour or overnight
  7. When ready to bake, preheat oven to 350°F
  8. Roll dough to about 0.5 cm in thickness. If dough was in the fridge overnight, let it sit at room temperature for about 20 minutes before rolling
  9. Cut into 8 cm x 12 cm rectangles (2 rectangles per tart)
  10. Place half of the rectangles on baking sheet lined with parchment paper
  11. Spoon 1-2 tablespoons of fillings on top
  12. Brush sides with egg white and cover with the other half of rectangles
  13. Press sides gently to seal, then press down with a fork
  14. Make a few holes on top to vent
  15. Brush top with egg white and sprinkle with vanilla sugar or granulated sugar
  16. Bake for about 30 minutes
  17. Cool, then decorate with glaze and sprinkles