Tag Archives: cookie recipes

Matcha (Green Tea) Chocolate Chips Cookies 

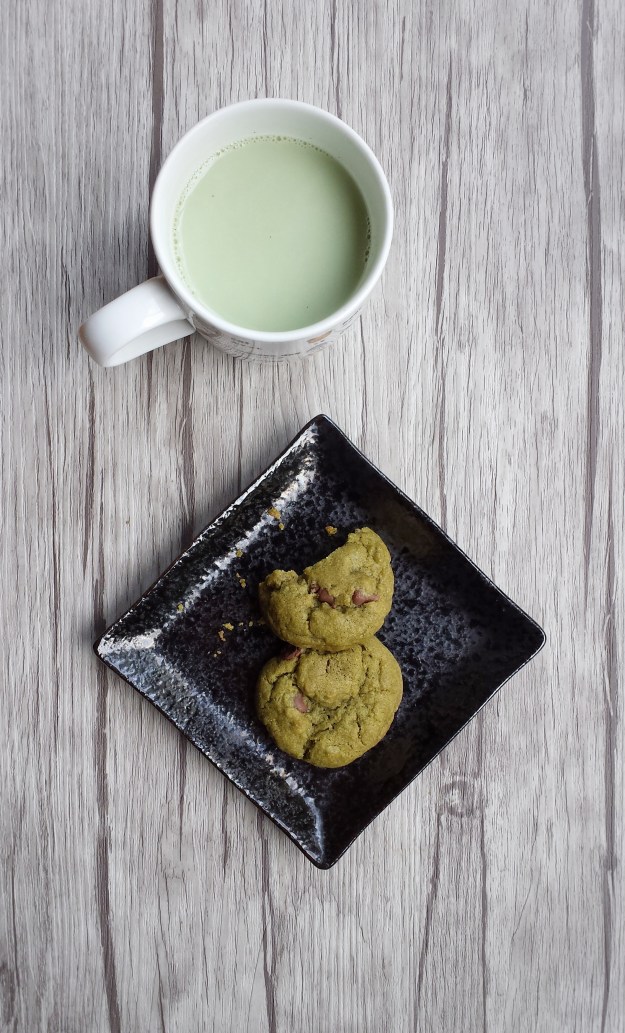
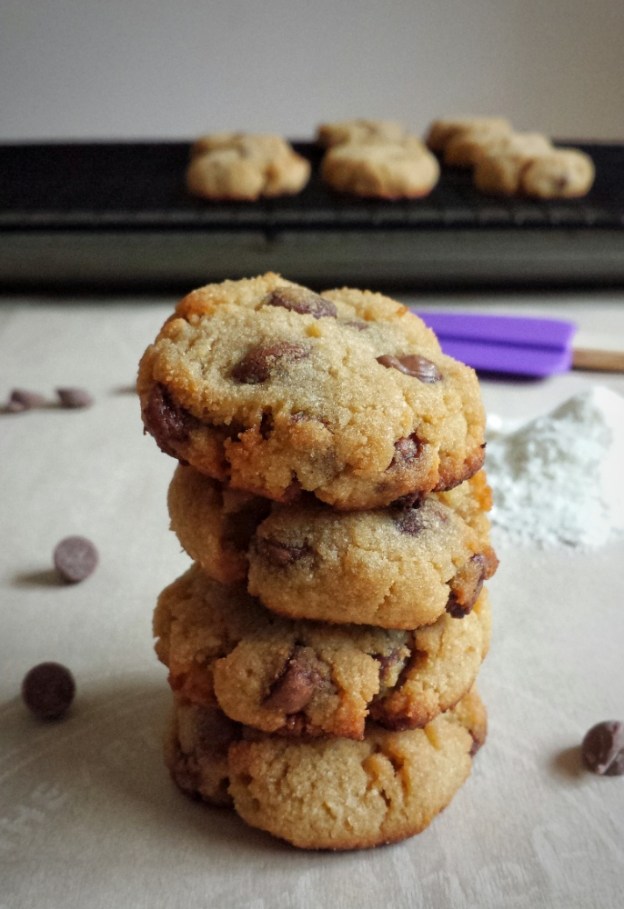
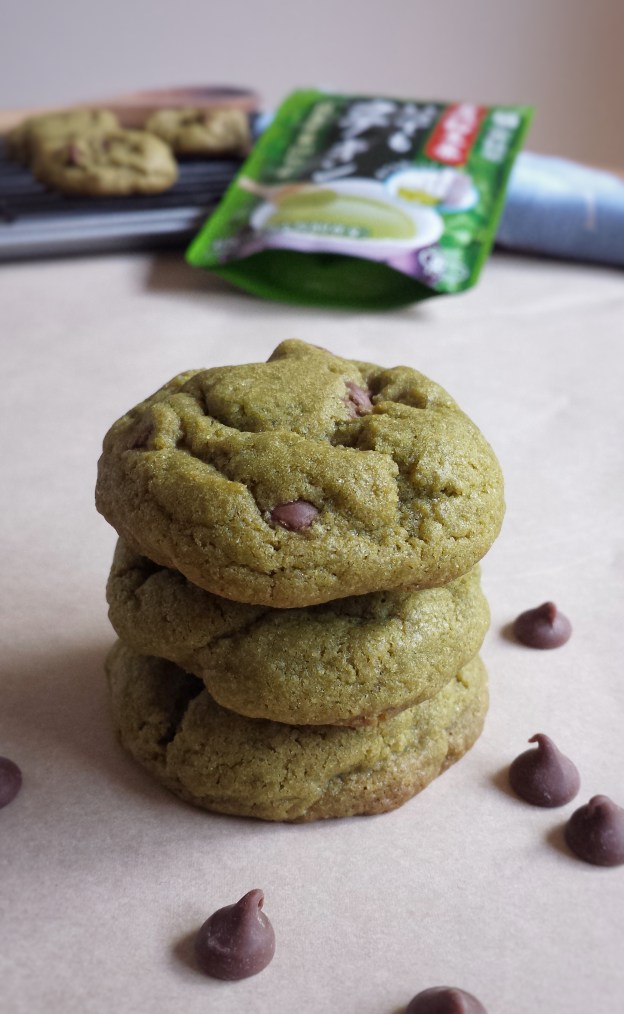
Few weeks ago, my daughter and I found a matcha latte mix in a local grocery store. We really wanted to try it but were a little skeptical at first. My daughter thought we could just get a small amount, so that’s what we did. To our surprise, it was very tasty ! And all you need is to do is add hot water or milk ! This has also given an idea to make this matcha chocolate chip cookies ! They are not the best looking cookies, but they sure taste good ! And don’t worry, you won’t turn into The Incredible Hulk after you eat them ! I actually had to make them twice to get the right taste, and as my daughter said, this second time is “matcha better” ! 

Makes about 24 cookies 

  • 120 g unsalted butter, softened 
  • 75 g granulated sugar 
  • 75 g demerara or brown sugar 
  • 1 egg
  • 5 mL pure vanilla extract 
  • 200 g all-purpose flour
  • 7.5 g matcha (green tea) powder 
  • 2 g baking powder
  • 2 g baking soda 
  • 1 g salt 
  • 90 g chocolate chips
  1. Preheat oven to 350ºF
  2. Sift together flour, matcha powder, baking powder, baking soda and salt, set aside 
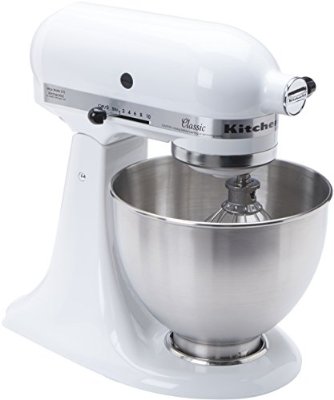
  3. Using an electric mixer with the paddle attachment, cream together butter and sugars until light and fluffy 
  4. Add egg and vanilla 
  5. Add flour mixture in 2 to 3 parts, mix until blended 
  6. Stir in chocolate chips 
  7. Scoop into one inch balls and place on cookie sheets lined with parchment paper, about 2 inches apart (Alternatively, you can roll them into balls, and flatten them slightly, they will have a smoother surface) 
  8. Bake for about 10 to 12 minutes 


Advertisement

Gingerbread Cookies

I have to apologize ! I haven’t been able to post for a month ! I have been busy…very busy. I participated in two Christmas Fairs selling my baked goodies….for the very first time ! 

It was a lot of work, more than I anticipated, but it was well worth it ! It was a very rewarding experience. I’ve received many positive comments, from the set up of my table to how yummy my cookies were. More important, I feel so blessed to have so much support from family and friends, especially my daughter ! I couldn’t do it without her ! 

Gingerbread cookie was one of the items I sold at the fairs. I had posted a recipe before, but over the years, I have made a few changes to make it better. So here is an updated version !

For the cookies

  • 180 g all-purpose flour
  • 180 g cake and pastry flour
  • 3 g baking soda
  • 2 g salt
  • 6 g ground ginger
  • 3.5 g ground cinnamon
  • Pinch of ground cloves
  • Pinch of ground nutmeg
  • 120 g butter
  • 120 g brown sugar
  • 100 g molasses
  • 1 egg
  1. Preheat oven to 350ºF
  2. Sift together flours, baking soda, salt and spices, set aside
  3. Using an electric mixer with the paddle attachment, cream together butter and brown sugar until light
  4. Add egg and molasses
  5. Add flour mixture in 2-3 parts, mixing after each addition until just blended
  6. Refrigerate dough for about 60 minutes for easy handling, you can also freeze it for later use
  7. Roll on a lightly floured surface to about 0.5 cm in thickness
  8. Cut with cookie cutters
  9. Bake on a cookie sheet lined with parchment paper for about 8 minutes.
  10. Cool completely before decorating

For the icing 

  • 45 g meringue powder
  • 500 g icing sugar, sifted 
  • 90 – 120 mL warm water
  • 5 mL pure vanilla extract
  • 10 mL corn syrup
  • Gel food colouring
  1. Mix meringue powder with about 45 mL of water, let sit for a few minutes
  2. Stir in vanilla and corn syrup 
  3. Whisk into icing sugar using an electric mixer or a hand whisk
  4. Slowly add in more warm water until shiny and desired consistency (thicker for outlining and thinner for filling)
  5. Add food colouring

Maple Cookies for Canada 150

It’s Canada 150th birthday ! How exciting ! I can’t believe I have been in this wonderful country for 27 years ! The friendly people, beautiful weather, nature, and food……I just love them all ! To celebrate this big day, I made these maple cookies ! And of course, I have to use maple syrup to make it Canadian ! Happy 150th, Canada ! And I hope you are enjoying the celebrations and activities all over our country ! 

Makes about 2-3 dozens, depending on size

For the cookie

  • 170 g all-purpose flour 
  • 170 g cake and pastry flour
  • 3 g baking soda 
  • 2 g salt
  • 120 g unsalted butter, at room temperature
  • 60 g granulated sugar
  • 60 mL maple syrup
  • 1 egg  
  • 5 mL pure vanilla extract 
  • 30 mL lemon juice 
  • Zest of 1 small lemon 
  1. Preheat oven to 325°F
  2. Sift together flours, baking soda and salt, set aside 
  3. Using an electric mixer with the paddle attachment, cream together butter and sugar until fluffy 
  4. Add maple syrup, egg, vanilla, lemon juice and lemon zest, mix until blended 
  5. Mix in flour mixture, 1/3 at a time until just cooperated (do not over mix)  
  6. Transfer to a lightly floured surface and gently press together until dough is formed (dough can be stored in the fridge or freezer for later use)
  7. Roll out to about 0.3 cm in thickness 
  8. Cut with cookie cutters (You can collect the dough scraps all together and re-roll, cover unused dough with a damp cloth or plastic wrap)
  9. Place on cookie sheets lined with parchment paper 
  10. Bake for 8 – 10 minutes, cool completely before decorate. 

For the royal icing

  • 45 g meringue powder,sifted 
  • 500 g icing sugar
  • Pinch of salt
  • 90 – 120 mL warm water
  • 5 mL pure vanilla extract
  • 10 mL corn syrup 
  • Gel food colouring
  1. Mix meringue powder with about 45 mL of water, let sit for a few minutes 
  2. Stir in vanilla and corn syrup 
  3. Using an electric mixer with the whisk attachment, mix icing sugar, salt and meringue powder mixture at low speed 
  4. Slowly add in warm water until shiny and desired consistency (thicker for outlining and thinner for filling)
  5. Add gel food colouring 

Checkerboard Cookies 

Making these checkerboard cookies may seem complicated, but once you made the dough, it’s pretty easy. It’s a fun recipe to get the kids involved. They can help measure and assemble. They can also make them in other patterns, like pinwheels or stripes. It’s like playing with clay or play dough, and they can learn about math and geometry at the same time !  (Another reason for me to bake more, yeah !) You can freeze the dough logs for up to 1 month, so you can have freshly baked cookies whenever you want ! 

Makes about 16 checkerboard cookies

For the vanilla dough

  • 50 g granulated sugar
  • 100 g unsalted butter
  • 1 egg yolk
  • 150 cake and pastry flour
  • Pinch of salt
  • 1/4 teaspoon pure vanilla extract

For the chocolate dough

  • 50 g granulated sugar
  • 100 g unsalted butter
  • 1 egg yolk
  • 140 g cake and pastry flour
  • 10 g unsweetened cocoa powder
  • Pinch of salt
  • 1/4 teaspoon pure vanilla extract

You will also need 1 egg white for assembling cookies

  1. Mix together cold butter and sugar using a wooden spoon until no more lumps
  2. Add egg yolk and vanilla, mix until blended
  3. Add flour and salt (and cocoa powder for the chocolate dough) all at once, mix with the wooden spoon, then transfer onto a table or counter and gently knead dough together (just work until ingredients are mixed in)
  4. Wrap with plastic wrap, refrigerate for at least 2-3 hours or overnight
  5. Knead dough until pliable
  6. Roll out 2/3 of each dough to about 0.8-1 cm in thickness 
  7. Cut into 0.8-1 cm wide strips and assemble into checkerboard pattern, brush egg white between pieces to help sticking 
  8. Roll out remaining 1/3 of each dough to about 3 mm in thickness
  9. Brush with egg white and wrap sheets around checkerboard logs 
  10. Trim off excess dough.
  11. Wrap with plastic wrap and refrigerate for at least 2-3 hours  
  12. When ready to bake, preheat oven to 325ºF 
  13. Cut cookies and place on baking sheets lined with parchment paper
  14. Bake for 8-10 minutes 

Notes: The dough scraps can be re-rolled, but not more than twice or it may crack. You can also gather them together, roll into a log and make some marble cookies! 

Originally recipe by Chef Marco Ropke at the Vancouver Pastry Training Centre 

White Chocolate and Lime Cookies 

I love citrus fruits ! The colours, the smell, the tanginess, they just brighten me up. I mostly bake with lemons or oranges and this is the first time I use lime. Normally I just use lime juice to make guacamole. The flavour of lime balances nicely with butter and white chocolate. This cookie dough is also very “unique” ! There are two kinds of flour, all-purpose and self-rising.  About 4 years ago, I tried to bake some shortbread cookies. The recipe called for cornstarch, but I accidentally put in self-rising flour ! To my surprise, they turned out really good ! Since then, I have used this combination many times with different variations and everyone likes it. Well, I guess I really have learned from my “mistake” …..but I don’t plan to correct it ! 🙂 Limes

Makes about 24 cookies 

  • 200 g unsalted butter, softened
  • 90 g icing sugar + more for dusting
  • 225 g all-purpose flour 
  • 45 g self-rising flour
  • 1/4 teaspoon salt
  • 1 tablespoon fresh lime juice
  • Zest of a small lime
  • 1 teaspoon pure vanilla extract
  • 50 g white chocolate chips 
  1. Preheat oven to 325°F
  2. Sift together both flours and salt, set aside
  3. Using an electric mixer with the paddle attachment, cream butter and sugar until fluffy
  4. Add lime juice, zest and vanilla extract 
  5. Add flour mixture in 2 parts, mix until just blended
  6. Stir in white chocolate chips
  7. Refrigerate dough for 1-2 hours to prevent cookies from spreading too much
  8. Shape dough into one inch balls and place on baking sheets lined with parchment paper, about 2 inches apart
  9. Bake for about 15 minutes, until edges just golden
  10. Cool on baking sheets for about 10 minutes, then completely on rack
  11. Dust with icing sugarWhite Chocolate and Lime Cookies


Tools I used and you may like

41rqjlmpovl._sy400_.jpg

KitchenAid K45SSWH Classic 4.5-Quart Bowl Stand Mixer, White


789.jpg

Microplane #40020 Classic Grater/Zester, Black

You can get these tools through the Amazon website by clicking the above link. I will receive a small compensation if you purchase the item.

Eisenbahner (Railroad) Cookies 

This is a cookie that I learned at my pastry course earlier this year. It was one of my favourites. It’s beautiful, festive, delicious and has a cool name! It looks like a railroad track, hence the name Eisenbahner, which means railroad man in German. When I did a google search, almost all the recipes for this cookie are in German. So, I think it’s a great idea to share this in our Canadian Food Creatives and the Canadian Christmas Cookie Exchange round-up. There are 3 parts to this cookie, the base, the marzipan paste and the jam. Yes, it may seem a little complicated, but it’s definitely worth all the work. Hope you enjoy the ride !

Makes about 12 cookies

For the cookie base

  • 120 g cold unsalted butter
  • 60 g granulated sugar
  • 1 egg yolk
  • 170 g cake and pastry flour

For the marzipan paste and jam 

  • 200 g marzipan
  • 20 g unsalted butter, softened
  • 30 g icing sugar
  • 30 g honey
  • 1 egg white
  • 100 g raspberry jam (You want the jam to be hot and runny, so you can put it in a bowl and sit in a hot water bath for a few minutes before using)
  1. To make the cookie base, mix together cold butter and sugar using a wooden spoon until no more lumps
  2. Add egg yolk, mix until blended
  3. Add flour all at once, mix then transfer onto a table or counter and gently knead dough together (do not overmix, just work until ingredients are mixed in)
  4. Wrap with plastic wrap, refrigerate for at least 2-3 hours or overnight
  5. To make the marzipan paste, mix together marzipan, softened butter, icing sugar and honey into a thick paste (I found it easier to mix them with hands)
  6. Add egg white, mix until it has a stiff piping consistency (it looks like mash potato and you may not need the whole egg white)
  7. Put in piping bag with a star tip
  8. When ready to bake, preheat oven to 325ºF
  9. Take dough out from fridge and knead gently on a floured surface until pliable
  10. Roll it flat, about 0.3 cm in thickness (it’s OK if it cracks a little, just patch it back together)
  11. Cut into two 6 cm x 25 cm rectanglesEisenbahner (Railroad) Cookies
  12. Bake on a cookie sheet lined with parchment paper until edges just starting to brown, about 8 minutes
  13. Cool, then brush a thin layer of hot jam in between the 2 sheets 
  14. Pipe marzipan paste along edgesEisenbahner (Railroad) Cookies
  15. Turn oven up to 425-450ºF at broiler setting
  16. Bake 2-3 minutes just to caramelize the marzipan paste (watch closely, as it can burn very quickly)
  17. Cool, then fill centre with hot jamEisenbahner (Railroad) Cookies
  18. Cool completely, cut into pieces, dust with icing sugarEisenbahner (Railroad) Cookies

Original recipe by Chef Marco Ropke at the Vancouver Pastry Training Centre.

Be sure to check out the links below for more cookie recipes from other Canadian Bloggers.  You can also find them on social media using the hashtag #CDNFoodCreatives . Many thanks to Laura Irvin at The Blue Nose Baker , Kacey Joanette at The Cookie Writer and Evelyne Budkewitsch at The Cultureatz for organizing.

cookie-collage-final.jpg.jpeg

Double Chocolate Cranberry Cookies 

I was craving for some chocolate cookies yesterday. Not just a plain chocolate chip cookie. But the decadent kind that is loaded with chocolate, and all you want to say after taking a bite is Mmmmm…..Mmmmmm and Mmmmmm ! So here they are ! Rich, chocolaty and soft…. I had to quickly shoot a few photos before they were all gone !
This is my first time using coconut sugar. Its taste and sweetness are very similar to brown sugar. I do find it gives the cookies a slightly drier texture. The cranberries are optional, but I thought it’s nice to add some tanginess. I hope you enjoy them as much as we do ! 

Makes about 16 cookies

  • 150 g all-purpose flour
  • 25 g unsweetened cocoa powder
  • 1/2 teaspoon baking soda
  • 1/4 teaspoon salt
  • 100 g unsalted butter
  • 60 g coconut sugar (or brown sugar)
  • 60 g granulated sugar
  • 1 egg
  • 1 teaspoon pure vanilla extract
  • 50 g dark chocolate, 70%, (chopped into small chunks)
  • 50 g semi-sweet chocolate (chopped into small chunks)
  • 60 g dried cranberries
  1. Preheat oven to 350ºF
  2. Sift together flour,cocoa powder, baking soda and salt, set aside
  3. Cream together butter and sugars using either an electric mixer with the paddle attachment or by hand with a wooden spoon (I just did it by hand)
  4. Add egg and vanilla, mix until blended
  5. Mix in flour mixture in two parts
  6. Stir in chocolate chunks and dried cranberries
  7. Drop about 1 tablespoon each of dough onto baking sheets lined with parchment paper, about 2 inches apart
  8. Bake for about 12 minutes
  9. Cool on baking sheets for about 5 minutes, then completely on rack

Double Chocolate Cranberry Cookies

Coconut Flour Chocolate Chip Cookies (Gluten-free)

Our family is very lucky. None of us have any food allergies, intolerance, special diet or restrictions.  I do have many friends or their kids who cannot eat nuts, shell-fish, dairy or gluten. Cooking or eating out can be very challenging for them.  These restrictions, however, have given me opportunities to try new ingredients. This is my first time using coconut flour to bake. It is gluten-free, high in fibre and protein, and low in carbohydrates. It is very absorbent, so you cannot make a cup-to-cup substitution with grain-based flour. For every cup of all-purpose flour, you only need about 1/4-1/3 cup of coconut flour. You would also need more eggs, about 2 eggs per 1/3 cup of coconut flour. These cookies are soft, chewy and much healthier than regular chocolate chip cookies. So we can eat more and feel a little less guilty! 

Makes about 12-14 cookies 

  • 40 g coconut flour (about 1/3 cup)
  • 60 g brown sugar 
  • Pinch of salt 
  • 2 eggs, lightly beaten 
  • 60 mL coconut oil, melted
  • 1 teaspoon pure vanilla extract 
  • 50 g semi-sweet chocolate chips 
  1. Preheat oven to 350ºF
  2. Mix together brown sugar, eggs, coconut oil and vanilla 
  3. Add coconut flour and salt, stir until dough is formed (Mixture may look very runny at the beginning, but as you stir, the coconut flour will absorb the liquid)
  4. Stir in chocolate chips
  5. Roll dough into one inch balls, place on baking sheets lined with parchment paper, then gently flattened each ball (these cookies don’t really spread, they remain pretty much the same shape before and after baking)
  6. Bake for about 12 minutes 

Coconut Flour Chocolate Chip Cookies


Chocolate Sweet Pastry Cookies

I love recipes that can be used in many ways. Sweet pastry is definitely one of them. Once you’ve found a good recipe, there are so many things you can do. Pies, tarts…..and cookies ! This is the same recipe I used for the shell of my Chocolate Pistachio Tart ! But instead of putting them in a tart mold, I cut them into squares and dressed them up with some melted white chocolate ! If you don’t want chocolate cookies, you can easily replace the cocoa powder with flour or even ground almond ! 

  • 120 g unsalted butter (cold)
  • 75 g granulated sugar
  • 1 egg yolk
  • 170 g cake and pastry flour (sifted)
  • 10 g unsweetened cocoa powder (sifted)
  • 20 g white chocolate chips (optional)

Makes about 30 cookies

  1. Mix together cold butter and sugar using a wooden spoon until no more lumps
  2. Add egg yolk, mix until blended
  3. Add flour and cocoa powder, mix with the wooden spoon, then transfer onto a table or counter and gently press dough together (just work until ingredients are mixed in)
  4. Wrap with plastic wrap, refrigerate for at least 2-3 hours or overnight
  5. When ready to bake, preheat oven to 350ºF
  6. Knead dough until pliable
  7. Roll dough out to about 1/8 inch in thickness on a floured surface, dock with a fork
  8. Cut into desired shapes using cookie cutters (dough scraps can be re-roll, but only do it once or twice or it may crack)
  9. Place on baking sheets lined with parchment paper, about 2 inches apart 
  10. Bake for about 10 minutes 
  11. Cool on cookie sheets for about 10 minutes, then completely on rack 
  12. Melt white chocolate in a heat proof bowl over a pot of simmering water, cool slightly
  13. Drizzle on top of cookies 

Chocolate Sweet Pastry Cookies


Orange Cranberry Cookie Bites

These cookies can be a delicious Christmas treat or you can have them anytime of the year! They have a rich butter flavour with a delightful orange taste.

Makes about 18-20 cookies

  • 1 cup unsalted butter, at room temperature
  • 1/2 cup icing sugar + more for dusting
  • 1+1/2 cup all-purpose flour
  • 1/4 self rising flour
  • 1/4 teaspoon salt
  • 2 tablespoons orange juice
  • 1 teaspoon orange zest
  • 1 teaspoon pure orange extract
  • 1 teaspoon pure vanilla extract
  • 1/4 cup dried cranberries
  1. Preheat oven to 350ºF
  2. Sift together flour, self-rising flour and salt, set aside
  3. Using an electric mixer with the paddle attachment, cream butter and sugar until light and fluffy
  4. Add orange juice,orange and vanilla extract
  5. Add flour mixture in 2-3 portions, mix until blended, scraping sides and bottom of mixing bowl
  6. Stir in orange zest and cranberries
  7. Spoon about 1 tablespoon each of dough and roughly shape into balls
  8. Place on cookie sheets lined with parchment paper, about 2 inches apart
  9. Bake for about 12 minutes, then decrease temperature to 325ºF and bake for about 10 minutes
  10. Cool on cookie sheets for about 5 minutes, then completely on rack
  11. Dust with icing sugar when completely cooled

I shape the cookies into bite sized balls.  You can also shape them in bigger balls and flatten gently with a fork.