Tag Archives: dessert recipe

Funfetti Cheesecake 

Can’t believe 2017 is almost over ! It has been a fun and eventful year for me ! I have tried a number of new things…..I did a 10K run (and I actually ran the whole 10K, not walking !) I did two Christmas markets, selling my cookies for the very first time…..I have also injured my feet (plantar fasciitis) and I am not sure when they will completely healed….but oh well, that’s an age thing too, I guess……But overall, I think I had more good than bad this year ! I hope 2018 will be even better, I already have many plans in my mind ! Hope yours will be a prosperous one too ! 

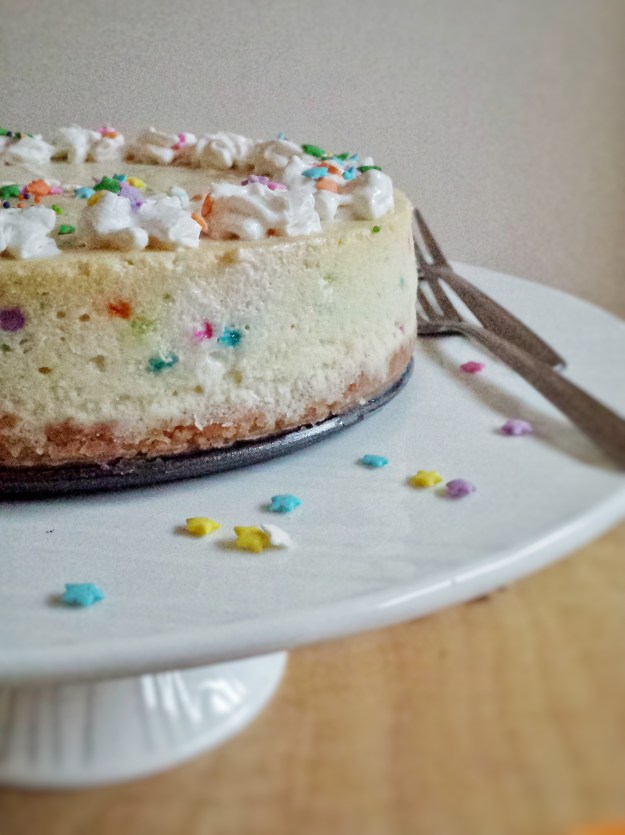
Here is a fun cake to make for New Year ! Funfetti Cheesecake ! I added some rainbow sprinkles to a basic cheesecake recipe and used shortbread cookies for the crust. I baked the cheesecake in a hot water bath to prevent the cake from cracking….Hope you’ll enjoy it and have a fun New Year ! 

Makes one 6-inch cake

For the crust 

  • 150 g shortbread cookie crumbs (you can use any cookies of your choice)
  • 45 g unsalted butter, melted 

For the filling 

  • 500 g light cream cheese, softened 
  • 180 g granulated sugar 
  • 2 eggs
  • 30 g all-purpose flour 
  • 7.5 mL pure vanilla extract 
  • 25 g rainbow sprinkles

Extra sprinkles and whipped cream for decorating if needed 

  1. To make the crust, mix cookie crumbs and melted butter together 
  2. Press firmly onto bottom of a 6-inch springform pan lined with parchment paper 
  3. Bake for about 8 minutes, cool slightly 
  4. To make the filling, beat together cream cheese and sugar until smooth using an electric mixer 
  5. Add eggs, flour and vanilla, mix until blended 
  6. Fold in sprinkles 
  7. Pour into pan, smooth with a spatula and bake in a hot water bath for 50-60 minutes. You can wrap the bottom of the pan with aluminum foil to prevent seepage 
  8. Cool completely, then refrigerate 
  9. When ready to serve, remove cake from pan, decorate with whipped cream and more sprinkles 


Advertisement

Baked Coconut Sticky Rice Cake for Lunar New Year

Lunar New Year was my favourite celebration when I was a kid in Hong Kong. I could visit and play with my cousins, get red envelopes and of course, eat lots and lots of good food ! My mom used to make all kinds of dishes and rice cakes, sweet and savoury. To be honest, I have never made them, because hers are always the best! But this year I thought…..hey, I am a baker, I should at least bake something to celebrate. Then, I remembered a recipe from my mom’s friend….Baked Coconut Sticky Rice Cake! I have modified her recipe to make it less greasy and added some shredded coconut on top. The glutinous rice flour and coconut milk should be available in any Asian market. Use the brands in the picture if you can find them, as according to the expert, aka my mom, they are better. (I am not sponsored by them, just personal preference) The cake will rise inside the oven, but then concave in a little when cooled and that’s ok. It doesn’t change the taste nor the texture of the cake. I used a round cake pan because but in Chinese, the word “round” has a meaning of being together. You can use a square pan, which probably will be easier to cut.

Wishing everyone good health and a prosperous year !

Baked Coconut Sticky Rice Cake

Makes one 8 inch round cake

  • 400 g glutinous rice flour, sifted (1 package)
  • 200 g granulated sugar
  • 5 eggs (lightly beaten)
  • 400 mL canned coconut milk (1 can)
  • 60 mL coconut oil (melted)
  • 1 teaspoon pure vanilla extract
  • 45 g unsweetened shredded coconut Baked Coconut Sticky Rice Cake
  1. Preheat oven to 350°F
  2. Line bottom of baking pan with parchment paper and lightly grease bottom and sides
  3. In a large bowl, mix together flour and sugar
  4. Stir in eggs, coconut milk, oil and vanilla until smooth using a hand whisk
  5. Strain batter through a mesh and pour into baking pan
  6. Sprinkle shredded coconut on top
  7. Bake for about 30 minutes, then reduce heat to 325ºF and bake for another 30 minutes (toothpick should come out clean when inserted into middle)
  8. Turn heat off, leave cake in oven with door ajar for about 20 minutes
  9. Take it out, cool slightly and serve warm
  10. You can store the cake in the fridge for up to 1 week. Reheat in oven before serving. Baked Coconut Sticky Rice Cake

Light Creme Anglaise

This is a modified version of the recipe I learned from my pastry course a few months ago. I didn’t have whipping or half and half cream at home, so I thought I would use milk and do a light version. It came out better than I thought! It may not be as creamy but it tastes almost as good as the original recipe! You can use it over any dessert, e.g. cakes, pies, puddings, pastries, cobblers, etc. 

  • 300 mL 2% milk
  • 4 egg yolks
  • 50 gram granulated sugar
  • 1/2 to 1 vanilla bean
  1. Gently whisk 1/3 of the milk with sugar and egg yolks, set aside
  2. Cut and scrape vanilla bean
  3. Put vanilla bean, including the pod, into the remaining of the milk and heat in a non-stick pot over medium heat until boil.
  4. Turn heat down to low
  5. Pour some boiled milk into egg mixture to temper, then pour back into the pot
  6. Heat mixture until thick enough to coat back of wooden spoon,  stirring constantly
    (Coat back of wooden spoon with sauce, draw a streak in the middle with your finger, if streak stays clear, the sauce is ready. Watch closely when cooking, the sauce thickens quite quickly. Do not over cook or you will have scrambled eggs instead!)
  7. Remove from heat, strain twice through a fine mesh
  8. Serve immediately or cool then refrigerate
  9. Use within one week

Original recipe by Chef Marco Ropke at the Pastry Training Centre of Vancouver

Lemon Curd Meringue Cookies

Meringue and lemon curd go very well together. These cookies are light and delicate but very rich in flavour. To balance the sweetness, I added less sugar to the meringue than I normally would. I also diluted the juice with a little bit of water, you can just use the juice if you prefer a more tangy flavour. Eat them right away though, otherwise the meringue will turn soft and sticky or you can sandwich them just before serving if you want to make them ahead. You can use the leftover lemon curd as a jam on your toasts, pancakes or waffles! Enjoy!

For the lemon curd

Makes about 1/2 cup

  • 2 egg yolks
  • 6 tablespoons granulated sugar
  • 3 tablespoons lemon juice
  • 2 teaspoons lemon zest
  • 2 tablespoons water
  • 50 gram unsalted butter, chilled and cut into small pieces
  1. Whisk together egg yolks, sugar, lemon juice, water and zest
  2. Heat mixture in non-stick pot over low heat, stirring constantly until thickened (mixture should coat back of spoon)
  3. Turn heat off, mix in butter, a few pieces at a time until all melted
  4. Cool, and refrigerate up to 2 weeks

For the meringues

Makes about 24 single cookies or 12 sandwiches

  • 2 egg whites
  • 1/4 teaspoon cream of tartar
  • 3 tablespoons granulated sugar
  1. Preheat oven to 225°F
  2. Using an electric mixer with whisk attachment, whisk egg whites and cream of tartar at medium speed until frothy
  3. Increase speed to high and slowly add in sugar
  4. Whisk until a stiff peak is formed
  5. Pour into piping bag with star or round tip
  6. Pipe onto cookie sheets lined with parchment paper, 2 inches apart
  7. Bake for about 40 minutes, depending on size of cookies, they should be dry to touch, turn off oven
  8. Leave cookies in oven for about 2 more hours to dry 
  9. Remove from oven to cool completely on rack

Pumpkin Tart

It’s Thanksgiving tomorrow. My daughter drew a picture and wrote a list at school about what she is thankful for. She made a long list, but the one I like the most was “I am thankful for my hilarious brother!” For myself, I am most thankful for having two lovely kids….they make me laugh, cry….they give me the energy to keep going but they also burn me out……Hope everyone have a good Thanksgiving!
This is actually my first time making pumpkin pie.  I wasn’t sure how it would turn out.  So I decided to make a mini version to experiment.  And I have some tart shells left in the freezer, so it’s a perfect time to use them up! I prefer a sweeter and milder taste, so I didn’t use too much spices.  But you can adjust the amount to your own taste.

Makes about 24 tarts

  • 1+1/2 cup pumpkin puree, preferably homemade (420 g)
  • 2 eggs
  • 3/4 cup brown sugar
  • 1 teaspoon ground cinnamon
  • 1/2 teaspoon ground ginger
  • pinch of nutmeg
  • 1/4 teaspoon salt
  • 1 tablespoon cornstarch
  • 3/4 cup whipping cream
  • 1 teaspoon pure vanilla extract
  • 24 store-bought small tart shells
  1. Preheat oven to 350ºF
  2. Whisk pumpkin and eggs
  3. Add brown sugar, spices, salt and cornstarch, mix until blended
  4. Add whipping cream and vanilla, mix well
  5. Pour into tart shells and bake for about 25 – 30 minutes 
  6. Top with whipped cream when cooled