Tag Archives: fbcigers

Cinnamon Bites

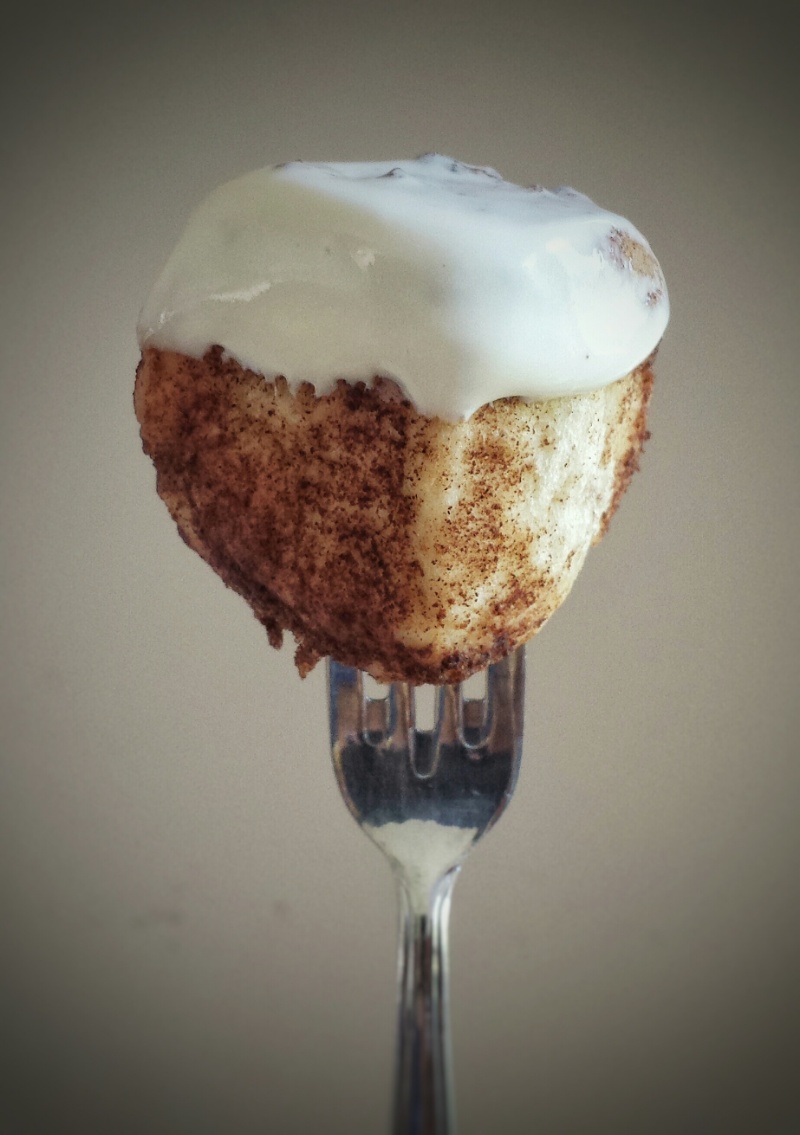
When I hear the words “comfort food”, I would somehow think of cinnamon buns ! Warm, sweet bread with ooey, gooey cream cheese icing……yum ! To no surprise, I found that they are originated from Sweden. (that’s why they sell them at Ikea?!) In Swedish they are called “kanelbulle”  which literally means “cinnamon buns” and October 4 is “Kanelbullens Dag” ,Cinnamon Roll Day. Wow, Swedish people must love their cinnamon buns !  I wish I can be there to taste the authentic flavour. Well, for now, I will comfort myself with these little cinnamon bites !  (I made them in bite-size pieces cause I often found the rolls too big) 

For the dough

    • 540 g (3 cups) bread flour
    • 1 cup warm whole milk
    • 1 teaspoon granulated sugar
    • 4 g instant yeast
    • 1/2 teaspoon salt
    • 1 egg
    • 2 tablespoons vegetable oil

For the coating

  • 100 g unsalted butter, melted
  • 1/2 cup granulated sugar
  • 2 tablespoons ground cinnamon

For the cream cheese icing

  • 180 g soft cream cheese
  • 6 tablespoons icing sugar
  • 1 teaspoon pure vanilla extract
  1. Dissolve sugar in warm milk, add yeast and let sit for a few minutes until frothy
  2. In a large mixing bowl, mix together flour, salt, egg, vegetable oil and yeast mixture
  3. Stir with hand and mix until dough starting to form
  4. Transfer to a lightly floured surface
  5. Knead dough until smooth and stretchy
  6. Wrap with plastic wrap and let rise for about 60 minutes until double in size 
  7. Preheat oven to 350ºF
  8. When dough is ready, punch air out, cut dough into 4 parts
  9. Roll each part into a long log, about 12 inches long
  10. Cut each log into about 12 small pieces
  11. Grease two 8 inch round flat pans or pans of your choice
  12. Mix cinnamon and 1/2 cup of sugar together
  13. Dip each small piece into melted butter, then coat with cinnamon sugar
  14. Place in pans, about 24 pieces each
  15. Bake for about 20 minutes
  16. Meanwhile, prepare icing by beating cream cheese, icing sugar and vanilla together until blended
  17. When bread bites are ready, serve warm with cream cheese frosting

Cinnamon Bites


No Bake Nutella Bites 

Can’t believe September is here already ! Kids are back to school, routines are slowly getting back to normal, and I have to start making lunches and snacks. I made these little energy bites as an after school snack. They are like mini granola bars and are super easy to make. Keep them in the fridge and the kids can just grab them when they want. They come in handy before hockey practices too ! There can be many variations to the recipe.  I used Nutella, but you can also use peanut butter, cookie butter or sunflower butter. You can also choose other nuts, seeds and dried fruits. 

Makes about 25-30 

  • 1 cup quick oats
  • 1 cup rice crispy cereal 
  • 2 tablespoons chia seeds 
  • 2 tablespoons ground flax seed 
  • 1/4 cup unsweetened shredded coconut 
  • 1/2 cup Nutella spread 
  • 3 tablespoons melted coconut oil 
  • 2 tablespoons honey 
  1. Mix all dry ingredients together 
  2. Add Nutella, coconut oil and honey, mix until blended 
  3. With the help of a melon scooper or spoon, roll mixtures into small balls
  4. Refrigerate until firm
  5. Keep in refrigerator 

No Bake Nutella Bites

Pineapple Coconut Cake

My family took a vacation to Hawaii last week. Both kids and adults had a lot of fun. We swam, snorkeled, paddled even parasailed ! To be honest, parasailing at 300 feet high was a little scary, but it was really fun ! My daughter had absolutely no fear and she just loved it ! We enjoyed the food too. There were garlic shrimps, fruits, desserts of course. Their Japanese food was also really good. Food is always the best part of my vacation ! To reminisce some of these wonderful flavours, I baked this Pineapple and Coconut Cake yesterday. I used canned pineapple as I was too lazy to chop one up, you can definitely use a fresh one.  I guess I am still in holiday mode !  🙂  

Makes one loaf (I used a 4.5″ x 8.5″ loaf pan)  

For the cake

  • 225 g cake and pastry flour 
  • 1 +1/2 teaspoon baking powder 
  • 1/2 teaspoon baking soda 
  • 1/4 teaspoon salt
  • 120 g unsalted butter, softened 
  • 120 g cup granulated sugar  
  • 2 eggs
  • 100 g canned pineapple tidbits 
  • 25 g shredded coconut 
  • 60 mL canned coconut milk 
  • 90 mL pineapple juice 
  • 1 teaspoon pure vanilla extract 

For the glaze

  • 150 icing sugar 
  • 45mL pineapple juice 
  • 1 tablespoon shredded coconut 
  1. Preheat oven to 350ºF
  2. Drain pineapples well, pat dry with paper towel and save the juice 
  3. To make the cake, sift together flour,baking power, baking soda and salt, set aside 
  4. Using an electric mixer, with the paddle attachment, cream together butter and sugar until fluffy 
  5. Add eggs, vanilla and coconut milk 
  6. Add half of the flour mixture and pineapple juice, mix until blended
  7. Add remaining of the flour mixture
  8. Fold in pineapples and shredded coconut 
  9. Pour batter into a lightly greased and floured loaf pan
  10. Bake for about 45 minutes
  11. To make the glaze, whisk together icing sugar, pineapple juice and shredded coconut
  12. When the cake is cooled, drizzle glaze on top 

Pineapple Coconut Cake


Caramelized Figs with Yoghurt and Granola 

My uncle has a green fig tree in his backyard. Every summer, he would give us a generous portion of his harvest. We like to eat them fresh, but I also like making them into desserts. This recipe is fairly simple and is a good way to use up figs that are starting to get too ripe.  You can serve them with yoghurt and honey like I did or eat them with ice cream, even in a salad ! I made some granola the other day, so I added them for extra crunchiness. 

Makes about 4-6 servings

  • 6 fresh figs
  • 15 g unsalted butter 
  • 30 g demerara or brown sugar 
  • 300 g plain Greek yoghurt 
  • 60 mL honey 
  • 1 cup homemade granola 
  1. Cut figs in halves, coat with brown sugar 
  2. Melt butter in a non-stick pan over medium heat 
  3. Add figs, cut sides down
  4. Cook for about 3-4 minutes (be careful not to burn the sugar)
  5. Flip figs over, remove from heat 
  6. Serve warm with yoghurt, honey and granola

Caramelized Figs with Yoghurt and Granola


Iced Coffee Popsicles 

For a lot of people, summer is a relaxing season, but if you are a mom, you would know, summer can be very busy too! For the last few weeks, I have been driving my kids to swimming and other activities almost every day, trying to keep them active and occupied….so they don’t spend too much time in front of the computer ! It’s busy, but they’ve been having a good time. For me, many days, by the afternoon, I am pooped ! And I need my afternoon “fuel” to keep me going, which is usually a light snack and a cup of iced coffee.  It was so hot the last few days, so I decided to transform my “fuel” into popsicles ! Oh, and I found a bottle of Kahlua in my fridge so I added some extra boost ! Sorry kids, you can’t have these, but you know what ?  When mom is cool, everything is cool ! 

Makes about 8-10 popsicles 

  • 1/2 cup hot brewed coffee 
  • 1/2 cup condensed milk 
  • 3/4 cup whole milk 
  • 3/4 cup half and half cream
  • 1 teaspoon pure vanilla extract 
  • 2 tablespoons coffee liqueur (optional)
  • 60 g semi-sweet or dark chocolate, melted (optional for drizzles) 
  1. Mix hot coffee and condensed milk together
  2. Add all other ingredients except the melted chocolate, stir until blended 
  3. Pour into popsicle molds and freeze until set, about 4 hours 
  4. Drizzle with melted chocolate if desired 

Iced Coffee Popsicles


Mini Blueberry Loaves

To me, the best part of summer is the large variety of fruits we get to enjoy, berries, watermelon, peaches, etc. And blueberry is our no.1 favourite ! Every summer, we can easily go through over 30 pounds of blueberries!  There are many blueberry farms in our area, fresh, local, sweet and at a very reasonable price. How can I resist ? And as a baker, how can I not bake with them ?!  Again, I tried to use less sugar. So, I used use vanilla-flavoured almond milk instead of milk and added some honey, and was very pleased with the result !
I asked my daughter, who is my “art director” for my blog, to draw me something with blueberries and here is what she came up with ! I guess she is right, blueberries made you happy and healthy rather than blue ! 

You Aren't Blue

Makes about 6-8 mini loaves

  • 150 g fresh blueberries 
  • 270 g all-purpose flour + extra for coating blueberries 
  • 1 teaspoon baking powder 
  • 1/2 teaspoon baking soda 
  • 1/4 teaspoon salt 
  • 120 g unsalted butter, at room temperature 
  • 60 g granulated sugar 
  • 2 large eggs
  • 100 mL vanilla-flavoured almond milk 
  • 60 mL honey
  • 15 mL lemon juice 
  • 5 mL pure vanilla extract 
  • zest of half a lemon
  1. Preheat oven to 350ºF
  2. Sift together flour,baking powder, baking soda and salt, set aside 
  3. Coat blueberries with about a tablespoon of flour, set aside 
  4. Using an electric mixer with the paddle attachment, cream butter and sugar until fluffy 
  5. Add eggs, honey, almond milk, lemon juice and vanilla
  6. Add flour mixture in 2 portions, mix until blended, scraping sides and bottom of mixing bowl (it’s ok if batter is slightly lumpy)
  7. Gently fold in blueberries and lemon zest
  8. Spoon batter into slightly greased and floured mini loaf pans
  9. Bake for about 20 minutes 
  10. Cool for about 10 minutes in pans, then completely on rack 

Mini Blueberry Loaves


Roasted Beet Chocolate Brownies

I get so excited whenever I can put vegetables in my desserts. Perhaps it makes me feel healthier and less guilty?!  I picked the beautiful beets this time.  They are sweet, colourful and very nutritious.  (My batter came out purple, which is my favourite colour!  Can’t “beet” that! ) You can make them into soup, salads, desserts, even their leaves are edible !  With their sweetness, I managed to use a little less sugar.  My son doesn’t normally like sweets, but he loves my brownies. He was a little skeptical when I told him I used beets. But after he had one, he said he couldn’t even taste them!  I guess that’s a success for me! My daughter?  No problem, she eats everything I make ! 

Roasted Beet Chocolate Brownies

Makes about 16 squares 

  • 200 g beet puree (about 2 -3 medium beets)
  • 180 g all-purpose flour
  • 1 teaspoon baking powder 
  • 50 g unsweetened cocoa powder 
  • 1/2 teaspoon salt 
  • 2 eggs
  • 180 g  granulated sugar 
  • 2 teaspoons vanilla extract 
  • 120 mL melted coconut oil 
  • 180 g semi-sweet chocolate 
  1. To prepare the beet puree, preheat oven to 375°F
  2. Cut stems and roots off, leave skin on 
  3. Wrap with aluminium foil and bake for about 60 minutes until fork tender 
  4. Cool, peel skin off and puree using a blender or food processor 
  5. To make the brownies, preheat oven to 350ºF
  6. Melt chocolate in a heat proof bowl over a pot of simmering water, cool slightly 
  7. Sift together flour, baking powder, cocoa powder and salt, set aside 
  8. In a large mixing bowl , whisk together eggs and sugar until pale (you can use an electric mixer, I just hand-whisked mine)
  9. Mix in vanilla extract, coconut oil and melted chocolate
  10. Add flour mixture in 2 parts, mix until blended 
  11. Add beet puree 
  12. Bake in a square baking pan lined with parchment paper for about 30 minutes 
  13. Cool completely before cutting 

Fresh Beets

I am so glad to be part of the The Canadian Food Creatives.  This month, our topic is “Fresh from the Garden”.  Be sure to check out the links below for other great recipes. They can also be found on social media using the hashtag #CDNFoodCreatives. Many thanks to Cassie Hendry at The Crumb Kitchen for hosting.

fb_img_1468681894617.jpg

Raspberry Swiss Roll

The other night, my daughter said,”mom, I want some cake ! ” , but I didn’t have any at home and it was a little too late to bake.  So the next day, I decided to make a Swiss Roll, using some fresh raspberries that I had.  The first attempt……not so good, I put too much filling in and did a bad job in rolling, so it looked more like a Halloween cake with “blood” all over.  Lucky the cake tasted pretty good, so my daughter could at least have some tasty cake.  The second time around, much better.  I tried not to use my electric mixer and do everything by hand. It came out perfect! I actually learned that when making meringues, you can get more volume whisking it by hand. Also you don’t need to worry about overbeating, cause you sore arms will tell you to stop! I used raspberries as the filling, you can switch it up easily with other fruits, whipped cream, Nutella, even peanut butter.

Makes one log (about 6-8 slices)

For the raspberry filling

  • 350 g fresh raspberry
  • 60 g granulated sugar (adjust to your own taste)
  • 15 mL lemon juice

For the sheet cake

  • 4 eggs (separated)
  • 120 g granulated sugar (20 g is used for the meringue)
  • 75 g cake and pastry flour, sifted
  • 1 teaspoon pure vanilla extract
  • 1/4 teaspoon cream of tartar
  • icing sugar for dusting

Meringue

  1. Prepare raspberries by heating them together with sugar and lemon juice in a non-stick pot over medium heat
  2. Turn heat down to low when liquid starts to bubble
  3. Gently mash raspberries with a wooden spoon, cook until thickened
  4. Strain seeds, let cool
  5. To make the cake, preheat oven to 350ºF
  6. Lightly grease a 8″ x 10″ baking tray and line bottom with parchment paper 
  7. In a mixing bowl, beat together egg yolks and 100 g of sugar until pale
  8. Add vanilla and the flour, mix until blended
  9. In a separate bowl, whisk egg whites, and cream of tartar until frothy, then add sugar slowly, a little at a time, and whisk until medium peak is formed
  10. Gently fold meringue into batter, do not over mix 
  11. Pour into baking tray and bake for about 15 minutes until golden
  12. Let cool, but still a little warm to touch
  13. Gently invert cake and place on top of another piece of parchment paper
  14. Carefully remove top sheet of parchment and trip sides of cake
  15. Spread a very thin layer of raspberry sauce on top
  16. Gently roll cake up
  17. Dust with icing sugar

Raspberry Swiss Roll