Monthly Archives: May 2016

Strawberry Vanilla Cream Tart

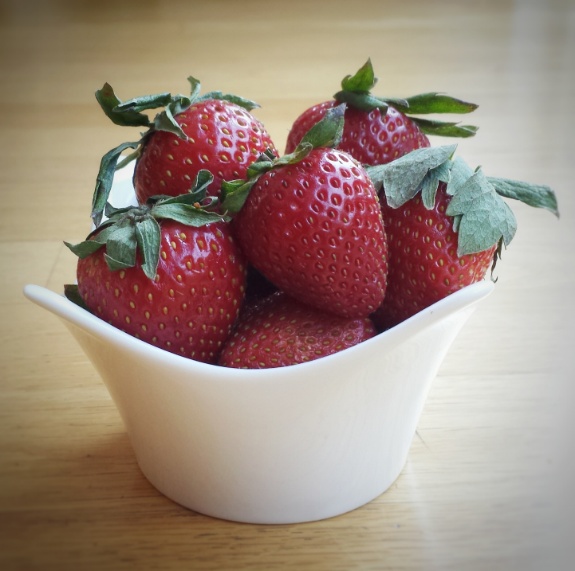
Strawberries ! One of our family favourites !  My son can “chomp down” (that’s his words) a bowl in no time! They taste good, look pretty and you can use them in many ways.  I always wish I have a bigger yard and more time so I can grow my own. Luckily, we have a few local farms close to our neighbourhood, and we can get fresh strawberries very easily.  I love the U-picks that they have in the early summer too ! It’s a great activity for both adults and kids.   

Makes about three to four 4-inch tarts

For the tart shell

  • 120 g cold unsalted butter (cut into small pieces)
  • 75 g granulated sugar
  • 1 egg yolk
  • 180 g cake and pastry flour, sifted

For the fillings

    • 450 g (about 1 lb) fresh strawberries
    • 500 mL milk (preferably full fat, but 2 % works too)
    • 2 egg yolks
    • 75 g granulated sugar
    • 40 g cornstarch
    • 1/2 to 1 vanilla bean
    • icing sugar for dusting

To make the tart shells

  1. Mix together cold butter and sugar using a wooden spoon until no more lumps
  2. Add egg yolk, mix until blended
  3. Add flour all at once, mix with the wooden spoon, then transfer onto a table or counter and gently knead dough together (just work until ingredients are mixed in)
  4. Wrap with plastic wrap, refrigerate for at least 2-3 hours or overnight
  5. When ready to bake, preheat oven to 350ºF
  6. Knead dough until pliable
  7. Roll dough out to about 1/8 inch in thickness on a floured surface, dock with a fork
  8. Place inside slightly greased tart molds, trim off excess dough (dough scraps can be re-roll, but may crack, so only re-roll once or twice)
  9. Bake for about 12 minutes till golden, let cool

To make the vanilla cream fillings

    1. Whisk egg yolks, sugar, cornstarch and 1/2 cup of milk together until no more lumps
    2. Cut vanilla bean lengthwise and scrape seeds out of bean pod, do not throw away bean pod
    3. In a pot, heat remaining milk, vanilla beans and the pod over medium heat until just boiled
    4. Whisk 1/2 of boiled milk slowly into egg mixture to temper, then pour everything back into the pot
    5. Heat until just starting to bubble and thicken, whisking constantly
    6. Remove from heat, take out vanilla pod and let cool

When ready to serve, pipe or spoon vanilla cream into baked tart shell, top with fresh strawberries and icing sugar

Original tart shell and vanilla cream recipe by Chef Marco Ropke at the Vancouver Pastry Training Centre 

img_20160525_172119.jpg

This is my first ever collaborative post, how exciting ! The Canadian Food Creatives collaboration are featuring fresh strawberries this month ! Be sure to check out the links below for other great recipes. They can also be found on social media using the hashtag #CDNFoodCreatives . Many thanks to Amanda Saxby at The Cinnamon Scrolls for hosting.
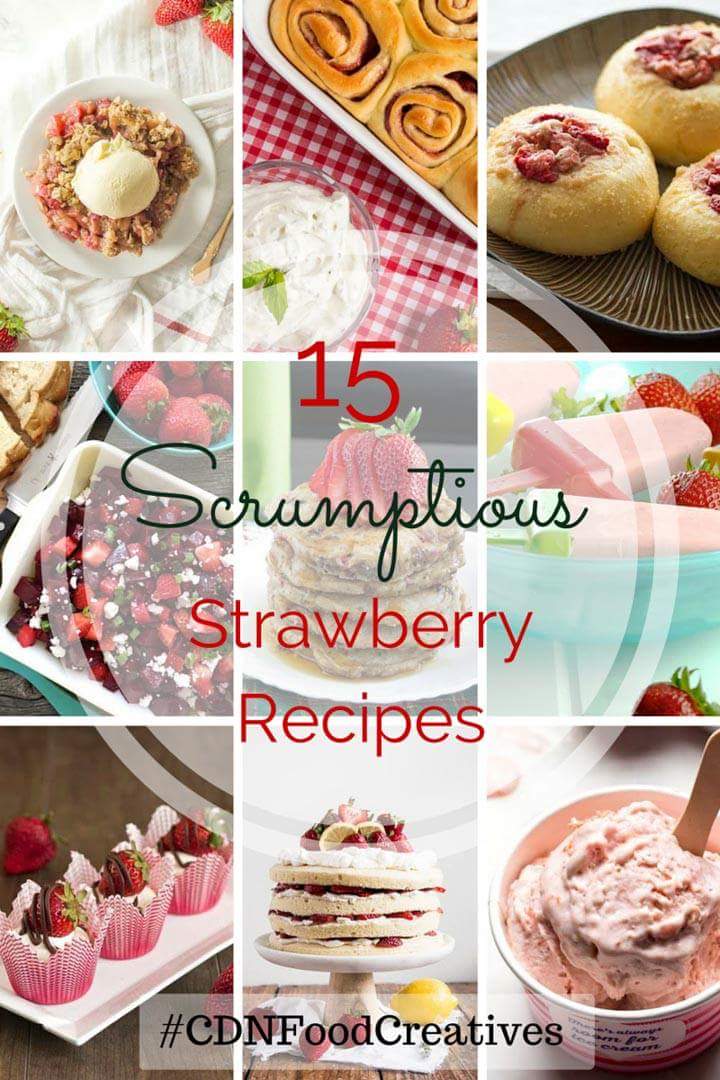
fb_img_1464467144697.jpg

Advertisement

Green Tea (Matcha) Ice Cream

I wanted to make green tea ice cream ever since I got the ice cream machine.  Besides, chocolate and mango, this is my favourite.  I made it without using egg yolks, and it came out very tasty and creamy!  Actually making the ice cream was easy, taking pictures of it was not. I have to plan ahead, set up my props and take it quickly before it melts!  I found some origami papers the other day in my daughter’s craft box, so I folded some paper cranes and use them as props. It’s actually quite fun to use what you have and make props out of it. Hope you like the picture and the ice cream ! 

Makes about 3 – 4 cups 

  • 1+1/2 cups whole milk
  • 1+1/2 cups cold whipping cream
  • 1/2 cup granulated sugar
  • 2 tablespoons matcha powder
  • 1 teaspoon pure vanilla extract
  1. In a pot, heat milk and sugar over medium heat until sugar dissolved
  2. Whisk in matcha powder
  3. Heat until just starting to bubble, turn heat off, stir in vanilla
  4. Strain mixture through a fine mesh into a bowl
  5. Let sit in an ice bath
  6. Stir in cold whipping cream
  7. Let cool completely, then refrigerate for 2-3 hours or overnight
  8. Pour into ice cream machine and churn according to manufacturer’s instructions

Tools I used and you may like 

41jgxv8adpl._sy400_.jpg

Cuisinart ICE-21C Frozen Yogurt, Ice Cream and Sorbet Maker

You can get this ice cream machine through the Amazon website by clicking the above link.  I will receive a small compensation if you purchase the item.


Baked Honey Crullers

We love doughnuts! And my daughter has been asking me to make some. I tried making the fried ones a few times, but failed. So, I thought I would try some other methods. Upon some “research”, I discovered that crullers are made from choux paste…..Wait a minute…… I have a choux paste recipe from my pastry course last year! So here it is, my Baked Honey Crullers! They have a light and airy texture. You can pipe them any shapes and sizes you want, and I had so much fun making them!

Makes about 20 crullers

For the choux paste

  • 200 mL water
  • 90 g unsalted butter
  • 1/4 teaspoon salt
  • 2 tablespoons granulated or vanilla sugar 
  • 2/3 cup all-purpose flour
  • 3 eggs
  • zest of 1/2 lemon (optional)

For the honey glaze

  • 3 tablespoons honey
  • 1 cup icing sugar
  • 3-4 tablespoons milk
  1. To prepare choux paste, heat together water, butter, salt and sugar in a pot over medium heat until just starting to boil
  2. Turn heat down to low, add flour all at once
  3. Stirring constantly, cook until a thin film of paste formed at the bottom of the pot, about 5 minutes
  4. Transfer paste to a heat-proofed mixing bowl and cool paste down
  5. Meanwhile, preheat oven to 375ºF and prepare piping bag with desired piping tip
  6. Add eggs to paste, one at a time and mix well after each addition
  7. Add lemon zest
  8. Transfer to piping bag and pipe into rings on baking sheets lined with parchment paper, about 3 inches in diameter
  9. Bake at 375ºF for about 12-14 minutes until starting to brown, then turn heat down to 325°F and bake for another 6-8 minutes until golden
  10. Let cool first on baking sheets, then completely on rack
  11. Prepare glaze by whisking together honey, icing sugar and milk to desired consistency
  12. Drizzle over crullers or dip crullers into glaze (Best to serve immediately)

Original recipe of choux paste by Chef Marco Ropke at the Vancouver Pastry Training Centre

Chocolate Zucchini Cake with Chocolate Ganache Glaze

My daughter said “zucchini is my worst enemy ! ” But with this yummy cake, I have successful converted her enemy into her new friend ! Yes, zucchini is definitely chocolate cake’s best friend. It makes the cake moist and soft. And you can eat your vegetable right inside a dessert !

Makes one 9 inch round cake

For the cake

  • 200 g grated zucchini
  • 2 ounces semi-sweet chocolate, finely chopped
  • 1+3/4 cups cake and pastry flour
  • 1/4 cup unsweetened cocoa powder
  • 1 teaspoon baking powder
  • 1/2 teaspoon baking soda
  • 1/2 teaspoon salt
  • 1/2 cup vegetable oil
  • 3/4 cup demerara or brown sugar
  • 1/4 cup granulated sugar
  • 2 eggs
  • 1/4 cup milk
  • 1 teaspoon lemon juice
  • 1 teaspoon pure vanilla extract

For the ganache

  • 1 cup whipping or heavy cream
  • 8 ounces semi-sweet chocolate, finely chopped

img_20160406_222927.jpg

  1. Preheat oven to 350ºF
  2. Lightly grease 9 inch spring-form cake pan with oil, then dust with flour
  3. Sift together flour, cocoa powder, baking powder, baking soda and salt, set aside
  4. Add lemon juice into milk, let sit for a few minutes
  5. Using an electric mixer with the paddle attachment, beat oil and sugars at medium speed until blended
  6. Mix in eggs, milk with lemon juice and vanilla
  7. Add flour mixture in 2-3 portions, scraping sides and bottom of mixing bowl
  8. Add grated zucchini, mix until just blended
  9. Stir in 2 ounces of chopped chocolate 
  10. Pour batter into pan and bake for about 30 minutes (toothpick should come out clear when inserted into middle of cake)
  11. Meanwhile, prepare the ganache by heating cream in a non-stick pot over medium heat
  12. Turn heat off when cream just starting to bubble
  13. Pour over chopped chocolate, let sit for 1 minute
  14. Stir until smooth, let cool at room temperature
  15. When cake is ready, cool in pan for about 10 minutes, then completely on rack
  16. Cover cake with chocolate ganache, smooth with a spatula
  17. Let chocolate set, keep in refrigerator

img_20160408_225656.jpg

Tools I used and you may like

41rqjlmpovl._sy400_.jpg

KitchenAid K45SSWH Classic 4.5-Quart Bowl Stand Mixer, White

31fyrsctu1l._sy400_.jpg

Wilton 409-7716 Angled Icing Spatula, 13-Inch, Black

You can get these tools through the Amazon website by clicking the above link. I will receive a small compensation if you purchase the item. 

Simple Shortbread Cookies

My mom, myself and my daughter all love sweets! Since Mother’s Day is coming up, I thought I would make something that all of us would enjoy. These shortbread cookies are sweet and buttery ! Making them is, literally, as easy as 1,2,3 ! All you need to remember is, 1 part of sugar, 2 parts of butter and 3 parts of flour! I also added a touch of lemon zest.
Have a Happy Mother’s Day ! I think moms are the most wonderful people into the world….of course that includes myself !……. 🙂   And I have to thank my daughter for her wonderful drawing !

Makes about 30 cookies

  • 1/2 cup very fine sugar or vanilla sugar plus more for sprinkling
  • 1 cup unsalted butter, at room temperature
  • 1+1/2 cups cake and pastry flour, sifted
  • Zest of half a lemon (optional)
  1. Using an electric mixer with the paddle attachment, cream butter and sugar together
  2. Add lemon zest
  3. Add flour in 2 portions, mix until dough starting to form
  4. Pat dough together with hands
  5. Cut dough into 2 parts, gently shape each dough into logs, about 1+1/2 inch in diameter
  6. Wrap with plastic wrap (Believe it or not, I wrapped the dough and put them inside paper towel rolls to shape! )
  7. Refrigerate for at least 3 hours or overnight
  8. When ready to bake, preheat oven to 300°F
  9. Cut dough into discs, about 1/4 – 3/8 inch in thickness (They do flattened slightly during baking)
  10. Place on cookie sheets lined with parchment paper, about 2 inches apart
  11. Sprinkle top with more sugar
  12. Bake for 18 -20 minutes until edges just golden (You don’t want them too brown)
  13. Cool on baking sheets for 10 minutes, then completely on rack

img_20160505_173658.jpg

Homemade Vanilla Ice Cream

Our weather has been so good, warm and sunny almost everyday ! And ice cream is just the perfect treat for this nice weather ! Making vanilla ice cream is easier than you think, especially if you have an ice cream machine. The most difficult step is heating up the mixture until thickened without scrambling the egg. Just make sure you keep your heat low and keep stirring it. Pay close attention as it can thicken very quickly. Once you got this, the rest is easy. If you want a creamier ice cream, you can use a 1+1/2 cups each of milk and whipping cream. (a 1:1 ratio, instead of a 2:1 that I used)

Makes about 4 cups

  • 2 cups whole milk
  • 1 cup cold whipping cream
  • 1 vanilla bean
  • 4 egg yolks
  • 2/3 cup granulated sugar
  1. Whisk together egg yolks, sugar and 1/4 cup milk
  2. Cut and scrape vanilla bean
  3. In a non-stick pot, heat remaining milk and vanilla bean, including the pod over medium heat until just boiled
  4. Add 1/3 cup of hot milk into egg mixture to temper, then pour everything back into pot
  5. Heat over low heat, stirring constantly until just thickened. Mixture should coat back of spoon
  6. Remove from heat immediately,  strain through a fine mesh twice
  7. Let sit in an ice bath, stir in whipping cream
  8. Let cool completely, cover with plastic wrap and refrigerate for at least 3 hours or overnight 
  9. Place in ice cream machine and churn according to manufacturer’s instructions

img_20160313_171706.jpg

Tools I used and you may like 

41jgxv8adpl._sy400_.jpg

Cuisinart ICE-21C Frozen Yogurt, Ice Cream and Sorbet Maker

You can get this ice cream machine through the Amazon website by clicking the above link. I will receive a small compensation if you purchase the item.