Monthly Archives: July 2016

Iced Coffee Popsicles 

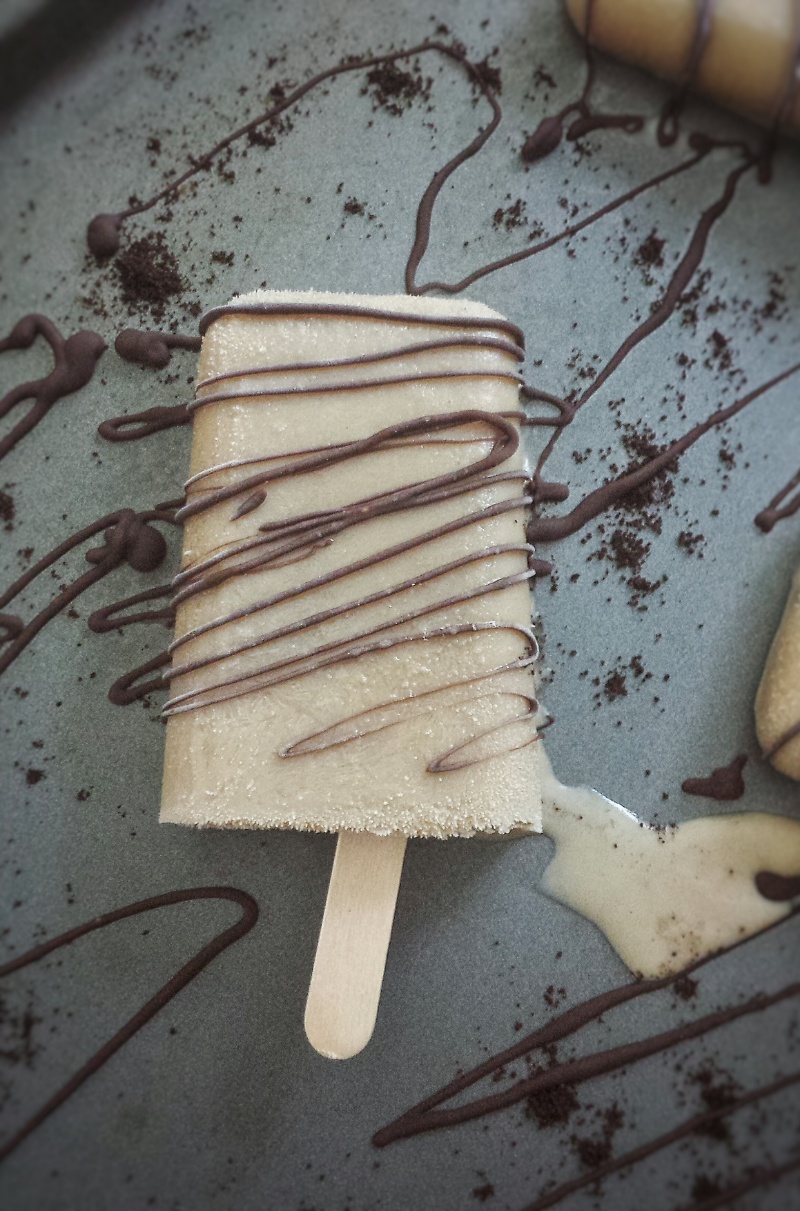
For a lot of people, summer is a relaxing season, but if you are a mom, you would know, summer can be very busy too! For the last few weeks, I have been driving my kids to swimming and other activities almost every day, trying to keep them active and occupied….so they don’t spend too much time in front of the computer ! It’s busy, but they’ve been having a good time. For me, many days, by the afternoon, I am pooped ! And I need my afternoon “fuel” to keep me going, which is usually a light snack and a cup of iced coffee.  It was so hot the last few days, so I decided to transform my “fuel” into popsicles ! Oh, and I found a bottle of Kahlua in my fridge so I added some extra boost ! Sorry kids, you can’t have these, but you know what ?  When mom is cool, everything is cool ! 

Makes about 8-10 popsicles 

  • 1/2 cup hot brewed coffee 
  • 1/2 cup condensed milk 
  • 3/4 cup whole milk 
  • 3/4 cup half and half cream
  • 1 teaspoon pure vanilla extract 
  • 2 tablespoons coffee liqueur (optional)
  • 60 g semi-sweet or dark chocolate, melted (optional for drizzles) 
  1. Mix hot coffee and condensed milk together
  2. Add all other ingredients except the melted chocolate, stir until blended 
  3. Pour into popsicle molds and freeze until set, about 4 hours 
  4. Drizzle with melted chocolate if desired 

Iced Coffee Popsicles


Advertisement

Mini Blueberry Loaves

To me, the best part of summer is the large variety of fruits we get to enjoy, berries, watermelon, peaches, etc. And blueberry is our no.1 favourite ! Every summer, we can easily go through over 30 pounds of blueberries!  There are many blueberry farms in our area, fresh, local, sweet and at a very reasonable price. How can I resist ? And as a baker, how can I not bake with them ?!  Again, I tried to use less sugar. So, I used use vanilla-flavoured almond milk instead of milk and added some honey, and was very pleased with the result !
I asked my daughter, who is my “art director” for my blog, to draw me something with blueberries and here is what she came up with ! I guess she is right, blueberries made you happy and healthy rather than blue ! 

You Aren't Blue

Makes about 6-8 mini loaves

  • 150 g fresh blueberries 
  • 270 g all-purpose flour + extra for coating blueberries 
  • 1 teaspoon baking powder 
  • 1/2 teaspoon baking soda 
  • 1/4 teaspoon salt 
  • 120 g unsalted butter, at room temperature 
  • 60 g granulated sugar 
  • 2 large eggs
  • 100 mL vanilla-flavoured almond milk 
  • 60 mL honey
  • 15 mL lemon juice 
  • 5 mL pure vanilla extract 
  • zest of half a lemon
  1. Preheat oven to 350ºF
  2. Sift together flour,baking powder, baking soda and salt, set aside 
  3. Coat blueberries with about a tablespoon of flour, set aside 
  4. Using an electric mixer with the paddle attachment, cream butter and sugar until fluffy 
  5. Add eggs, honey, almond milk, lemon juice and vanilla
  6. Add flour mixture in 2 portions, mix until blended, scraping sides and bottom of mixing bowl (it’s ok if batter is slightly lumpy)
  7. Gently fold in blueberries and lemon zest
  8. Spoon batter into slightly greased and floured mini loaf pans
  9. Bake for about 20 minutes 
  10. Cool for about 10 minutes in pans, then completely on rack 

Mini Blueberry Loaves


Roasted Beet Chocolate Brownies

I get so excited whenever I can put vegetables in my desserts. Perhaps it makes me feel healthier and less guilty?!  I picked the beautiful beets this time.  They are sweet, colourful and very nutritious.  (My batter came out purple, which is my favourite colour!  Can’t “beet” that! ) You can make them into soup, salads, desserts, even their leaves are edible !  With their sweetness, I managed to use a little less sugar.  My son doesn’t normally like sweets, but he loves my brownies. He was a little skeptical when I told him I used beets. But after he had one, he said he couldn’t even taste them!  I guess that’s a success for me! My daughter?  No problem, she eats everything I make ! 

Roasted Beet Chocolate Brownies

Makes about 16 squares 

  • 200 g beet puree (about 2 -3 medium beets)
  • 180 g all-purpose flour
  • 1 teaspoon baking powder 
  • 50 g unsweetened cocoa powder 
  • 1/2 teaspoon salt 
  • 2 eggs
  • 180 g  granulated sugar 
  • 2 teaspoons vanilla extract 
  • 120 mL melted coconut oil 
  • 180 g semi-sweet chocolate 
  1. To prepare the beet puree, preheat oven to 375°F
  2. Cut stems and roots off, leave skin on 
  3. Wrap with aluminium foil and bake for about 60 minutes until fork tender 
  4. Cool, peel skin off and puree using a blender or food processor 
  5. To make the brownies, preheat oven to 350ºF
  6. Melt chocolate in a heat proof bowl over a pot of simmering water, cool slightly 
  7. Sift together flour, baking powder, cocoa powder and salt, set aside 
  8. In a large mixing bowl , whisk together eggs and sugar until pale (you can use an electric mixer, I just hand-whisked mine)
  9. Mix in vanilla extract, coconut oil and melted chocolate
  10. Add flour mixture in 2 parts, mix until blended 
  11. Add beet puree 
  12. Bake in a square baking pan lined with parchment paper for about 30 minutes 
  13. Cool completely before cutting 

Fresh Beets

I am so glad to be part of the The Canadian Food Creatives.  This month, our topic is “Fresh from the Garden”.  Be sure to check out the links below for other great recipes. They can also be found on social media using the hashtag #CDNFoodCreatives. Many thanks to Cassie Hendry at The Crumb Kitchen for hosting.

fb_img_1468681894617.jpg

Raspberry Swiss Roll

The other night, my daughter said,”mom, I want some cake ! ” , but I didn’t have any at home and it was a little too late to bake.  So the next day, I decided to make a Swiss Roll, using some fresh raspberries that I had.  The first attempt……not so good, I put too much filling in and did a bad job in rolling, so it looked more like a Halloween cake with “blood” all over.  Lucky the cake tasted pretty good, so my daughter could at least have some tasty cake.  The second time around, much better.  I tried not to use my electric mixer and do everything by hand. It came out perfect! I actually learned that when making meringues, you can get more volume whisking it by hand. Also you don’t need to worry about overbeating, cause you sore arms will tell you to stop! I used raspberries as the filling, you can switch it up easily with other fruits, whipped cream, Nutella, even peanut butter.

Makes one log (about 6-8 slices)

For the raspberry filling

  • 350 g fresh raspberry
  • 60 g granulated sugar (adjust to your own taste)
  • 15 mL lemon juice

For the sheet cake

  • 4 eggs (separated)
  • 120 g granulated sugar (20 g is used for the meringue)
  • 75 g cake and pastry flour, sifted
  • 1 teaspoon pure vanilla extract
  • 1/4 teaspoon cream of tartar
  • icing sugar for dusting

Meringue

  1. Prepare raspberries by heating them together with sugar and lemon juice in a non-stick pot over medium heat
  2. Turn heat down to low when liquid starts to bubble
  3. Gently mash raspberries with a wooden spoon, cook until thickened
  4. Strain seeds, let cool
  5. To make the cake, preheat oven to 350ºF
  6. Lightly grease a 8″ x 10″ baking tray and line bottom with parchment paper 
  7. In a mixing bowl, beat together egg yolks and 100 g of sugar until pale
  8. Add vanilla and the flour, mix until blended
  9. In a separate bowl, whisk egg whites, and cream of tartar until frothy, then add sugar slowly, a little at a time, and whisk until medium peak is formed
  10. Gently fold meringue into batter, do not over mix 
  11. Pour into baking tray and bake for about 15 minutes until golden
  12. Let cool, but still a little warm to touch
  13. Gently invert cake and place on top of another piece of parchment paper
  14. Carefully remove top sheet of parchment and trip sides of cake
  15. Spread a very thin layer of raspberry sauce on top
  16. Gently roll cake up
  17. Dust with icing sugar

Raspberry Swiss Roll


Chocolate Pistachio Tart

As a mom, my kids are always my priorities. But sometimes I feel it’s necessary to do something for myself….in order to keep my sanity ! So I made this dessert just for me ! It’s loaded with chocolate with a bit of crunch and saltiness from the pistachios. Did you know that pistachios are called the “happy nuts” in Chinese? Their partially opened shells look like a smile. They are an excellent source of vitamin B, fibre, potassium, magnesium and many more. No wonder I felt fantastic after eating them! 

Makes about three to four 4-inch tarts

For the chocolate tart

  • 120 g unsalted butter (cold)
  • 75 g granulated sugar
  • 1 egg yolk
  • 170 g cake and pastry flour (sifted)
  • 10 g unsweetened cocoa powder (sifted)

For the filling

  • 2 ounces dark chocolate (finely chopped)
  • 4 ounces semi-sweet chocolate (finely chopped)
  • 4 ounces whipping cream
  • 1/2 teaspoon pure vanilla extract
  • 30 g salted pistachios (shells removed)
  1. Mix together cold butter and sugar using a wooden spoon until no more lumps
  2. Add egg yolk, mix until blended
  3. Add flour and cocoa powder, mix with the wooden spoon, then transfer onto a table or counter and gently press dough together (just work until ingredients are mixed in)
  4. Wrap with plastic wrap, refrigerate for at least 2-3 hours or overnight
  5. When ready to bake, preheat oven to 350ºF
  6. Knead dough until pliable
  7. Roll dough out to about 1/8 inch in thickness on a floured surface, dock with a fork
  8. Place inside slightly greased tart molds, trim off excess dough (dough scraps can be re-roll, but only do it once or twice or it may crack)
  9. Bake for about 12 minutes till golden, let cool
  10. For the filling, crush pistachios into small pieces
  11. Heat whipping cream in a non-stick pot over medium heat until starting to bubble
  12. Pour cream over chopped chocolate, let stand for 1 minute
  13. Add vanilla extract, stir until smooth
  14. Mix in half of the crushed pistachios
  15. Pour into baked tart shells, sprinkle remaining pistachios on top 
  16. Let cool then put in refrigerator until set

Chocolate Pistachio Tart


Original chocolate tart shell recipe by Chef Marco Ropke at the Vancouver Pastry Training Centre 


Raspberry Yoghurt Popsicles (for Canada Day)

Happy Canada Day!
Can’t believe I have been in this country for 26 years! I am so thankful that my parents made the decision to move to Canada. I love this country, the friendly people, the weather (especially for us who are in the west coast), the amazing scenery. It’s a fantastic place for my kids too, so many activities they can enjoy. (Well, only now I am worried they won’t be able to afford to have their own house when they grow up….)
Our weather has been really nice and today is a great day for a picnic or BBQ. These little popsicles make a perfect cool treat and are so easy to make.

Makes about 12 popsicles

  • 850 g vanilla flavoured Greek yoghurt
  • 1 kg fresh raspberries
  • 200 g granulated sugar (adjust to your own taste)
  • 3 tablespoons lemon juice
  1. Prepare raspberries by heating them together with sugar and lemon juice in a non-stick pot over medium heat
  2. Turn heat down to low when liquid starts to bubble
  3. Gently mesh raspberries with a wooden spoon, cook until thickened
  4. Strain seeds, let cool
  5. To make popsicles, layer yoghurt and raspberry sauce alternately in small paper cups or popsicle molds, freezing in between layers (You can also swirl them together to make a marble effect). That’s it, enjoy!

img_20160629_165520.jpg