Monthly Archives: June 2017

Maple Cookies for Canada 150

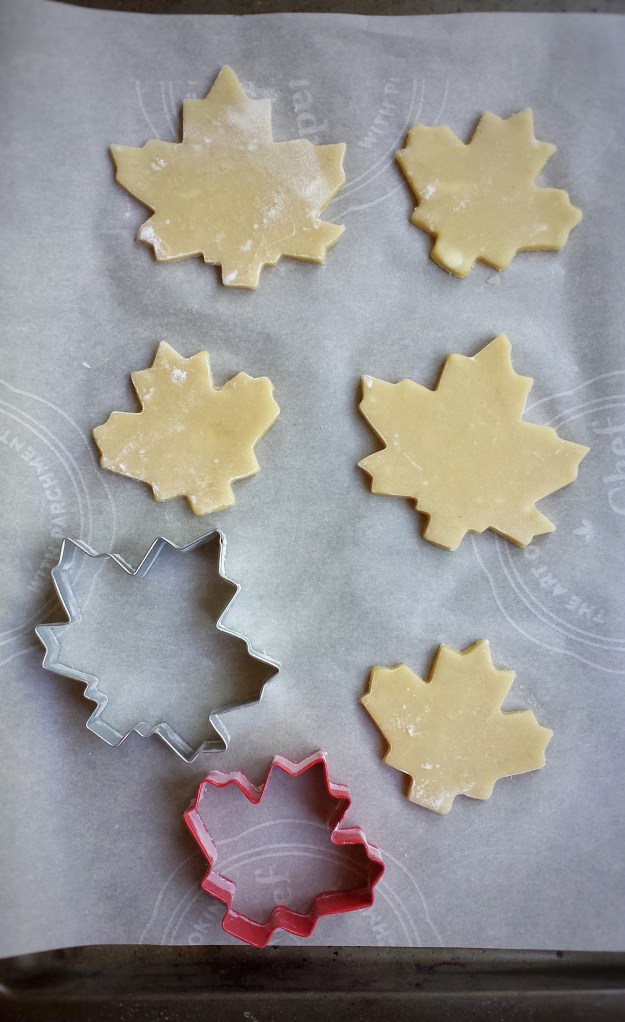
It’s Canada 150th birthday ! How exciting ! I can’t believe I have been in this wonderful country for 27 years ! The friendly people, beautiful weather, nature, and food……I just love them all ! To celebrate this big day, I made these maple cookies ! And of course, I have to use maple syrup to make it Canadian ! Happy 150th, Canada ! And I hope you are enjoying the celebrations and activities all over our country ! 

Makes about 2-3 dozens, depending on size

For the cookie

  • 170 g all-purpose flour 
  • 170 g cake and pastry flour
  • 3 g baking soda 
  • 2 g salt
  • 120 g unsalted butter, at room temperature
  • 60 g granulated sugar
  • 60 mL maple syrup
  • 1 egg  
  • 5 mL pure vanilla extract 
  • 30 mL lemon juice 
  • Zest of 1 small lemon 
  1. Preheat oven to 325°F
  2. Sift together flours, baking soda and salt, set aside 
  3. Using an electric mixer with the paddle attachment, cream together butter and sugar until fluffy 
  4. Add maple syrup, egg, vanilla, lemon juice and lemon zest, mix until blended 
  5. Mix in flour mixture, 1/3 at a time until just cooperated (do not over mix)  
  6. Transfer to a lightly floured surface and gently press together until dough is formed (dough can be stored in the fridge or freezer for later use)
  7. Roll out to about 0.3 cm in thickness 
  8. Cut with cookie cutters (You can collect the dough scraps all together and re-roll, cover unused dough with a damp cloth or plastic wrap)
  9. Place on cookie sheets lined with parchment paper 
  10. Bake for 8 – 10 minutes, cool completely before decorate. 

For the royal icing

  • 45 g meringue powder,sifted 
  • 500 g icing sugar
  • Pinch of salt
  • 90 – 120 mL warm water
  • 5 mL pure vanilla extract
  • 10 mL corn syrup 
  • Gel food colouring
  1. Mix meringue powder with about 45 mL of water, let sit for a few minutes 
  2. Stir in vanilla and corn syrup 
  3. Using an electric mixer with the whisk attachment, mix icing sugar, salt and meringue powder mixture at low speed 
  4. Slowly add in warm water until shiny and desired consistency (thicker for outlining and thinner for filling)
  5. Add gel food colouring 
Advertisement

Classic Madeleines 

Madeleines are something that have been in my mind for a long time. These elegant looking mini cakes are so buttery and tasty. They are not difficult to make, you just need a little patience as both the batter and the molds have to be chilled before baking. And yes, you do have to buy the Madeleine pan to get that shell-liked shape, but for about $20-$30, it’s worth it. Well, I guess that’s from a baker’s point of view ! My kids often tell me I spend too much on my baking stuff, but hey, these are my toys, plus I don’t buy expensive clothes, handbags or jewellery like other people do ! Most importantly, I am doing something that makes me happy ! And when mom is happy, everyone’s happy ! 

Makes about 22-24 

  • 120 g unsalted butter + 30 g for greasing tray, melted 
  • 90 g all-purpose flour 
  • 90 g cake and pastry flour 
  • 3 g baking powder 
  • Pinch of salt
  • 150 g vanilla sugar or granulated sugar 
  • 2 large eggs 
  • Zest of one lemon 
  • 15 mL lemon juice 
  • 5 mL pure vanilla extract 
  • Icing sugar for dusting 
  1. Melt butter in a sauce pan or microwave, cool slightly 
  2. Brush madeleine moulds with about 30 g of melted butter, coat with flour, tapping off excess
  3. Place coated pan in freezer for at least one hour 
  4. Sift together flours, baking powder and salt, mix in sugar, set aside 
  5. Using an electric mixer, beat together eggs, lemon zest, lemon juice and vanilla until frothy, about 5 minutes 
  6. Fold flour mixture into egg mixture 
  7. Gently mix in 120 g of melted (and cooled) butter, 2-3 tablespoons at a time until just blended 
  8. Cover and refrigerate for at least one hour or overnight 
  9. When ready to bake, preheat oven to 375°F
  10. Drop about 1 tablespoon of batter into each mould without spreading it out
  11. Place madeleine pan on another large baking tray and bake for about 12 minutes until edges are golden 
  12. Cool in moulds for a few minutes then completely on rack 
  13. Dust with icing sugar, best to eat within 2 days 

Recipe adapted from Mark Bittman, “How to Bake Everything” 

Tools and Books 


Chicago Metallic 26631 12-Cup Nonstick Madeleine Pan

How to Bake Everything: Simple Recipes for the Best Baking

You can get the Madeleine pan and the cookbook through the Amazon website by clicking the above link. I will receive a small compensation if you purchase the item. 

Buttermilk Scones and my day at Vista D’Oro Farm 

A couple of weeks ago, on a beautiful Sunday afternoon, I had the opportunity to participate in a jam making workshop at Vista D’Oro farm in Langley, B.C. It was organized by Appetite by Penguin Random House and Food Bloggers of Canada. Lee Murphy, the owner of the farm, also the author of the cookbook, The Preservatory, patiently taught us her techniques of making artisanal preserves from fresh fruits. We cooked and created some very special blueberry and rhubarb preserves. We then had a tour of the winery with Lee’s husband, Patrick, enjoyed some wine tasting and a yummy snack platter at the patio, with cheese, bread, sausages and jams of course ! It was a wonderful experience and we all went home with a big box full of jams and The Preservatory cookbook !

I also brought home with something else….. something that I saw in Lee and Patrick. It’s the love, the enthusiasm and the passion that they put into their farm, their preserves and their wine. And I truly think that’s what make their products unique. Being able to do what you love and love what you do is a blessing, and I think we should really embrace those opportunities in life and make the best out of them.

So……to make the best use of the jams I got, I made these buttermilk scones. They match perfectly with the fruit preserves. They taste best when they are fresh and warm. So if you cannot consume the whole batch, you can save part of the dough in the freezer.

Makes about 16 scones

  • 180 g all-purpose flour
  • 180 g cake and pastry flour
  • 15 g baking powder
  • 3 g baking soda
  • 1 g salt
  • 100 g vanilla sugar granulated sugar plus more for sprinkling
  • 120 g cold unsalted butter (cut or grate into small pieces)
  • 2 eggs (1 for dough, 1 for egg wash)
  • 150 mL buttermilk
  1. Preheat oven to 400°F
  2. Sift together flours, baking powder, baking soda and salt
  3. Mix in sugar
  4. Rub in cold butter with fingers until resembles coarse crumbs, there should be small lumps of butter in the dough
  5. Lightly beat 1 egg and buttermilk together and add to dry ingredients, mix until just combined 
  6. Transfer to a generously floured surface, gently knead and press until dough just come together, handle the dough as little as possible 
  7. Roll flat to about 1/2 inch in thickness
  8. Cut into discs, about 2 inches in diameter, and place on baking trays lined with parchment paper
  9. Beat the other egg with about 2 teaspoons of water 
  10. Brush top of discs with egg wash and sprinkle with vanilla sugar or granulated sugar
  11. Bake for 10-12 minutes until golden
  12. Serve warm with your favourite jam 

Lee Murphy’s new cookbook, The Preservatory, is a wonderful resource for making and using preserves. The book is divided into 2 parts. Part 1 includes recipes for preserves using seasonal fruits with the addition of spices, herbs and wine. Part 2 contains recipes using the preserves, it covers everything from an appetizer to a dessert. Wow ! Jam is a lot more than a PB&J sandwich ! Lee also has a wonderful scone recipe in her book, which is slightly different from the one above, but her scones were super tasty too ! 


The Preservatory: Seasonally Inspired Recipes for Creating and Cooking with Artisanal Preserves

You can get this beautiful cookbook through the Amazon website by clicking the above link. I will receive a small compensation if you purchase the item. 

Strawberry Sherbet 

My son used to be a picky eater when he was little and was very reluctant to try new things. Meal time was a real challenge back then. Luckily, he would never say no to fruits, especially strawberries and blueberries. He is now 12 years old, not as picky as before, eats more than me, almost as tall as I am and still loves his berries. Strawberries are in season right now and he can easily eat half to one pound a day ! I love fresh strawberries, they taste yummy as a fruit but can also be used for many desserts. With the warmer weather finally showing up, I brought out my ice cream maker and made this strawberry sherbet. Sherbet is like a cousin of sorbet. Sorbet is mainly made with fruit juice and sugar without any dairy. On the other hand, milk or cream is added to sherbet. Its texture is in between a sorbet and an ice cream. So if you are craving for a cool treat, but don’t want something too rich, a sherbet will be perfect. And this recipe is approved by the strawberry fan in my house ! 

Makes about 1 L

  • 800 g fresh strawberries (after washed and hulled)
  • 120 g granulated sugar (adjust according to taste)
  • 1/4 teaspoon salt 
  • 250 mL milk 
  • 15 mL lemon juice 
  1. Blend all ingredients together and press mixture through a fine strainer with a spatula   
  2. Refrigerate for 3-4 hours or overnight 
  3. Pour into an ice-cream maker and churn according to manufacturer’s instructions 

If you don’t have an ice cream maker, you can pour the mixture in a shallow tray, cover and put in the freezer for at least 4 hours or overnight; then break the frozen mixture into large chunks and blend again until smooth. 

Ice Cream Machine that I used 

41jgxv8adpl._sy400_.jpg

Cuisinart ICE-21C Frozen Yogurt, Ice Cream and Sorbet Maker

You can get this ice cream machine through the Amazon website by clicking the above link. I will receive a small compensation if you purchase the item.