Tag Archives: baking

Double Chocolate Cranberry Cookies 

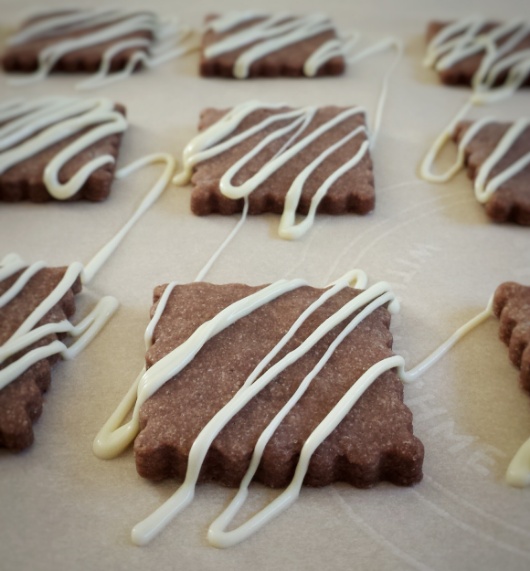
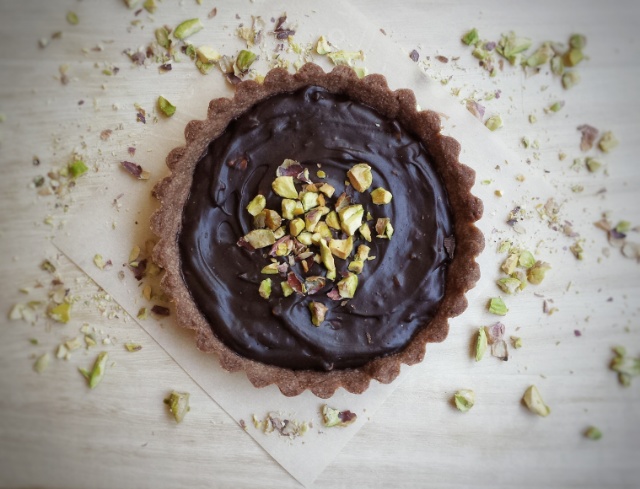
I was craving for some chocolate cookies yesterday. Not just a plain chocolate chip cookie. But the decadent kind that is loaded with chocolate, and all you want to say after taking a bite is Mmmmm…..Mmmmmm and Mmmmmm ! So here they are ! Rich, chocolaty and soft…. I had to quickly shoot a few photos before they were all gone !
This is my first time using coconut sugar. Its taste and sweetness are very similar to brown sugar. I do find it gives the cookies a slightly drier texture. The cranberries are optional, but I thought it’s nice to add some tanginess. I hope you enjoy them as much as we do ! 

Makes about 16 cookies

  • 150 g all-purpose flour
  • 25 g unsweetened cocoa powder
  • 1/2 teaspoon baking soda
  • 1/4 teaspoon salt
  • 100 g unsalted butter
  • 60 g coconut sugar (or brown sugar)
  • 60 g granulated sugar
  • 1 egg
  • 1 teaspoon pure vanilla extract
  • 50 g dark chocolate, 70%, (chopped into small chunks)
  • 50 g semi-sweet chocolate (chopped into small chunks)
  • 60 g dried cranberries
  1. Preheat oven to 350ºF
  2. Sift together flour,cocoa powder, baking soda and salt, set aside
  3. Cream together butter and sugars using either an electric mixer with the paddle attachment or by hand with a wooden spoon (I just did it by hand)
  4. Add egg and vanilla, mix until blended
  5. Mix in flour mixture in two parts
  6. Stir in chocolate chunks and dried cranberries
  7. Drop about 1 tablespoon each of dough onto baking sheets lined with parchment paper, about 2 inches apart
  8. Bake for about 12 minutes
  9. Cool on baking sheets for about 5 minutes, then completely on rack

Double Chocolate Cranberry Cookies

Pumpkin Cheesecake with Maple Caramel Sauce 

Fall

October is a busy baking month for me. Thanksgiving, my daughter’s birthday, bake sale, Halloween…. all of them are happening this month. I am not complaining, in fact, I am enjoying it . Apples, pumpkins, corn, the spices, the Halloween decorations ….the aroma, the colours, the fun, I love them all ! For this Thanksgiving, I made a pumpkin cheesecake topped with maple caramel sauce. It is crunchy, creamy, sweet and a little spicy…..just delicious ! And it’s fairly easy to make ! It’s a great alternative to pumpkin pie.

Makes one 6-inch cake

For the crust

  • 120 g ginger snaps
  • 3 tablespoons unsalted butter, melted

For the fillings

  • 250 g soft cream cheese
  • 120 g granulated sugar
  • 1 tablespoon all-purpose flour
  • 1 teaspoon ground cinnamon
  • 1 teaspoon ground ginger
  • Pinch of ground nutmeg
  • Pinch of ground cloves
  • 1/4 teaspoon salt
  • 120 g pumpkin puree (homemade or canned)
  • 2 eggs
  • 1 teaspoon pure vanilla extract

For the maple caramel

  • 120 ml maple syrup
  • 15 g unsalted butter
  • 60 mL heavy or whipping cream

Pumpkin Cheesecake

To prepare the crust

  1. Crush ginger cookies into fine crumbs
  2. Mix crumbs with melted butter, press firmly into bottom of a spring-form pan or a cake ring (if you use a cake ring like I did, you have to wrap the bottom with parchment paper as it is bottomless)
  3. Bake for about 10 minutes, let cool

To prepare the cheesecake

  1. When crust is cooled, wrap bottom of cake pan with 2 layers of aluminium foil and place on a rimmed baking tray
  2. Turn oven down to 325ºF
  3. Using an electric mixer with the paddle attachment, beat cream cheese and sugar until smooth
  4. Add flour, spices, salt,pumpkin puree and vanilla
  5. Add eggs, one at a time, mix until just blended, do not overmix
  6. Pour batter on top of crust and place the baking tray into the oven
  7. Pour about one inch of hot water into baking tray and bake for about 40-45 minutes (the top should be a little jiggly, do not overbake)
  8. Turn oven off, leave cheesecake inside oven with door ajar for another hour to cool gradually
  9. Take cake out, let cool at room temperature completely, then refrigerate for at least 3-4 hours

To prepare maple caramel

  1. Melt butter in a non-stick pan over medium heat
  2. Add maple syrup, when boil, turn heat down and simmer for about 3 minutes until thicken
  3. Add cream, stirring occasionally and continue to simmer until thick

When cheesecake is set, serve with maple caramel and whipped cream

Pumpkin Cheesecake

Halloween Cake Pops

My daughter borrowed a book about Halloween treats from the library last week, there were so many great ideas we want to try. After looking through the book and “researching” on the internet, we decided to make cake pops !  So we went to the store and bought all we need…..cake pop sticks, chocolate, coating wafers, licorice sticks, sprinkles…..and we also picked up some sour candies, dried fruits, peppermint paddies….. oops, I guess we got a little too much ! Oh well, we had a lot of fun shopping and making them, that’s all that matters, right?! The coating wafers tend to be very sweet, so I used less sugar for the cake and dark chocolate for the frosting. They turned out really tasty and fudgy like brownies. My son, who doesn’t have a sweet tooth, said these cake pops are “boss” !

For the cake

  • 135 g self-rising flour (about 3/4 cup)
  • 25 g unsweetened cocoa powder
  • 60 g unsalted butter
  • 60 g granulated sugar
  • 1 egg
  • 1/2  teaspoon pure vanilla extract
  • 90 mL boiling water

For the chocolate frosting 

  • 60 g unsalted butter
  • 100 g icing sugar
  • 1/2 teaspoon pure vanilla extract
  • 60 g dark chocolate (70%)

For the coating

  • Chocolate or candy moulding wafers (You will need about 300 g of wafers to coat 6 cake pops)
  • Sprinkles, licorice, and or other decorations of choice 

Makes about 20 cake pops 

To make the cake

  1. Preheat oven to 350ºF
  2. Sift together self-rising flour and cocoa powder
  3. Using an electric mixer with the paddle attachment, cream butter and sugar until fluffy
  4. Add egg and vanilla
  5. Add flour mixture in 2 parts, mix until blended
  6. Gradually stir in boiling water, batter will be slightly runny
  7. Bake in a 9 inch x 5 inch loaf pan, lined with parchment paper, for about 20 minutes 
  8. Let cake cool completely

To make the frosting

  1. Melt dark chocolate in a bowl over a pan of simmering water, let cool slightly
  2. Using an electric mixer with paddle attachment, cream butter and icing sugar
  3. Add in vanilla and melted chocolate, mix until smooth

To prepare the cake balls

  1. When the cake is completely cooled, break the cake into fine crumbs with hands
  2. Gradually add frosting, a couple of tablespoons at a time, mix until you can roll mixture into balls
  3. Roll cake mixture into small balls, place on a cookie sheet lined with parchment paper, cover with plastic wrap and put in fridge for at least about 30 minutes

Halloween Cake Pops


 To assemble the cake pops

  1. Melt candy melts or chocolate in a bowl over a pot of simmering water 
  2. Dip cake pop sticks into coating about 1 inch deep
  3. Insert coated sticks into cake balls 
  4. Dip into coating, covering the whole cake pop (since it’s a chocolate cake, you may need to do 2 coatings if using white coating)
  5. Gently tap off excess coating
  6. Decorate while coating is still wet, then let dry (alternatively, you can draw on them when they are dry using edible markers)

Coconut Flour Chocolate Chip Cookies (Gluten-free)

Our family is very lucky. None of us have any food allergies, intolerance, special diet or restrictions.  I do have many friends or their kids who cannot eat nuts, shell-fish, dairy or gluten. Cooking or eating out can be very challenging for them.  These restrictions, however, have given me opportunities to try new ingredients. This is my first time using coconut flour to bake. It is gluten-free, high in fibre and protein, and low in carbohydrates. It is very absorbent, so you cannot make a cup-to-cup substitution with grain-based flour. For every cup of all-purpose flour, you only need about 1/4-1/3 cup of coconut flour. You would also need more eggs, about 2 eggs per 1/3 cup of coconut flour. These cookies are soft, chewy and much healthier than regular chocolate chip cookies. So we can eat more and feel a little less guilty! 

Makes about 12-14 cookies 

  • 40 g coconut flour (about 1/3 cup)
  • 60 g brown sugar 
  • Pinch of salt 
  • 2 eggs, lightly beaten 
  • 60 mL coconut oil, melted
  • 1 teaspoon pure vanilla extract 
  • 50 g semi-sweet chocolate chips 
  1. Preheat oven to 350ºF
  2. Mix together brown sugar, eggs, coconut oil and vanilla 
  3. Add coconut flour and salt, stir until dough is formed (Mixture may look very runny at the beginning, but as you stir, the coconut flour will absorb the liquid)
  4. Stir in chocolate chips
  5. Roll dough into one inch balls, place on baking sheets lined with parchment paper, then gently flattened each ball (these cookies don’t really spread, they remain pretty much the same shape before and after baking)
  6. Bake for about 12 minutes 

Coconut Flour Chocolate Chip Cookies


Apple Walnut Crumble

September has been pretty busy, school has started, so does hockey, piano, drawing class…..etc.  And I want to go back to my running routine…… just wish there was more time to bake and blog ! September also means it’s apple season, there are so many varieties.  My favourite kind is Gala.  They are sweet, juicy with medium firmness.  They are excellent for both eating and baking. Other good choices for baking are McIntosh, Golden Delicious and Fuji.  A lot of recipes use Granny Smith, but I found them too tart and hard.  The crumble tastes delicious on its own, I had it with yoghurt.  You can also use Vanilla Ice Cream or Creme Anglaise

Makes about 4 servings 

For the fillings

  • 2 medium-sized apples (peel, core and cut into chunks)
  • 50 g chopped walnuts 
  • 1 tablespoon lemon juice 
  • Zest of 1/2 lemon 
  • 2 tablespoons brown sugar 
  • 3 tablespoons maple syrup 
  • 1/2 teaspoon ground cinnamon 

For the toppings

  • 1/2 cup oats
  • 1/4 cup flour 
  • 3 tablespoons brown sugar 
  • 45 g unsalted butter, melted 
  1. Preheat oven to 350ºF 
  2. To prepare the fillings, mix apples with walnuts,lemon juice, lemon zest, brown sugar, maple syrup and cinnamon, set aside 
  3. Prepare crisp toppings by mixing oats, flour, brown sugar and melted butter together 
  4. Put apple mixture into 4 baking dishes, top with crust mixture
  5. Bake for about 30 minutes until top is golden and apples are soft 
  6. Serve warm with Vanilla Ice Cream, Creme Anglaise or yoghurt


Cinnamon Bites

When I hear the words “comfort food”, I would somehow think of cinnamon buns ! Warm, sweet bread with ooey, gooey cream cheese icing……yum ! To no surprise, I found that they are originated from Sweden. (that’s why they sell them at Ikea?!) In Swedish they are called “kanelbulle”  which literally means “cinnamon buns” and October 4 is “Kanelbullens Dag” ,Cinnamon Roll Day. Wow, Swedish people must love their cinnamon buns !  I wish I can be there to taste the authentic flavour. Well, for now, I will comfort myself with these little cinnamon bites !  (I made them in bite-size pieces cause I often found the rolls too big) 

For the dough

    • 540 g (3 cups) bread flour
    • 1 cup warm whole milk
    • 1 teaspoon granulated sugar
    • 4 g instant yeast
    • 1/2 teaspoon salt
    • 1 egg
    • 2 tablespoons vegetable oil

For the coating

  • 100 g unsalted butter, melted
  • 1/2 cup granulated sugar
  • 2 tablespoons ground cinnamon

For the cream cheese icing

  • 180 g soft cream cheese
  • 6 tablespoons icing sugar
  • 1 teaspoon pure vanilla extract
  1. Dissolve sugar in warm milk, add yeast and let sit for a few minutes until frothy
  2. In a large mixing bowl, mix together flour, salt, egg, vegetable oil and yeast mixture
  3. Stir with hand and mix until dough starting to form
  4. Transfer to a lightly floured surface
  5. Knead dough until smooth and stretchy
  6. Wrap with plastic wrap and let rise for about 60 minutes until double in size 
  7. Preheat oven to 350ºF
  8. When dough is ready, punch air out, cut dough into 4 parts
  9. Roll each part into a long log, about 12 inches long
  10. Cut each log into about 12 small pieces
  11. Grease two 8 inch round flat pans or pans of your choice
  12. Mix cinnamon and 1/2 cup of sugar together
  13. Dip each small piece into melted butter, then coat with cinnamon sugar
  14. Place in pans, about 24 pieces each
  15. Bake for about 20 minutes
  16. Meanwhile, prepare icing by beating cream cheese, icing sugar and vanilla together until blended
  17. When bread bites are ready, serve warm with cream cheese frosting

Cinnamon Bites


Pineapple Coconut Cake

My family took a vacation to Hawaii last week. Both kids and adults had a lot of fun. We swam, snorkeled, paddled even parasailed ! To be honest, parasailing at 300 feet high was a little scary, but it was really fun ! My daughter had absolutely no fear and she just loved it ! We enjoyed the food too. There were garlic shrimps, fruits, desserts of course. Their Japanese food was also really good. Food is always the best part of my vacation ! To reminisce some of these wonderful flavours, I baked this Pineapple and Coconut Cake yesterday. I used canned pineapple as I was too lazy to chop one up, you can definitely use a fresh one.  I guess I am still in holiday mode !  🙂  

Makes one loaf (I used a 4.5″ x 8.5″ loaf pan)  

For the cake

  • 225 g cake and pastry flour 
  • 1 +1/2 teaspoon baking powder 
  • 1/2 teaspoon baking soda 
  • 1/4 teaspoon salt
  • 120 g unsalted butter, softened 
  • 120 g cup granulated sugar  
  • 2 eggs
  • 100 g canned pineapple tidbits 
  • 25 g shredded coconut 
  • 60 mL canned coconut milk 
  • 90 mL pineapple juice 
  • 1 teaspoon pure vanilla extract 

For the glaze

  • 150 icing sugar 
  • 45mL pineapple juice 
  • 1 tablespoon shredded coconut 
  1. Preheat oven to 350ºF
  2. Drain pineapples well, pat dry with paper towel and save the juice 
  3. To make the cake, sift together flour,baking power, baking soda and salt, set aside 
  4. Using an electric mixer, with the paddle attachment, cream together butter and sugar until fluffy 
  5. Add eggs, vanilla and coconut milk 
  6. Add half of the flour mixture and pineapple juice, mix until blended
  7. Add remaining of the flour mixture
  8. Fold in pineapples and shredded coconut 
  9. Pour batter into a lightly greased and floured loaf pan
  10. Bake for about 45 minutes
  11. To make the glaze, whisk together icing sugar, pineapple juice and shredded coconut
  12. When the cake is cooled, drizzle glaze on top 

Pineapple Coconut Cake


Chocolate Sweet Pastry Cookies

I love recipes that can be used in many ways. Sweet pastry is definitely one of them. Once you’ve found a good recipe, there are so many things you can do. Pies, tarts…..and cookies ! This is the same recipe I used for the shell of my Chocolate Pistachio Tart ! But instead of putting them in a tart mold, I cut them into squares and dressed them up with some melted white chocolate ! If you don’t want chocolate cookies, you can easily replace the cocoa powder with flour or even ground almond ! 

  • 120 g unsalted butter (cold)
  • 75 g granulated sugar
  • 1 egg yolk
  • 170 g cake and pastry flour (sifted)
  • 10 g unsweetened cocoa powder (sifted)
  • 20 g white chocolate chips (optional)

Makes about 30 cookies

  1. Mix together cold butter and sugar using a wooden spoon until no more lumps
  2. Add egg yolk, mix until blended
  3. Add flour and cocoa powder, mix with the wooden spoon, then transfer onto a table or counter and gently press dough together (just work until ingredients are mixed in)
  4. Wrap with plastic wrap, refrigerate for at least 2-3 hours or overnight
  5. When ready to bake, preheat oven to 350ºF
  6. Knead dough until pliable
  7. Roll dough out to about 1/8 inch in thickness on a floured surface, dock with a fork
  8. Cut into desired shapes using cookie cutters (dough scraps can be re-roll, but only do it once or twice or it may crack)
  9. Place on baking sheets lined with parchment paper, about 2 inches apart 
  10. Bake for about 10 minutes 
  11. Cool on cookie sheets for about 10 minutes, then completely on rack 
  12. Melt white chocolate in a heat proof bowl over a pot of simmering water, cool slightly
  13. Drizzle on top of cookies 

Chocolate Sweet Pastry Cookies


Mini Blueberry Loaves

To me, the best part of summer is the large variety of fruits we get to enjoy, berries, watermelon, peaches, etc. And blueberry is our no.1 favourite ! Every summer, we can easily go through over 30 pounds of blueberries!  There are many blueberry farms in our area, fresh, local, sweet and at a very reasonable price. How can I resist ? And as a baker, how can I not bake with them ?!  Again, I tried to use less sugar. So, I used use vanilla-flavoured almond milk instead of milk and added some honey, and was very pleased with the result !
I asked my daughter, who is my “art director” for my blog, to draw me something with blueberries and here is what she came up with ! I guess she is right, blueberries made you happy and healthy rather than blue ! 

You Aren't Blue

Makes about 6-8 mini loaves

  • 150 g fresh blueberries 
  • 270 g all-purpose flour + extra for coating blueberries 
  • 1 teaspoon baking powder 
  • 1/2 teaspoon baking soda 
  • 1/4 teaspoon salt 
  • 120 g unsalted butter, at room temperature 
  • 60 g granulated sugar 
  • 2 large eggs
  • 100 mL vanilla-flavoured almond milk 
  • 60 mL honey
  • 15 mL lemon juice 
  • 5 mL pure vanilla extract 
  • zest of half a lemon
  1. Preheat oven to 350ºF
  2. Sift together flour,baking powder, baking soda and salt, set aside 
  3. Coat blueberries with about a tablespoon of flour, set aside 
  4. Using an electric mixer with the paddle attachment, cream butter and sugar until fluffy 
  5. Add eggs, honey, almond milk, lemon juice and vanilla
  6. Add flour mixture in 2 portions, mix until blended, scraping sides and bottom of mixing bowl (it’s ok if batter is slightly lumpy)
  7. Gently fold in blueberries and lemon zest
  8. Spoon batter into slightly greased and floured mini loaf pans
  9. Bake for about 20 minutes 
  10. Cool for about 10 minutes in pans, then completely on rack 

Mini Blueberry Loaves


Chocolate Pistachio Tart

As a mom, my kids are always my priorities. But sometimes I feel it’s necessary to do something for myself….in order to keep my sanity ! So I made this dessert just for me ! It’s loaded with chocolate with a bit of crunch and saltiness from the pistachios. Did you know that pistachios are called the “happy nuts” in Chinese? Their partially opened shells look like a smile. They are an excellent source of vitamin B, fibre, potassium, magnesium and many more. No wonder I felt fantastic after eating them! 

Makes about three to four 4-inch tarts

For the chocolate tart

  • 120 g unsalted butter (cold)
  • 75 g granulated sugar
  • 1 egg yolk
  • 170 g cake and pastry flour (sifted)
  • 10 g unsweetened cocoa powder (sifted)

For the filling

  • 2 ounces dark chocolate (finely chopped)
  • 4 ounces semi-sweet chocolate (finely chopped)
  • 4 ounces whipping cream
  • 1/2 teaspoon pure vanilla extract
  • 30 g salted pistachios (shells removed)
  1. Mix together cold butter and sugar using a wooden spoon until no more lumps
  2. Add egg yolk, mix until blended
  3. Add flour and cocoa powder, mix with the wooden spoon, then transfer onto a table or counter and gently press dough together (just work until ingredients are mixed in)
  4. Wrap with plastic wrap, refrigerate for at least 2-3 hours or overnight
  5. When ready to bake, preheat oven to 350ºF
  6. Knead dough until pliable
  7. Roll dough out to about 1/8 inch in thickness on a floured surface, dock with a fork
  8. Place inside slightly greased tart molds, trim off excess dough (dough scraps can be re-roll, but only do it once or twice or it may crack)
  9. Bake for about 12 minutes till golden, let cool
  10. For the filling, crush pistachios into small pieces
  11. Heat whipping cream in a non-stick pot over medium heat until starting to bubble
  12. Pour cream over chopped chocolate, let stand for 1 minute
  13. Add vanilla extract, stir until smooth
  14. Mix in half of the crushed pistachios
  15. Pour into baked tart shells, sprinkle remaining pistachios on top 
  16. Let cool then put in refrigerator until set

Chocolate Pistachio Tart


Original chocolate tart shell recipe by Chef Marco Ropke at the Vancouver Pastry Training Centre