Tag Archives: food

Lemon Coconut Thumbprint Cookies

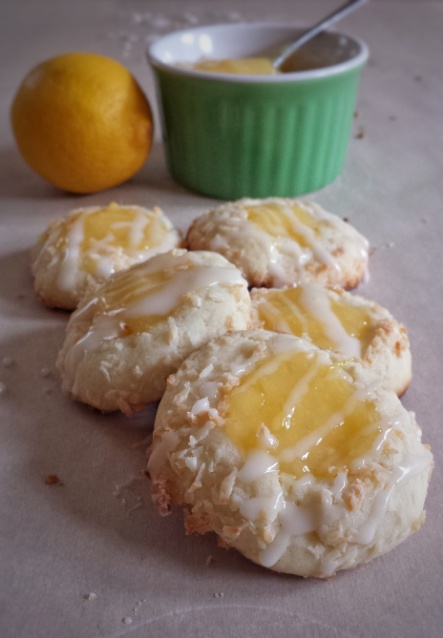
Can’t believe Spring is already on its way ! The weather is warmer, Cherry Blossom trees are blooming….and my hay fever is back ! Even though my nose is a little itchy and stuffy, I can still smell these delicious cookies. They are loaded with lemon flavour ! I added some shredded coconut around the cookies for extra crunchiness. You can omit it, or use almonds or hazelnuts if you are not a coconut fan.

Total time: 90 minutes

For the lemon curd

Makes about 1/2 cup

  • 2 egg yolks
  • 6 tablespoons granulated sugar
  • 3 tablespoons lemon juice
  • 2 teaspoons lemon zest
  • 2 tablespoons water
  • 50 gram unsalted butter, chilled and cut into small pieces
  1. Whisk together egg yolks, sugar, lemon juice, water and zest
  2. Heat mixture in non-stick pot over low heat, stirring constantly until thickened (mixture should coat back of spoon)
  3. Turn heat off, mix in butter, a few pieces at a time until all melted
  4. Cool, can refrigerate up to 2 weeks

For the cookies

Makes about 20 cookies

  • 1+1/4 cup all-purpose flour
  • 1/4 teaspoon salt
  • 1/2 cup unsalted butter,at room temperature
  • 1/2 cup granulated sugar
  • 1 egg
  • 1 tablespoon lemon juice
  • 1 teaspoon pure vanilla extract
  • 1/4 cup unsweetened shredded coconut (optional)
  1. Preheat oven to 325ºF
  2. Sift together flour and salt, set aside
  3. Using an electric mixer with the paddle attachment, cream butter and sugar until fluffy
  4. Add egg, lemon juice and vanilla
  5. Add flour mixture in 2 portions, mix until blended
  6. Roll dough into one inch balls
  7. Gently crate an indentation in the middle of balls with thumb or tip of a wooden spoon
  8. Coat top of cookies with shredded coconut
  9. Bake for about 10 minutes, take cookies out, gently crate centres again
  10. Bake for another 7-8 minutes until golden
  11. Cool on cookie sheets for about 5 minutes, then completely on rack
  12. Spoon lemon curd into centres of cookies 

Japanese Cheesecake

Last Sunday, I made this Japanese cheesecake with my daughter. It turned out very nice. It has a lighter taste and a softer texture than a regular cheesecake, but is still very creamy. The special ingredient ? ……. Meringue ! It allows more air to be incorporated into the cake batter and hence, a fluffy cake. So if you find regular cheesecake too heavy, this may just be right.
By the way, you can now “yum” my recipes on Yummly if you have an account.  Just click the Yummly button under each recipe. Thanks in advance !

For the cake

  • 3/4 cup cake and pastry flour
  • 1/2 teaspoon baking soda
  • 400 g soft cream cheese
  • 1/4 cup granulated sugar
  • 60 g unsalted butter, at room temperature
  • 6 egg yolks
  • 200 mL whipping cream
  • 2 teaspoons lemon juice
  • 1 teaspoon pure vanilla extract
  • pot of boiling water for baking cake

For the meringue

  • 6 egg whites
  • 1/2 cup granulated sugar
  • 1/4 teaspoon cream of tartar

To make the cake

  1. Preheat oven to 325ºF
  2. Line a 9 inch spring-form cake pan with slightly greased parchment paper
  3. Wrap base of pan with two layers of aluminium foil to prevent seepage
  4. Sift together flour and baking soda, set aside
  5. Using an electric mixer with the paddle attachment, cream butter, cream cheese and sugar until fluffy
  6. Add egg yolks, lemon juice, vanilla extract and whipping cream, mix until blended
  7. Add flour mixture, mix until smooth
  8. Pour batter into a different large mixing bowl
  9. Clean and dry used mixing bowl thoroughly before making meringue
  10. To make the meringue, use the electric mixer with whisk attachment, whisk egg whites and cream of tartar at medium speed until frothy
  11. Increase speed to high, gradually add in sugar
  12. Whisk until stiff peak is formed
  13. Gently fold meringue into cake batter until just blended, do not over mix
  14. Pour batter into cake pan, place on a tray filled with boiling water and bake for about 60 minutes until golden brown, a tooth pick should come out clear when inserted in the middle
  15. Turn oven off, leave oven door ajar for about 20 minutes before taking cake out. This will prevent cake from shrinking too much due to sudden drop in temperature.  A slight shrinkage is normal.
  16. Remove baking tray, let cool on rack completely
  17. Remove from cake pan, refrigerate for 2-3 hours or overnight in an air tight container
  18. Cut, serve and enjoy!


img_20160228_112118.jpg

Adapted from http://www.justonecookbook.com

Honey Buns

I made these buns last week and my parents absolutely love them ! My mom said they are much better than the ones she bought from a store. Thanks mom !  Actually, bread making is very easy, even if you don’t have a bread machine or a stand mixer. I actually find it easier to knead the dough with hands. It may be messier, but that’s the fun part, isn’t it? And the best part for my kids ? Punching the dough! Well, I like it too….especially when I need to release some stress ! These buns taste best when fresh out of the oven. Or you can keep them in an air-tight container for about 5 days, just toast them before serving.

Makes about 12 rolls

  • 4 g instant yeast
  • 1 cup warm water
  • 1 teaspoon granulated sugar
  • 3 cups bread flour (white or whole wheat or a mix of both)
  • Pinch of salt
  • 2 eggs (1 slightly beaten for egg wash)
  • 1/4 cup honey
  • 2 tablespoons vegetable oil
  1. Dissolve sugar in warm water, add yeast and let sit for about 5 minutes until frothy
  2. Put flour and salt in a big mixing bowl, gradually mix in 1 egg, yeast mixture, honey and oil with hands until dough starts to form
  3. Transfer to a floured surface, knead until smooth and stretchy
  4. Cover with plastic wrap and let dough rise for about 60 minutes or double in size (You can speed up the process by putting it in an not-preheated oven with a small pot of hot water on the lower rack. The moist and warm environment makes the dough rise quicker)
  5. Punch air out, cut dough into 12 equal pieces (about 80 g each)
  6. Shape pieces into balls, then place on a slightly greased baking dish
  7. Cover with plastic wrap and let rise again for another 60 minutes until double in size
  8. Preheat oven to 350ºF
  9. Brush top with egg wash
  10. Bake for about 25 minutes until golden

Easy Chocolate Fudge

Happy Valentine’s Day ! I got a Valentine’s card before I even got out of bed this morning from my daughter, how sweet !  And here is a sweet treat that I made last night, yummy chocolate fudge ! Classic chocolate fudge requires the chocolate to be heated to a precise temperature which can be tricky. This recipe is much easier and it tastes just as good.

Makes about 16 ounces

  • 8 ounces semi-sweet chocolate, coarsely chopped
  • 1/2 cup unsweetened cocoa powder
  • 2 tablespoons unsalted butter
  • 1/2 cup condensed milk
  • Pinch of salt
  • 1 teaspoon pure vanilla extract
  1. Put chocolate, cocoa powder, butter, condensed milk and salt in a large heatproof bowl over a pan of simmering water
  2. Cook and stir until all melted
  3. Turn heat off, stir in vanilla extract
  4. Spread evenly in a container lined with slightly greased parchment paper or aluminum foil
  5. Refrigerate for about 3 hours until firm
  6. Cut into squares
  7. Store in refrigerator

Chocolate Molten Lava Cake

This dessert is definitely for chocolate lovers like me !  It is simple, yet very yummy and looks amazing.  It makes a great Valentine’s dessert.  Try it with vanilla ice cream, it’s divine with the warm chocolate “lava” ! I don’t think anyone can resist that.   

Makes about 4 servings

  • 4 oz dark or semi-sweet chocolate
  • 1/4 cup cake and pastry flour, sifted
  • 1/4 teaspoon salt
  • 50 g unsalted butter at room temperature, more for coating ramekins
  • 1/4 cup demerara or brown sugar
  • 2 eggs
  • 1 teaspoon pure vanilla extract
  1. Preheat oven to 400ºF
  2. Melt chocolate in a glass bowl over a pot of simmering water, cool slightly
  3. Generously coat ramekins with butter
  4. Using an electric mixer, cream 50 g of butter and sugar until fluffy
  5. Add eggs and vanilla extract
  6. Slowly pour in melted chocolate, mix until blended
  7. Mix in flour and salt
  8. Pour batter into ramekins, about 2/3 full 
  9. Bake for about 10-11 minutes
  10. Cool for about 5 minutes, invert ramekins over plates, cakes should come out fairly easily
  11. Dust with icing sugar, serve warm


Pinwheel Cookies

I found this pinwheel recipe in my big recipe binder the other day. I don’t even remember when and how I got it as it was hand-written by me!? Perhaps it was from a friend? All I remember was I’ve made it once and it tasted good ! The original recipe was a chocolate pinwheel . I added some pink colour instead and made them into Valentine’s cookies !  

Makes about 3 dozens

  • 2 cups all-purpose flour
  • 1/2 teaspoon baking soda
  • 1/4 teaspoon salt
  • 1/2 cup unsalted butter, at room temperature
  • 3/4 cup granulated sugar
  • 1 egg
  • 1 egg white for brushing
  • 2 tablespoons lemon juice
  • 1 teaspoon pure vanilla extract
  • food colouring
  • vanilla sugar or granulated sugar for sprinkling (optional, to make cookies shinier)
  1. Preheat oven to 350ºF
  2. Sift together flour, baking soda and salt, set aside
  3. Using an electric mixer with paddle attachment, cream butter and sugar until light and fluffy
  4. Add 1 egg, lemon juice and vanilla extract
  5. Add flour mixture in 2-3 portions, mix until blended
  6. Divide dough into two halves, add food coloring to one part, knead to mix in color
  7. Roll out each half to about 1/8 inch in thickness between 2 sheets of parchment paper
  8. Remove the two top sheets of parchment paper 
  9. Brush plain dough with egg white
  10. Carefully invert coloured dough and place on top, roll gently with a rolling-pin to adhere
  11. Remove top sheet of parchment paper and trip off uneven edges
  12. Slowly roll up two sheets (like a Swiss roll)
  13. Wrap with plastic wrap and refrigerate for at least 2 hours or until firm
  14. Using a sharp knife, cut into slices about 1/8-1/4 inch in thickness (you may need to gently reshape the cookies into circles)
  15. Sprinkle top with vanilla sugar or granulated sugar if desired
  16. Place on cookie svheets lined with parchment paper
  17. Bake for about 8 minutes
  18. Cool on cookie sheets for 5 minutes, then completely on rack

Sweet Potato Honey Muffins

One of my goals this year is to use less sugar in my recipes without compromising flavours.  Japanese sweet potatoes have red skin and light yellow flesh.  They are a good source of vitamin A, C and dietary fibre. They taste very sweet, so you don’t really need to add much sweetener.  I only added some honey and they came out super tasty ! They are very healthy too !   

Makes about 10-12 muffins

  • 240 g mashed Japanese sweet potatoes
  • 1+1/4 cups cake and pastry flour
  • 1 teaspoon baking powder
  • 1/2 teaspoon baking soda
  • 1/4 teaspoon salt
  • 1/2 teaspoon ground cinnamon
  • 100 g unsalted butter, at room temperature
  • 2 eggs
  • 240 mL milk
  • 100 g plain Greek yogurt
  • 6 tablespoons honey
  • 1 teaspoon pure vanilla extract

To prepare the sweet potato

  1. Cut sweet potatoes into large chunks
  2. Prick with a fork a few times
  3. Bake in an 400ºF oven until soft, about 45 minutes to 1 hour
  4. Peel and mash, cool and set aside

To make the muffins

  1. Preheat oven to 375ºF
  2. Sift together flour, baking powder, baking soda, cinnamon and salt, set aside
  3. Blend mashed sweet potatoes, milk and honey to make a puree
  4. Using an electric mixer with the paddle attachment, cream butter until fluffy
  5. Mix in eggs, yoghurt, vanilla and sweet potato puree
  6. Add flour mixture, mix until just blended, do not over mix (it is fine if mixture is slightly lumpy)
  7. Pour batter into muffin tins lined with slightly greased paper or silicone muffin cups
  8. Bake for about 20-22 minutes

Lemon Raisin Scones

I fell in love with lemon lately! I add it to many of my recipes, e.g. pies, cakes, muffins, smoothies, etc. It just makes them taste a lot better!  It is also an acid, so when it’s combined with baking soda, it helps to rise your dough.  I’ve drizzled some lemon glaze on top of these scones, but they taste amazing even with just butter.  You can have them for breakfast or afternoon tea. I actually had one for lunch too!

Makes about 8 scones
Total time = 2 hours

  • 2 cups all-purpose flour
  • 1 tablespoon baking powder
  • 1/4 teaspoon salt
  • 1/2 cup sugar
  • 1/2 cup unsalted butter, cut into small pieces and chilled
  • 1 egg (beaten)
  • 1/2 cup milk
  • 1 +1/2 tablespoons lemon juice
  • zest of 1 large lemon
  • 1 teaspoon pure vanilla extract
  • 1/2 cup raisins
  1. Preheat oven to 375ºF
  2. Add lemon juice to milk and let sit for a few minutes
  3. Sift together flour, baking powder and salt
  4. Mix in sugar
  5. Cut in butter by pastry cutter or rub in by hands until resembles coarse crumbs 
  6. Add lemon zest and raisins
  7. Add egg,milk with lemon juice and vanilla extract, mix until blended
  8. Transfer dough to a floured surface, and press together to form a round disc about 1/2 inch thick
  9. Wrap with plastic wrap and refrigerate for about 1 hour
  10. Cut disc into about 8 triangular wedges (like cutting a pizza) 
  11. Bake on cookie sheet lined with parchment paper for about 20 minutes
  12. Serve warm with butter or lemon glaze

For the lemon glaze

  • 1+1/4 cup icing sugar
  • 2 tablespoons lemon juice
  • 1 tablespoon water
  • 1/2 teaspoon lemon zest
  1. Sift icing sugar
  2. Whisk in lemon juice, water and lemon zest until smooth

Orange Cupcakes with Chocolate Frosting

For me, the taste of chocolate and orange brings back a lot of childhood memories.  One of my favourite treats when I was young was Jacob’s Club Orange Chocolate Bar.  It’s a orange-flavoured wafer biscuit coated with chocolate.  It’s absolutely delicious !  So when I was thinking about a cupcake recipe, this combination came to my mind.

For the cupcakes

  • 1+1/2 cups cake and pastry flour
  • 1 teaspoon baking powder
  • 1/4 teaspoon baking soda
  • 1/4 teaspoon salt
  • 1/2 cup (120g) unsalted butter, at room temperature
  • 2/3 cup granulated sugar
  • 2 eggs
  • 3 tablespoons orange juice
  • zest of one large orange
  • 4 tablespoons milk
  • 1 +1/2 teaspoon pure orange extract
  • 1 teaspoon pure vanilla extract
  1. Preheat oven to 350ºF
  2. Sift together flour, baking powder, baking soda and salt, set aside
  3. Using an electric mixer with the paddle attachment, cream butter and sugar until light and fluffy
  4. Add eggs, orange juice, orange zest, milk and the 2 extracts, mix until blended
  5. Mix in flour mixture in 2-3 portions
  6. Pour into baking tins lined with baking cups, about 2/3 full
  7. Bake for about 20 minutes
  8. Cool completely before frosting


For the chocolate frosting

  • 3/4 cup unsalted butter (150 g), at room temperature
  • 2 cups icing sugar
  • 1/4 cup unsweetened cocoa powder
  • 3 tablespoons milk
  • 1 teaspoon pure vanilla extract
  • 2 ounces semi-sweet chocolate
  1. Sift together icing sugar and cocoa powder
  2. Melt chocolate in a bowl over a pot of simmering water, cool slightly
  3. Using an electric mixer with the paddle attachment, beat butter until creamy
  4. Add milk and vanilla
  5. Add sugar and cocoa powder in 2-3 portions, mix well after each addition, scraping sides of bowl
  6. Add melted chocolate, mix until smooth

Vanilla Cream Pastry Puffs

This is a dessert that has been in my mind ever since I took the pastry course in September. The original recipe uses a choux pastry.  I used a store-bought puff pastry instead. The textures of the two pastries are quite different, but they both go really well with the vanilla cream. 

Makes about 8 puffs

For the vanilla cream

  • 500 mL milk (preferably full fat, but 2 % works too)
  • 2 egg yolks
  • 1/3 cup granulated sugar
  • 4 tablespoons cornstarch
  • 1/2 to 1 vanilla bean
  1. Whisk egg yolks, sugar, cornstarch and 1/2 cup of milk together until no more lumps
  2. Cut vanilla bean lengthwise and scrape seeds out of bean pod, do not throw away bean pod
  3. In a pot, heat remaining milk, vanilla beans and the pod over medium heat until just boiled
  4. Whisk 1/2 of boiled milk slowly into egg mixture to temper, then pour everything back into the pot
  5. Heat until just starting to bubble, whisking constantly
  6. Take pot off the heat, remove vanilla pod 
  7. Transfer to a large bowl and let cool

To make the pastry puffs

  • 1 box frozen puff pastry (two 10 inch x 10 inch sheets), thawed
  • 1 egg, beaten
  • 1 -2 tablespoons granulated sugar or vanilla sugar 
  • Icing sugar and fruits for toppings
  1. Preheat oven to 375ºF
  2. Spread two sheets of pastry flat on a floured surface separately (if your pastry comes in a block, cut and row into 2 sheets of about 1/8 inch in thickness)  
  3. Brush one sheet with egg wash, then sprinkle evenly with granulated or  vanilla sugar
  4. Place the other sheet on top, pressing gently
  5. Cut with a round cookie cutter into circles, about 2 -3 inches in diameter
  6. Prick a few times with a fork in the middle, so they won’t puff up too much
  7. Bake for about 15 minutes until golden
  8. Let cool, then gently cut puffs in half horizontally
  9. Spoon or pipe vanilla cream in the middle
  10. Top with icing sugar and fruits


Original recipe of vanilla cream by Chef Marco Ropke at Vancouver Pastry Training Centre