Author Archives: tinysweettooth

Chocolate Pistachio Tart

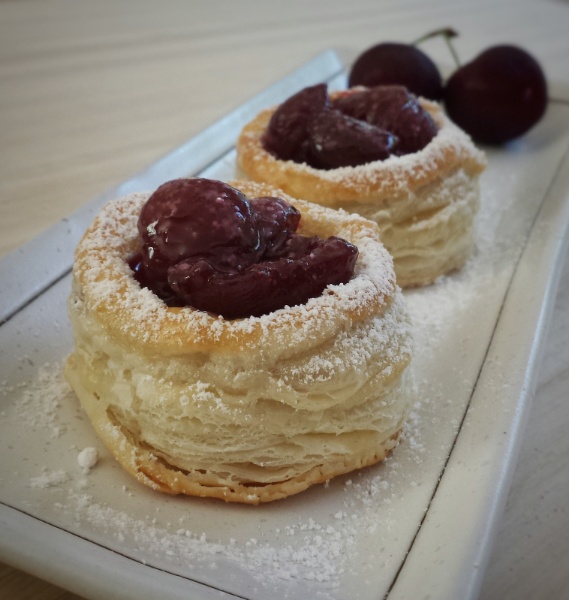
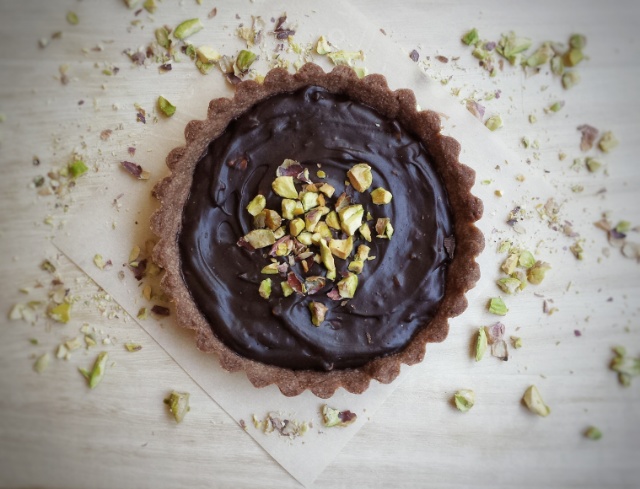
As a mom, my kids are always my priorities. But sometimes I feel it’s necessary to do something for myself….in order to keep my sanity ! So I made this dessert just for me ! It’s loaded with chocolate with a bit of crunch and saltiness from the pistachios. Did you know that pistachios are called the “happy nuts” in Chinese? Their partially opened shells look like a smile. They are an excellent source of vitamin B, fibre, potassium, magnesium and many more. No wonder I felt fantastic after eating them! 

Makes about three to four 4-inch tarts

For the chocolate tart

  • 120 g unsalted butter (cold)
  • 75 g granulated sugar
  • 1 egg yolk
  • 170 g cake and pastry flour (sifted)
  • 10 g unsweetened cocoa powder (sifted)

For the filling

  • 2 ounces dark chocolate (finely chopped)
  • 4 ounces semi-sweet chocolate (finely chopped)
  • 4 ounces whipping cream
  • 1/2 teaspoon pure vanilla extract
  • 30 g salted pistachios (shells removed)
  1. Mix together cold butter and sugar using a wooden spoon until no more lumps
  2. Add egg yolk, mix until blended
  3. Add flour and cocoa powder, mix with the wooden spoon, then transfer onto a table or counter and gently press dough together (just work until ingredients are mixed in)
  4. Wrap with plastic wrap, refrigerate for at least 2-3 hours or overnight
  5. When ready to bake, preheat oven to 350ºF
  6. Knead dough until pliable
  7. Roll dough out to about 1/8 inch in thickness on a floured surface, dock with a fork
  8. Place inside slightly greased tart molds, trim off excess dough (dough scraps can be re-roll, but only do it once or twice or it may crack)
  9. Bake for about 12 minutes till golden, let cool
  10. For the filling, crush pistachios into small pieces
  11. Heat whipping cream in a non-stick pot over medium heat until starting to bubble
  12. Pour cream over chopped chocolate, let stand for 1 minute
  13. Add vanilla extract, stir until smooth
  14. Mix in half of the crushed pistachios
  15. Pour into baked tart shells, sprinkle remaining pistachios on top 
  16. Let cool then put in refrigerator until set

Chocolate Pistachio Tart


Original chocolate tart shell recipe by Chef Marco Ropke at the Vancouver Pastry Training Centre 


Raspberry Yoghurt Popsicles (for Canada Day)

Happy Canada Day!
Can’t believe I have been in this country for 26 years! I am so thankful that my parents made the decision to move to Canada. I love this country, the friendly people, the weather (especially for us who are in the west coast), the amazing scenery. It’s a fantastic place for my kids too, so many activities they can enjoy. (Well, only now I am worried they won’t be able to afford to have their own house when they grow up….)
Our weather has been really nice and today is a great day for a picnic or BBQ. These little popsicles make a perfect cool treat and are so easy to make.

Makes about 12 popsicles

  • 850 g vanilla flavoured Greek yoghurt
  • 1 kg fresh raspberries
  • 200 g granulated sugar (adjust to your own taste)
  • 3 tablespoons lemon juice
  1. Prepare raspberries by heating them together with sugar and lemon juice in a non-stick pot over medium heat
  2. Turn heat down to low when liquid starts to bubble
  3. Gently mesh raspberries with a wooden spoon, cook until thickened
  4. Strain seeds, let cool
  5. To make popsicles, layer yoghurt and raspberry sauce alternately in small paper cups or popsicle molds, freezing in between layers (You can also swirl them together to make a marble effect). That’s it, enjoy!

img_20160629_165520.jpg


Cherry Puff Tarts

Cherry is another fruit that we love to eat in the summer. My parents used to have 2 giant cherries at their old house. I still remember my brother and I would pick as much as we could before the birds get to them. There would be so much cherries that we would fill almost every single basket and bucket in the house….Oh, how I miss those good times.  My folks have moved and we no longer have our own cherry trees, but I can make these yummy tarts for them instead !
I always keep a box of puff pastry in the freezer. It’s really handy if you need to make something quick, both sweet and savory. I yet to try making my own puff pastry…. Well, it’s on my list! 🙂

Makes about 10-12 tarts

  • 200 g pitted fresh cherries
  • 3 tablespoons granulated sugar
  • 1/2 tablespoon lemon juice
  • 1 box puff pastry (about 400 g)
  • 1 egg, lightly beaten
  • vanilla sugar or granulated sugar for sprinkling
  • Icing sugar for dusting
  1. To prepare the fillings, heat cherries, 3 tablespoons of sugar and lemon juice in a non-stick pot over medium heat
  2. Turn heat down to low when liquid starts to bubble
  3. Cook until cherries softened, set aside to cool
  4. To make the puff pastry, preheat oven to 350°F
  5. Roll out pastry on a floured surface to about 1/8 inch in thickness
  6. Cut with a round cookie cutter into circles, about 2-3 inches in diameter
  7. Place half the number of circles on cookie sheets lined with parchment paper
  8. Dork with a fork, brush with egg wash and sprinkle with granulated or vanilla sugar 
  9. Cut out the centres of the other circles using a smaller cookie cutter, (or a bottle cap would work too) to form rings
  10. Place rings on top of the circles
  11. Brush ring tops with egg wash and sprinkle with sugar (You can collect all the dough scrapes and re-roll, but only do it once, otherwise it will lose its puffiness)
  12. Bake for about 15 minutes until golden, let cool
  13. Spoon in cherry fillings, dust with icing sugar and serve immediately

img_20160628_180422.jpg

Chocolate Ice Cream

I made this ice cream about 2 weeks ago. Since then I have been thinking what I should write about this post. I wanted to share something special other than just telling you how good this ice cream is. (It is REALLY good !) The day that I made this ice cream, I actually just finished a very good session of rock climbing. So, I decided to share the experience. I started indoor rock climbing about a year ago, and I absolutely fell in love with it. Back then, I never thought I could do it. Yes, my arms “hurt like hell” every time I finished, but I feel good, it’s a good kind of pain. For a 40 something-year old mom, who was not very active, being able to finish a 5.8 route, it’s a big achievement…..(Oh, FYI, a climbing route is graded according to its difficulty. It ranges from 5 all the way to 5.15) Through rock climbing, and also running, I have become more healthy physically and mentally. (Well, I guess that’s a good excuse to make more desserts !) I have learned to be more patient and perseverance.  As a mom, I feel it is important to teach my kids to pursue their dreams and goals no matter how hard they seem…..I have to thank my daughter too ! She likes to climb and keeps me going.  Actually she is even tougher than I am !  Well done, girl ! …. and well done mom too ! 
OK, back to the ice cream ! I have made chocolate ice cream before but without the ice cream machine.  Now that I own one, I thought I should make the “real” thing.  And the “real” thing does taste better !  I added some chopped chocolate for extra flavour and crunchiness, you can omit it if preferred.  

Makes about 1 L

  • 2 cups whipping cream
  • 1 cup whole milk
  • 4 egg yolks
  • 200 g granulated sugar
  • 50 g unsweetened cocoa powder
  • 1 teaspoon pure vanilla extract
  • 100 g dark or semi-sweet chocolate, finely chopped (optional) 
  • ice and water for ice bath
  1. Whisk together egg yolks, sugar and 1/4 cup milk
  2. In a non-stick pot, heat remaining milk, 1 cup of whipping cream and cocoa powder over medium heat until just boiled, stirring constantly (Keep the other cup of whipping cream in the fridge)
  3. Add 1/3 cup of hot mixture into egg mixture to temper, then pour everything back into pot
  4. Turn heat down to low, stir constantly until just thickened, mixture should coat back of spoon (You can draw a streak in the middle of the spoon with your finger, if the streak stays clear, it is ready)
  5. Remove from heat immediately, strain through a fine mesh twice
  6. Let sit in an ice bath, stir in vanilla extract and remaining cold whipping cream
  7. Let cool completely, cover with plastic wrap and refrigerate for at least 3 hours or overnight
  8. Place in ice cream machine and churn according to manufacturer’s instructions
  9. Fold in chopped chocolate
  10. Serve soft immediately or keep in freezer

img_20160614_180310.jpg

My Favourite Cookbooks – My latest good read

Ratio: The Simple Codes Behind the Craft of Everyday Cooking – by Michael Ruhlman

This book was recommended by Chef Marco Ropke at the Vancouver Pastry Training Centre when I took a course there. If you see this book in a book store, you probably wouldn’t think it’s a cookbook. It doesn’t have any mouth-watering food photos or unique recipes.  Although I think it would be nice to have some coloured pictures inside.  But for less than $20, it is well worth it. It talks about culinary ratios, which are the backbones for all recipes. For example, a basic pie dough ratio is 3-2-1, 3 parts flour, 2 parts fat and 1 part water; a vinaigrette is 3 parts oil and 1 part vinegar. Once you know these ratios, you can add your flavours (sweet or savory), herbs, spices, seasonings, etc. You can create recipes according to your own preference. Even if you are trying someone else’s recipe, you can change it to the way you like as long as you keep your backbone ratios.  It also has many cooking tips. So, if you like to cook and create your own recipes, you will enjoy reading it.

You can find this great book on the Amazon website by clicking on the title of the book. I will receive a small compensation if you purchase the item. 


Lemon Panna Cotta with Blackberry Sauce

This is one of the desserts that my daughter and I would “fight” to have the last bite…. and of course mommy always “loses” 🙂 I love the blackberry sauce, it’s refreshing and it helps to balance the richness of the panna cotta.  If you have left over sauce, you can use it as a spread on you toast, pancakes or waffles.

Makes about 4 servings

For the panna cotta

  • 1+1/2 cups whipping cream
  • 1/2 cup milk
  • 1/3 cup granulated sugar
  • zest of 1 lemon
  • 2 tablespoons lemon juice
  • 1 envelope or tablespoon unflavoured gelatin

For the blackberry sauce

  • 12 ounces fresh blackberries
  • 4 tablespoons granulated sugar
  • 2 tablespoons water
  1. Sprinkle gelatin over lemon juice and let sit for a few minutes (it will form a block of jelly, which is fine)
  2. Heat together whipping cream, milk, sugar and lemon zest in a non-stick pot over medium heat until sugar all dissolved and just starting to bubble, turn heat down to low 
  3. Add gelatin mixture
  4. Stir until gelatin all dissolved
  5. Strain through a fine mesh twice
  6. Pour into lightly greased ramekins or desired containers
  7. Let cool and refrigerate until set, at least 3 hours or overnight
  8. Prepare blackberry sauce by heating up blackberries, sugar and water in a non-stick pot over medium heat
  9. Turn heat down to low when liquid starts to bubble
  10. Gently mash blackberries with a wooden spoon, cook until thickened
  11. Strain seeds and skin out, let cool
  12. When panna cotta is set, dip bottom of ramekins in hot water for about 10 seconds, then run a knife around ramekins, invert gently on plates (Alternatively, you can just serve them inside the ramekins)
  13. Serve with blackberry sauce

img_20160508_163931.jpg

Healthy Banana Bread

Besides a mom and a home baker, I am also a pharmacist, so whenever I bake or make desserts, I would have a dilemma in my mind. Shouldn’t I be promoting healthy eating as a health professional? But I really like to make and eat sweets ? To somewhat justify myself, I try to create more recipes that use less sugar and fat, and incorporate healthier ingredients.  It took me a few tries to make this healthy yet very delicious banana bread. It contains no butter and no refined sugar. It is moist but not too dense, which is what my family likes. You can use bread flour if you prefer a denser texture. I also added some ground flax seeds for your extra dose of fibre and omega fatty acids!

Makes one 9×5 inch loaf

  • 2 cups all-purpose flour
  • 1 teaspoon baking soda
  • 1/4 teaspoon salt
  • 1/4 cup ground flax seeds
  • 3-4 ripe bananas, meshed (about 1+1/2 cups)
  • 2 eggs, lightly beaten
  • 120 g coconut oil, melted
  • 1/4 cup organic agave syrup
  • 100 g plain Greek yoghurt
  • 1 teaspoon pure vanilla extract
  1. Preheat oven to 350ºF
  2. Sift together flour, baking soda and salt into a large mixing bowl
  3. Mix in ground flax seeds
  4. Add other wet ingredients, mix until blended
  5. Pour into a lightly greased and floured 9×5 inch loaf pan
  6. Bake for about 50-60 minutes

Oreo Cookies and Cream Cups

Oreos! One of kids’ favourite cookies! Actually they are one of my favourites too. They are super yummy and they make great desserts like these little cookies and cream cups. Great easy idea for pot luck or kids’ parties !  And I think they would taste extra yummy when the weather is so warm and nice !  

Makes about 10-12 cups

  • 20 Oreo Cookies
  • 3 tablespoons unsalted butter, melted
  • 100 g soft cream cheese
  • 1/4 cup icing sugar
  • 1 teaspoon pure vanilla extract
  • 1/2 cup whipping cream
  1. Crush about 15 Oreo cookies into fine crumbs
  2. Mix crumbs with melted butter
  3. Put into silicone baking cups and press firmly to form base
  4. Using an electric mixer, cream icing sugar and cream cheese until fluffy
  5. Add vanilla, mix well
  6. In a separate bowl, using an electric mixer, beat whipping cream until stiff peak is formed
  7. Gently fold whipped cream into cream cheese mixture
  8. Spread on top of cookie base
  9. Coarsely crush remaining cookies and sprinkle on top or you can decorate them with mini Oreos
  10. Freeze for at least 3 hours or overnight

Strawberry Vanilla Cream Tart

Strawberries ! One of our family favourites !  My son can “chomp down” (that’s his words) a bowl in no time! They taste good, look pretty and you can use them in many ways.  I always wish I have a bigger yard and more time so I can grow my own. Luckily, we have a few local farms close to our neighbourhood, and we can get fresh strawberries very easily.  I love the U-picks that they have in the early summer too ! It’s a great activity for both adults and kids.   

Makes about three to four 4-inch tarts

For the tart shell

  • 120 g cold unsalted butter (cut into small pieces)
  • 75 g granulated sugar
  • 1 egg yolk
  • 180 g cake and pastry flour, sifted

For the fillings

    • 450 g (about 1 lb) fresh strawberries
    • 500 mL milk (preferably full fat, but 2 % works too)
    • 2 egg yolks
    • 75 g granulated sugar
    • 40 g cornstarch
    • 1/2 to 1 vanilla bean
    • icing sugar for dusting

To make the tart shells

  1. Mix together cold butter and sugar using a wooden spoon until no more lumps
  2. Add egg yolk, mix until blended
  3. Add flour all at once, mix with the wooden spoon, then transfer onto a table or counter and gently knead dough together (just work until ingredients are mixed in)
  4. Wrap with plastic wrap, refrigerate for at least 2-3 hours or overnight
  5. When ready to bake, preheat oven to 350ºF
  6. Knead dough until pliable
  7. Roll dough out to about 1/8 inch in thickness on a floured surface, dock with a fork
  8. Place inside slightly greased tart molds, trim off excess dough (dough scraps can be re-roll, but may crack, so only re-roll once or twice)
  9. Bake for about 12 minutes till golden, let cool

To make the vanilla cream fillings

    1. Whisk egg yolks, sugar, cornstarch and 1/2 cup of milk together until no more lumps
    2. Cut vanilla bean lengthwise and scrape seeds out of bean pod, do not throw away bean pod
    3. In a pot, heat remaining milk, vanilla beans and the pod over medium heat until just boiled
    4. Whisk 1/2 of boiled milk slowly into egg mixture to temper, then pour everything back into the pot
    5. Heat until just starting to bubble and thicken, whisking constantly
    6. Remove from heat, take out vanilla pod and let cool

When ready to serve, pipe or spoon vanilla cream into baked tart shell, top with fresh strawberries and icing sugar

Original tart shell and vanilla cream recipe by Chef Marco Ropke at the Vancouver Pastry Training Centre 

img_20160525_172119.jpg

This is my first ever collaborative post, how exciting ! The Canadian Food Creatives collaboration are featuring fresh strawberries this month ! Be sure to check out the links below for other great recipes. They can also be found on social media using the hashtag #CDNFoodCreatives . Many thanks to Amanda Saxby at The Cinnamon Scrolls for hosting.

fb_img_1464467144697.jpg

Green Tea (Matcha) Ice Cream

I wanted to make green tea ice cream ever since I got the ice cream machine.  Besides, chocolate and mango, this is my favourite.  I made it without using egg yolks, and it came out very tasty and creamy!  Actually making the ice cream was easy, taking pictures of it was not. I have to plan ahead, set up my props and take it quickly before it melts!  I found some origami papers the other day in my daughter’s craft box, so I folded some paper cranes and use them as props. It’s actually quite fun to use what you have and make props out of it. Hope you like the picture and the ice cream ! 

Makes about 3 – 4 cups 

  • 1+1/2 cups whole milk
  • 1+1/2 cups cold whipping cream
  • 1/2 cup granulated sugar
  • 2 tablespoons matcha powder
  • 1 teaspoon pure vanilla extract
  1. In a pot, heat milk and sugar over medium heat until sugar dissolved
  2. Whisk in matcha powder
  3. Heat until just starting to bubble, turn heat off, stir in vanilla
  4. Strain mixture through a fine mesh into a bowl
  5. Let sit in an ice bath
  6. Stir in cold whipping cream
  7. Let cool completely, then refrigerate for 2-3 hours or overnight
  8. Pour into ice cream machine and churn according to manufacturer’s instructions

Tools I used and you may like 

41jgxv8adpl._sy400_.jpg

Cuisinart ICE-21C Frozen Yogurt, Ice Cream and Sorbet Maker

You can get this ice cream machine through the Amazon website by clicking the above link.  I will receive a small compensation if you purchase the item.