Tag Archives: baking

Cherry Puff Tarts

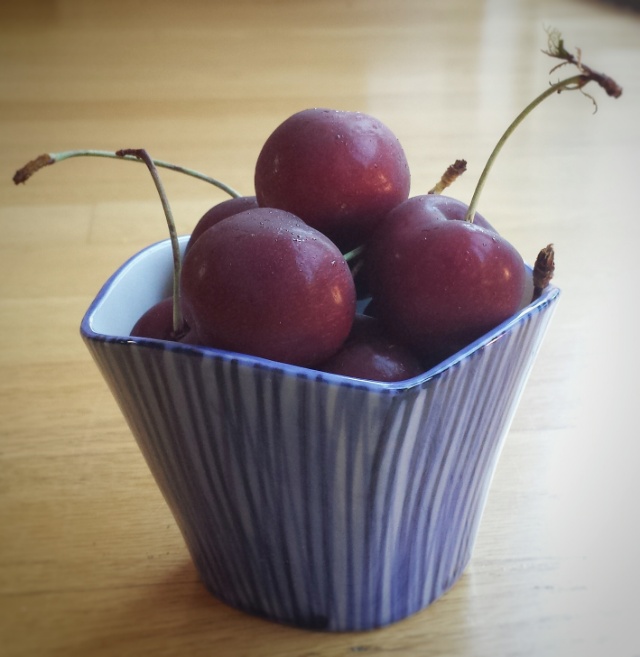
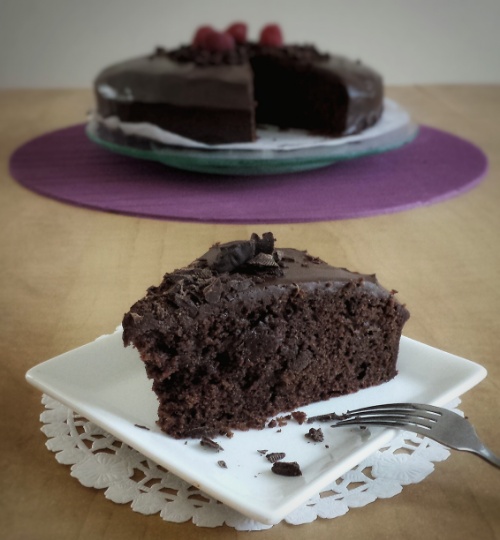
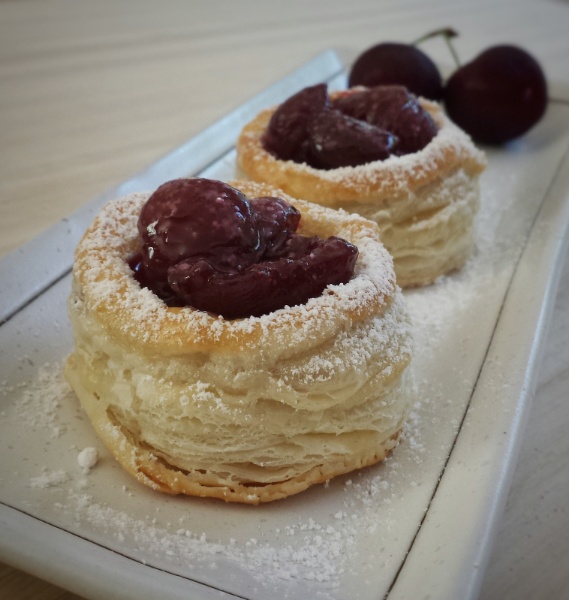
Cherry is another fruit that we love to eat in the summer. My parents used to have 2 giant cherries at their old house. I still remember my brother and I would pick as much as we could before the birds get to them. There would be so much cherries that we would fill almost every single basket and bucket in the house….Oh, how I miss those good times.  My folks have moved and we no longer have our own cherry trees, but I can make these yummy tarts for them instead !
I always keep a box of puff pastry in the freezer. It’s really handy if you need to make something quick, both sweet and savory. I yet to try making my own puff pastry…. Well, it’s on my list! 🙂

Makes about 10-12 tarts

  • 200 g pitted fresh cherries
  • 3 tablespoons granulated sugar
  • 1/2 tablespoon lemon juice
  • 1 box puff pastry (about 400 g)
  • 1 egg, lightly beaten
  • vanilla sugar or granulated sugar for sprinkling
  • Icing sugar for dusting
  1. To prepare the fillings, heat cherries, 3 tablespoons of sugar and lemon juice in a non-stick pot over medium heat
  2. Turn heat down to low when liquid starts to bubble
  3. Cook until cherries softened, set aside to cool
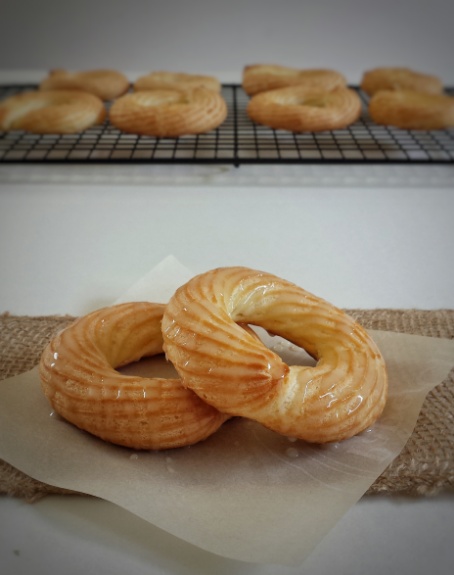
  4. To make the puff pastry, preheat oven to 350°F
  5. Roll out pastry on a floured surface to about 1/8 inch in thickness
  6. Cut with a round cookie cutter into circles, about 2-3 inches in diameter
  7. Place half the number of circles on cookie sheets lined with parchment paper
  8. Dork with a fork, brush with egg wash and sprinkle with granulated or vanilla sugar 
  9. Cut out the centres of the other circles using a smaller cookie cutter, (or a bottle cap would work too) to form rings
  10. Place rings on top of the circles
  11. Brush ring tops with egg wash and sprinkle with sugar (You can collect all the dough scrapes and re-roll, but only do it once, otherwise it will lose its puffiness)
  12. Bake for about 15 minutes until golden, let cool
  13. Spoon in cherry fillings, dust with icing sugar and serve immediately

img_20160628_180422.jpg

Healthy Banana Bread

Besides a mom and a home baker, I am also a pharmacist, so whenever I bake or make desserts, I would have a dilemma in my mind. Shouldn’t I be promoting healthy eating as a health professional? But I really like to make and eat sweets ? To somewhat justify myself, I try to create more recipes that use less sugar and fat, and incorporate healthier ingredients.  It took me a few tries to make this healthy yet very delicious banana bread. It contains no butter and no refined sugar. It is moist but not too dense, which is what my family likes. You can use bread flour if you prefer a denser texture. I also added some ground flax seeds for your extra dose of fibre and omega fatty acids!

Makes one 9×5 inch loaf

  • 2 cups all-purpose flour
  • 1 teaspoon baking soda
  • 1/4 teaspoon salt
  • 1/4 cup ground flax seeds
  • 3-4 ripe bananas, meshed (about 1+1/2 cups)
  • 2 eggs, lightly beaten
  • 120 g coconut oil, melted
  • 1/4 cup organic agave syrup
  • 100 g plain Greek yoghurt
  • 1 teaspoon pure vanilla extract
  1. Preheat oven to 350ºF
  2. Sift together flour, baking soda and salt into a large mixing bowl
  3. Mix in ground flax seeds
  4. Add other wet ingredients, mix until blended
  5. Pour into a lightly greased and floured 9×5 inch loaf pan
  6. Bake for about 50-60 minutes

Strawberry Vanilla Cream Tart

Strawberries ! One of our family favourites !  My son can “chomp down” (that’s his words) a bowl in no time! They taste good, look pretty and you can use them in many ways.  I always wish I have a bigger yard and more time so I can grow my own. Luckily, we have a few local farms close to our neighbourhood, and we can get fresh strawberries very easily.  I love the U-picks that they have in the early summer too ! It’s a great activity for both adults and kids.   

Makes about three to four 4-inch tarts

For the tart shell

  • 120 g cold unsalted butter (cut into small pieces)
  • 75 g granulated sugar
  • 1 egg yolk
  • 180 g cake and pastry flour, sifted

For the fillings

    • 450 g (about 1 lb) fresh strawberries
    • 500 mL milk (preferably full fat, but 2 % works too)
    • 2 egg yolks
    • 75 g granulated sugar
    • 40 g cornstarch
    • 1/2 to 1 vanilla bean
    • icing sugar for dusting

To make the tart shells

  1. Mix together cold butter and sugar using a wooden spoon until no more lumps
  2. Add egg yolk, mix until blended
  3. Add flour all at once, mix with the wooden spoon, then transfer onto a table or counter and gently knead dough together (just work until ingredients are mixed in)
  4. Wrap with plastic wrap, refrigerate for at least 2-3 hours or overnight
  5. When ready to bake, preheat oven to 350ºF
  6. Knead dough until pliable
  7. Roll dough out to about 1/8 inch in thickness on a floured surface, dock with a fork
  8. Place inside slightly greased tart molds, trim off excess dough (dough scraps can be re-roll, but may crack, so only re-roll once or twice)
  9. Bake for about 12 minutes till golden, let cool

To make the vanilla cream fillings

    1. Whisk egg yolks, sugar, cornstarch and 1/2 cup of milk together until no more lumps
    2. Cut vanilla bean lengthwise and scrape seeds out of bean pod, do not throw away bean pod
    3. In a pot, heat remaining milk, vanilla beans and the pod over medium heat until just boiled
    4. Whisk 1/2 of boiled milk slowly into egg mixture to temper, then pour everything back into the pot
    5. Heat until just starting to bubble and thicken, whisking constantly
    6. Remove from heat, take out vanilla pod and let cool

When ready to serve, pipe or spoon vanilla cream into baked tart shell, top with fresh strawberries and icing sugar

Original tart shell and vanilla cream recipe by Chef Marco Ropke at the Vancouver Pastry Training Centre 

img_20160525_172119.jpg

This is my first ever collaborative post, how exciting ! The Canadian Food Creatives collaboration are featuring fresh strawberries this month ! Be sure to check out the links below for other great recipes. They can also be found on social media using the hashtag #CDNFoodCreatives . Many thanks to Amanda Saxby at The Cinnamon Scrolls for hosting.

fb_img_1464467144697.jpg

Baked Honey Crullers

We love doughnuts! And my daughter has been asking me to make some. I tried making the fried ones a few times, but failed. So, I thought I would try some other methods. Upon some “research”, I discovered that crullers are made from choux paste…..Wait a minute…… I have a choux paste recipe from my pastry course last year! So here it is, my Baked Honey Crullers! They have a light and airy texture. You can pipe them any shapes and sizes you want, and I had so much fun making them!

Makes about 20 crullers

For the choux paste

  • 200 mL water
  • 90 g unsalted butter
  • 1/4 teaspoon salt
  • 2 tablespoons granulated or vanilla sugar 
  • 2/3 cup all-purpose flour
  • 3 eggs
  • zest of 1/2 lemon (optional)

For the honey glaze

  • 3 tablespoons honey
  • 1 cup icing sugar
  • 3-4 tablespoons milk
  1. To prepare choux paste, heat together water, butter, salt and sugar in a pot over medium heat until just starting to boil
  2. Turn heat down to low, add flour all at once
  3. Stirring constantly, cook until a thin film of paste formed at the bottom of the pot, about 5 minutes
  4. Transfer paste to a heat-proofed mixing bowl and cool paste down
  5. Meanwhile, preheat oven to 375ºF and prepare piping bag with desired piping tip
  6. Add eggs to paste, one at a time and mix well after each addition
  7. Add lemon zest
  8. Transfer to piping bag and pipe into rings on baking sheets lined with parchment paper, about 3 inches in diameter
  9. Bake at 375ºF for about 12-14 minutes until starting to brown, then turn heat down to 325°F and bake for another 6-8 minutes until golden
  10. Let cool first on baking sheets, then completely on rack
  11. Prepare glaze by whisking together honey, icing sugar and milk to desired consistency
  12. Drizzle over crullers or dip crullers into glaze (Best to serve immediately)

Original recipe of choux paste by Chef Marco Ropke at the Vancouver Pastry Training Centre

Chocolate Zucchini Cake with Chocolate Ganache Glaze

My daughter said “zucchini is my worst enemy ! ” But with this yummy cake, I have successful converted her enemy into her new friend ! Yes, zucchini is definitely chocolate cake’s best friend. It makes the cake moist and soft. And you can eat your vegetable right inside a dessert !

Makes one 9 inch round cake

For the cake

  • 200 g grated zucchini
  • 2 ounces semi-sweet chocolate, finely chopped
  • 1+3/4 cups cake and pastry flour
  • 1/4 cup unsweetened cocoa powder
  • 1 teaspoon baking powder
  • 1/2 teaspoon baking soda
  • 1/2 teaspoon salt
  • 1/2 cup vegetable oil
  • 3/4 cup demerara or brown sugar
  • 1/4 cup granulated sugar
  • 2 eggs
  • 1/4 cup milk
  • 1 teaspoon lemon juice
  • 1 teaspoon pure vanilla extract

For the ganache

  • 1 cup whipping or heavy cream
  • 8 ounces semi-sweet chocolate, finely chopped

img_20160406_222927.jpg

  1. Preheat oven to 350ºF
  2. Lightly grease 9 inch spring-form cake pan with oil, then dust with flour
  3. Sift together flour, cocoa powder, baking powder, baking soda and salt, set aside
  4. Add lemon juice into milk, let sit for a few minutes
  5. Using an electric mixer with the paddle attachment, beat oil and sugars at medium speed until blended
  6. Mix in eggs, milk with lemon juice and vanilla
  7. Add flour mixture in 2-3 portions, scraping sides and bottom of mixing bowl
  8. Add grated zucchini, mix until just blended
  9. Stir in 2 ounces of chopped chocolate 
  10. Pour batter into pan and bake for about 30 minutes (toothpick should come out clear when inserted into middle of cake)
  11. Meanwhile, prepare the ganache by heating cream in a non-stick pot over medium heat
  12. Turn heat off when cream just starting to bubble
  13. Pour over chopped chocolate, let sit for 1 minute
  14. Stir until smooth, let cool at room temperature
  15. When cake is ready, cool in pan for about 10 minutes, then completely on rack
  16. Cover cake with chocolate ganache, smooth with a spatula
  17. Let chocolate set, keep in refrigerator

img_20160408_225656.jpg

Tools I used and you may like

41rqjlmpovl._sy400_.jpg

KitchenAid K45SSWH Classic 4.5-Quart Bowl Stand Mixer, White

31fyrsctu1l._sy400_.jpg

Wilton 409-7716 Angled Icing Spatula, 13-Inch, Black

You can get these tools through the Amazon website by clicking the above link. I will receive a small compensation if you purchase the item. 

Simple Shortbread Cookies

My mom, myself and my daughter all love sweets! Since Mother’s Day is coming up, I thought I would make something that all of us would enjoy. These shortbread cookies are sweet and buttery ! Making them is, literally, as easy as 1,2,3 ! All you need to remember is, 1 part of sugar, 2 parts of butter and 3 parts of flour! I also added a touch of lemon zest.
Have a Happy Mother’s Day ! I think moms are the most wonderful people into the world….of course that includes myself !……. 🙂   And I have to thank my daughter for her wonderful drawing !

Makes about 30 cookies

  • 1/2 cup very fine sugar or vanilla sugar plus more for sprinkling
  • 1 cup unsalted butter, at room temperature
  • 1+1/2 cups cake and pastry flour, sifted
  • Zest of half a lemon (optional)
  1. Using an electric mixer with the paddle attachment, cream butter and sugar together
  2. Add lemon zest
  3. Add flour in 2 portions, mix until dough starting to form
  4. Pat dough together with hands
  5. Cut dough into 2 parts, gently shape each dough into logs, about 1+1/2 inch in diameter
  6. Wrap with plastic wrap (Believe it or not, I wrapped the dough and put them inside paper towel rolls to shape! )
  7. Refrigerate for at least 3 hours or overnight
  8. When ready to bake, preheat oven to 300°F
  9. Cut dough into discs, about 1/4 – 3/8 inch in thickness (They do flattened slightly during baking)
  10. Place on cookie sheets lined with parchment paper, about 2 inches apart
  11. Sprinkle top with more sugar
  12. Bake for 18 -20 minutes until edges just golden (You don’t want them too brown)
  13. Cool on baking sheets for 10 minutes, then completely on rack

img_20160505_173658.jpg

Butterscotch Coconut Cookies

I was cleaning up my pantry today. I found many bags and containers of leftover, soon expired ingredients. So I threw most of them together and made some granola bars. Still left with some butterscotch chips and shredded coconut, I decided to put the two together. I was never a big fan of butterscotch, but these cookies came out soft, sweet and chewy, they are super yummy ! So if you have some leftover ingredients in your pantry, don’t feel shy to experiment, you never know what you can come up with.

Makes about 40 cookies
Total time = 30 minutes

  • 2 cups all-purpose flour
  • 2 teaspoons baking powder
  • 1/2 teaspoon salt
  • 1/2 cup unsalted butter
  • 1 cup granulated sugar
  • 2 eggs
  • 1 teaspoon pure vanilla extract
  • 1/4 cup canned coconut milk
  • 1/2 cup unsweetened shredded coconut
  • 1/2 cup butterscotch chips
  1. Preheat oven to 350ºF
  2. Sift together flour, baking powder and salt, set aside
  3. Using an electric mixer with the paddle attachment, cream butter and sugar until fluffy
  4. Add eggs, vanilla and coconut milk, mix until blended, scraping sides and bottom of mixing bowl
  5. Stir in shredded coconut and butterscotch chips
  6. Drop about 1 tablespoon each of dough onto cookie sheets lined with parchment paper, spacing 2 inches apart
  7. Bake for about 12 minutes until edges are golden

img_20160419_102454.jpg


My Favourite Cook Books – The Baking Handbooks

These are great baking books for both beginners and more experienced bakers. They have all your bases covered.  From muffins to cakes, from breads, pizzas to French pastries,  you can for sure find something you like.

1. Robin Hood Home Baking: From Cookies and Cakes, to Pizza, Pot Pies and More
– Jill Snider

511b4n2sshl._sl1500_.jpg

This is one of my very first reference.  It may look a little outdated,  but I still like a lot of the recipes in this book. They are simple and very easy to follow. There are also specific tips on each recipe which are helpful for beginners.

2. Martha Stewart’s Baking Handbook
– Martha Stewart

51igx4qmxol._sy400_-1.jpg

This is a handbook that really has everything in it. From basic recipes like muffins, pies and cookies to more advanced projects like croissants, layered cakes, even a wedding cake ! It also has very nice photos, it’s a joy to read even if you are not baking.

3. Duff Bakes: Think and Bake Like a Pro at Home
– Duff Goldman and Sara Gonzales

516jjae6iul._sl1500_.jpg

Duff Goldman is well-known for his amazing decorated cakes. This book though, is not about cake decorating, it has many yummy goodies that we can make at home. My favourite parts, however, are the chapters about equipment, ingredients and techniques. They have very good information, and with a little Duff’s humour, I just really enjoy reading them.

You can find these great books on the Amazon website by clicking on the title of the books. I will receive a small compensation if you purchase the item. 

My Favourite Cookbooks – The Good Looking Ones

Starting this month, I will be sharing some of my favourite cookbooks on the blog.
Whenever I go to a book store or library, I always go straight to the Cooking section. Of course I am looking for ideas of what to make all the time, but sometimes, I just love to look at all the gorgeous food photos ! People say most of us eat with our eyes first and I couldn’t agree more. So this week, I have picked a few books that show us some amazing ideas and photos on cake or dessert decorating. 

1. 1,000 Ideas for Decorating Cupcakes, Cookies & Cakes
– Sandra Salomony & Gina M. Brown

61kqu5unszl._sy400_.jpg
This is my number one favourite ! It showcases many beautiful cakes and cookies around the world for every occasion ! From Christmas, Valentine’s to Halloween, from weddings to kids’ birthdays. I have read this book many many times and I am still in love with it !

2. Sweet: Our Best Cupcakes, Cookies, Candy, and More
– Editors of Food Network Magazine

61iuwpxwuol._sy400_.jpg

This one is my daughter’s favourite ! We both get amazed by the cakes that were dressed in disguised ! A hamburger, a gigantic candied apple, even spaghetti and meat balls ! This book also has many other recipes, including cookies, pies, cakes, bars, etc. It’s a great book for both beginners and more experienced bakers.

3. Cake Pops: Tips, Tricks, and Recipes for more than 40 Irresistible Mini Treats
– Bakerella

51sqmx0kol._sy400_.jpg.jpeg

When I was first started baking, cake pop is one of the challenges I wasn’t sure if I could do. But it is actually quite simple. And you can be really creative with it. This book has many cute creations that you can easily follow. You can just use it as a basic reference and let your imagination be your guide.

You can find these great books on the Amazon website by clicking on the title of the books. I will receive a small compensation if you purchase the item. 


Carrot Cupcakes with Marshmallow Frosting

These cupcakes are a delightful treat for kids at Easter ! The carrot cupcakes are soft and moist. The marshmallow frosting is fluffy and shiny but actually contains no real marshmallows ! Overall, they contain less fat and are lighter than a regular carrot cake with cream cheese frosting.  Hey ! I think I just saw an Easter Bunny taking one of my cupcakes !

Makes about 15 cupcakes
Total time = 90 minutes

For the cupcakes

  • 200 g grated carrots
  • 1+1/2 cups cake and pastry flour
  • 1 teaspoon baking powder
  • 1/2 teaspoon baking soda
  • 1/2 teaspoon ground cinnamon
  • 1/4 teaspoon salt
  • 1/2 cup unsalted butter
  • 3/4 granulated sugar
  • 2 eggs
  • 6 tablespoons milk
  • 2 teaspoons lemon juice
  • 1 teaspoon pure vanilla extract
  1. Preheat oven to 350ºF
  2. Sift together flour, baking powder, baking soda, salt and cinnamon, set aside
  3. Using an electric mixer with the paddle attachment, cream butter and sugar until light and fluffy
  4. Mix in eggs,milk, lemon juice and vanilla
  5. Add flour mixture in 2 portions, mix until blended
  6. Add grated carrots
  7. Pour batter into lightly greased paper muffin cups
  8. Bake in muffin tins for about 20 minutes
  9. Cool in tins for about 5 minutes, then completely on rack before frosting

For the marshmallow frosting

  • 4 egg whites
  • 1 cup granulated sugar
  • 1/4 teaspoon cream of tartar
  • 1 teaspoon pure vanilla extract
  1. Put egg whites, sugar and cream of tartar in a heat-proof mixing bowl, and place on top of a pan of simmering water
  2. Whisk constantly until sugar is dissolved and egg whites are warm (3-4 minutes)
  3. Remove bowl from heat, continue whisking with an electric mixer until stiff peak is formed (start slow, then increase speed to high)
  4. Add in vanilla
  5. Best to use immediately, may refrigerate for 2 days

Original marshmallow frosting recipe is by Martha Stewart at marthastewart.com