Tag Archives: desserts

Pumpkin Cheesecake with Maple Caramel Sauce 

Fall

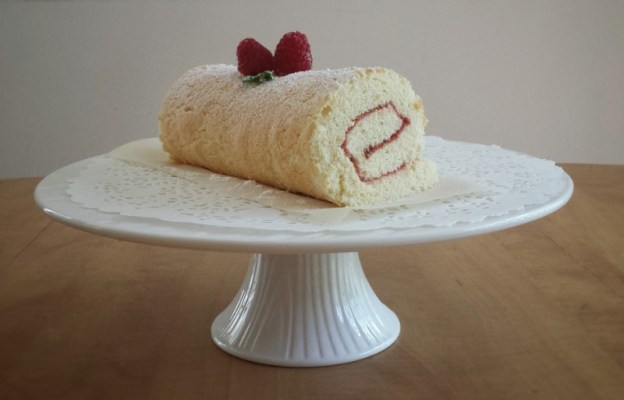
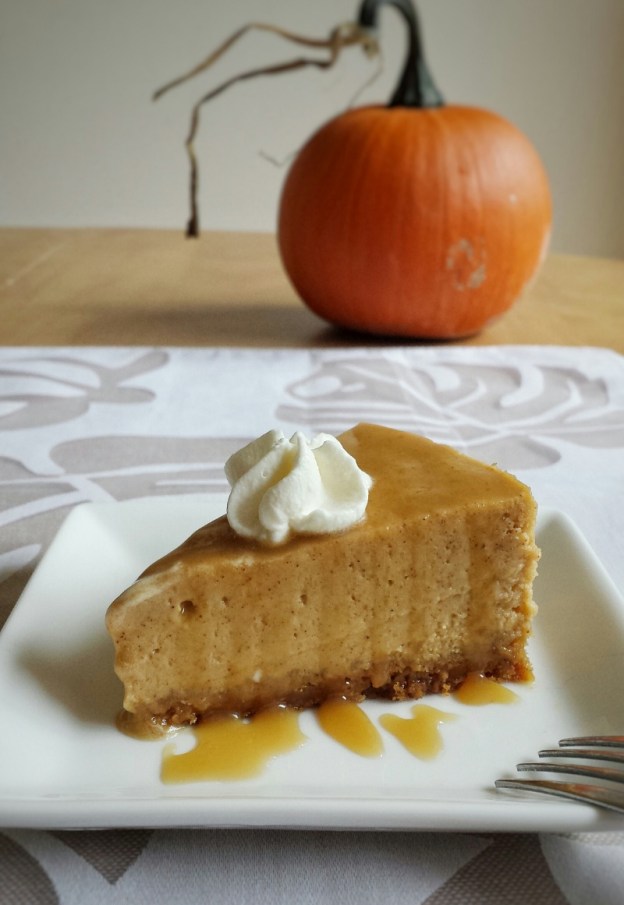
October is a busy baking month for me. Thanksgiving, my daughter’s birthday, bake sale, Halloween…. all of them are happening this month. I am not complaining, in fact, I am enjoying it . Apples, pumpkins, corn, the spices, the Halloween decorations ….the aroma, the colours, the fun, I love them all ! For this Thanksgiving, I made a pumpkin cheesecake topped with maple caramel sauce. It is crunchy, creamy, sweet and a little spicy…..just delicious ! And it’s fairly easy to make ! It’s a great alternative to pumpkin pie.

Makes one 6-inch cake

For the crust

  • 120 g ginger snaps
  • 3 tablespoons unsalted butter, melted

For the fillings

  • 250 g soft cream cheese
  • 120 g granulated sugar
  • 1 tablespoon all-purpose flour
  • 1 teaspoon ground cinnamon
  • 1 teaspoon ground ginger
  • Pinch of ground nutmeg
  • Pinch of ground cloves
  • 1/4 teaspoon salt
  • 120 g pumpkin puree (homemade or canned)
  • 2 eggs
  • 1 teaspoon pure vanilla extract

For the maple caramel

  • 120 ml maple syrup
  • 15 g unsalted butter
  • 60 mL heavy or whipping cream

Pumpkin Cheesecake

To prepare the crust

  1. Crush ginger cookies into fine crumbs
  2. Mix crumbs with melted butter, press firmly into bottom of a spring-form pan or a cake ring (if you use a cake ring like I did, you have to wrap the bottom with parchment paper as it is bottomless)
  3. Bake for about 10 minutes, let cool

To prepare the cheesecake

  1. When crust is cooled, wrap bottom of cake pan with 2 layers of aluminium foil and place on a rimmed baking tray
  2. Turn oven down to 325ºF
  3. Using an electric mixer with the paddle attachment, beat cream cheese and sugar until smooth
  4. Add flour, spices, salt,pumpkin puree and vanilla
  5. Add eggs, one at a time, mix until just blended, do not overmix
  6. Pour batter on top of crust and place the baking tray into the oven
  7. Pour about one inch of hot water into baking tray and bake for about 40-45 minutes (the top should be a little jiggly, do not overbake)
  8. Turn oven off, leave cheesecake inside oven with door ajar for another hour to cool gradually
  9. Take cake out, let cool at room temperature completely, then refrigerate for at least 3-4 hours

To prepare maple caramel

  1. Melt butter in a non-stick pan over medium heat
  2. Add maple syrup, when boil, turn heat down and simmer for about 3 minutes until thicken
  3. Add cream, stirring occasionally and continue to simmer until thick

When cheesecake is set, serve with maple caramel and whipped cream

Pumpkin Cheesecake

Halloween Cake Pops

My daughter borrowed a book about Halloween treats from the library last week, there were so many great ideas we want to try. After looking through the book and “researching” on the internet, we decided to make cake pops !  So we went to the store and bought all we need…..cake pop sticks, chocolate, coating wafers, licorice sticks, sprinkles…..and we also picked up some sour candies, dried fruits, peppermint paddies….. oops, I guess we got a little too much ! Oh well, we had a lot of fun shopping and making them, that’s all that matters, right?! The coating wafers tend to be very sweet, so I used less sugar for the cake and dark chocolate for the frosting. They turned out really tasty and fudgy like brownies. My son, who doesn’t have a sweet tooth, said these cake pops are “boss” !

For the cake

  • 135 g self-rising flour (about 3/4 cup)
  • 25 g unsweetened cocoa powder
  • 60 g unsalted butter
  • 60 g granulated sugar
  • 1 egg
  • 1/2  teaspoon pure vanilla extract
  • 90 mL boiling water

For the chocolate frosting 

  • 60 g unsalted butter
  • 100 g icing sugar
  • 1/2 teaspoon pure vanilla extract
  • 60 g dark chocolate (70%)

For the coating

  • Chocolate or candy moulding wafers (You will need about 300 g of wafers to coat 6 cake pops)
  • Sprinkles, licorice, and or other decorations of choice 

Makes about 20 cake pops 

To make the cake

  1. Preheat oven to 350ºF
  2. Sift together self-rising flour and cocoa powder
  3. Using an electric mixer with the paddle attachment, cream butter and sugar until fluffy
  4. Add egg and vanilla
  5. Add flour mixture in 2 parts, mix until blended
  6. Gradually stir in boiling water, batter will be slightly runny
  7. Bake in a 9 inch x 5 inch loaf pan, lined with parchment paper, for about 20 minutes 
  8. Let cake cool completely

To make the frosting

  1. Melt dark chocolate in a bowl over a pan of simmering water, let cool slightly
  2. Using an electric mixer with paddle attachment, cream butter and icing sugar
  3. Add in vanilla and melted chocolate, mix until smooth

To prepare the cake balls

  1. When the cake is completely cooled, break the cake into fine crumbs with hands
  2. Gradually add frosting, a couple of tablespoons at a time, mix until you can roll mixture into balls
  3. Roll cake mixture into small balls, place on a cookie sheet lined with parchment paper, cover with plastic wrap and put in fridge for at least about 30 minutes

Halloween Cake Pops


 To assemble the cake pops

  1. Melt candy melts or chocolate in a bowl over a pot of simmering water 
  2. Dip cake pop sticks into coating about 1 inch deep
  3. Insert coated sticks into cake balls 
  4. Dip into coating, covering the whole cake pop (since it’s a chocolate cake, you may need to do 2 coatings if using white coating)
  5. Gently tap off excess coating
  6. Decorate while coating is still wet, then let dry (alternatively, you can draw on them when they are dry using edible markers)

Cinnamon Bites

When I hear the words “comfort food”, I would somehow think of cinnamon buns ! Warm, sweet bread with ooey, gooey cream cheese icing……yum ! To no surprise, I found that they are originated from Sweden. (that’s why they sell them at Ikea?!) In Swedish they are called “kanelbulle”  which literally means “cinnamon buns” and October 4 is “Kanelbullens Dag” ,Cinnamon Roll Day. Wow, Swedish people must love their cinnamon buns !  I wish I can be there to taste the authentic flavour. Well, for now, I will comfort myself with these little cinnamon bites !  (I made them in bite-size pieces cause I often found the rolls too big) 

For the dough

    • 540 g (3 cups) bread flour
    • 1 cup warm whole milk
    • 1 teaspoon granulated sugar
    • 4 g instant yeast
    • 1/2 teaspoon salt
    • 1 egg
    • 2 tablespoons vegetable oil

For the coating

  • 100 g unsalted butter, melted
  • 1/2 cup granulated sugar
  • 2 tablespoons ground cinnamon

For the cream cheese icing

  • 180 g soft cream cheese
  • 6 tablespoons icing sugar
  • 1 teaspoon pure vanilla extract
  1. Dissolve sugar in warm milk, add yeast and let sit for a few minutes until frothy
  2. In a large mixing bowl, mix together flour, salt, egg, vegetable oil and yeast mixture
  3. Stir with hand and mix until dough starting to form
  4. Transfer to a lightly floured surface
  5. Knead dough until smooth and stretchy
  6. Wrap with plastic wrap and let rise for about 60 minutes until double in size 
  7. Preheat oven to 350ºF
  8. When dough is ready, punch air out, cut dough into 4 parts
  9. Roll each part into a long log, about 12 inches long
  10. Cut each log into about 12 small pieces
  11. Grease two 8 inch round flat pans or pans of your choice
  12. Mix cinnamon and 1/2 cup of sugar together
  13. Dip each small piece into melted butter, then coat with cinnamon sugar
  14. Place in pans, about 24 pieces each
  15. Bake for about 20 minutes
  16. Meanwhile, prepare icing by beating cream cheese, icing sugar and vanilla together until blended
  17. When bread bites are ready, serve warm with cream cheese frosting

Cinnamon Bites


No Bake Nutella Bites 

Can’t believe September is here already ! Kids are back to school, routines are slowly getting back to normal, and I have to start making lunches and snacks. I made these little energy bites as an after school snack. They are like mini granola bars and are super easy to make. Keep them in the fridge and the kids can just grab them when they want. They come in handy before hockey practices too ! There can be many variations to the recipe.  I used Nutella, but you can also use peanut butter, cookie butter or sunflower butter. You can also choose other nuts, seeds and dried fruits. 

Makes about 25-30 

  • 1 cup quick oats
  • 1 cup rice crispy cereal 
  • 2 tablespoons chia seeds 
  • 2 tablespoons ground flax seed 
  • 1/4 cup unsweetened shredded coconut 
  • 1/2 cup Nutella spread 
  • 3 tablespoons melted coconut oil 
  • 2 tablespoons honey 
  1. Mix all dry ingredients together 
  2. Add Nutella, coconut oil and honey, mix until blended 
  3. With the help of a melon scooper or spoon, roll mixtures into small balls
  4. Refrigerate until firm
  5. Keep in refrigerator 

No Bake Nutella Bites

Pineapple Coconut Cake

My family took a vacation to Hawaii last week. Both kids and adults had a lot of fun. We swam, snorkeled, paddled even parasailed ! To be honest, parasailing at 300 feet high was a little scary, but it was really fun ! My daughter had absolutely no fear and she just loved it ! We enjoyed the food too. There were garlic shrimps, fruits, desserts of course. Their Japanese food was also really good. Food is always the best part of my vacation ! To reminisce some of these wonderful flavours, I baked this Pineapple and Coconut Cake yesterday. I used canned pineapple as I was too lazy to chop one up, you can definitely use a fresh one.  I guess I am still in holiday mode !  🙂  

Makes one loaf (I used a 4.5″ x 8.5″ loaf pan)  

For the cake

  • 225 g cake and pastry flour 
  • 1 +1/2 teaspoon baking powder 
  • 1/2 teaspoon baking soda 
  • 1/4 teaspoon salt
  • 120 g unsalted butter, softened 
  • 120 g cup granulated sugar  
  • 2 eggs
  • 100 g canned pineapple tidbits 
  • 25 g shredded coconut 
  • 60 mL canned coconut milk 
  • 90 mL pineapple juice 
  • 1 teaspoon pure vanilla extract 

For the glaze

  • 150 icing sugar 
  • 45mL pineapple juice 
  • 1 tablespoon shredded coconut 
  1. Preheat oven to 350ºF
  2. Drain pineapples well, pat dry with paper towel and save the juice 
  3. To make the cake, sift together flour,baking power, baking soda and salt, set aside 
  4. Using an electric mixer, with the paddle attachment, cream together butter and sugar until fluffy 
  5. Add eggs, vanilla and coconut milk 
  6. Add half of the flour mixture and pineapple juice, mix until blended
  7. Add remaining of the flour mixture
  8. Fold in pineapples and shredded coconut 
  9. Pour batter into a lightly greased and floured loaf pan
  10. Bake for about 45 minutes
  11. To make the glaze, whisk together icing sugar, pineapple juice and shredded coconut
  12. When the cake is cooled, drizzle glaze on top 

Pineapple Coconut Cake


Caramelized Figs with Yoghurt and Granola 

My uncle has a green fig tree in his backyard. Every summer, he would give us a generous portion of his harvest. We like to eat them fresh, but I also like making them into desserts. This recipe is fairly simple and is a good way to use up figs that are starting to get too ripe.  You can serve them with yoghurt and honey like I did or eat them with ice cream, even in a salad ! I made some granola the other day, so I added them for extra crunchiness. 

Makes about 4-6 servings

  • 6 fresh figs
  • 15 g unsalted butter 
  • 30 g demerara or brown sugar 
  • 300 g plain Greek yoghurt 
  • 60 mL honey 
  • 1 cup homemade granola 
  1. Cut figs in halves, coat with brown sugar 
  2. Melt butter in a non-stick pan over medium heat 
  3. Add figs, cut sides down
  4. Cook for about 3-4 minutes (be careful not to burn the sugar)
  5. Flip figs over, remove from heat 
  6. Serve warm with yoghurt, honey and granola

Caramelized Figs with Yoghurt and Granola


Mini Blueberry Loaves

To me, the best part of summer is the large variety of fruits we get to enjoy, berries, watermelon, peaches, etc. And blueberry is our no.1 favourite ! Every summer, we can easily go through over 30 pounds of blueberries!  There are many blueberry farms in our area, fresh, local, sweet and at a very reasonable price. How can I resist ? And as a baker, how can I not bake with them ?!  Again, I tried to use less sugar. So, I used use vanilla-flavoured almond milk instead of milk and added some honey, and was very pleased with the result !
I asked my daughter, who is my “art director” for my blog, to draw me something with blueberries and here is what she came up with ! I guess she is right, blueberries made you happy and healthy rather than blue ! 

You Aren't Blue

Makes about 6-8 mini loaves

  • 150 g fresh blueberries 
  • 270 g all-purpose flour + extra for coating blueberries 
  • 1 teaspoon baking powder 
  • 1/2 teaspoon baking soda 
  • 1/4 teaspoon salt 
  • 120 g unsalted butter, at room temperature 
  • 60 g granulated sugar 
  • 2 large eggs
  • 100 mL vanilla-flavoured almond milk 
  • 60 mL honey
  • 15 mL lemon juice 
  • 5 mL pure vanilla extract 
  • zest of half a lemon
  1. Preheat oven to 350ºF
  2. Sift together flour,baking powder, baking soda and salt, set aside 
  3. Coat blueberries with about a tablespoon of flour, set aside 
  4. Using an electric mixer with the paddle attachment, cream butter and sugar until fluffy 
  5. Add eggs, honey, almond milk, lemon juice and vanilla
  6. Add flour mixture in 2 portions, mix until blended, scraping sides and bottom of mixing bowl (it’s ok if batter is slightly lumpy)
  7. Gently fold in blueberries and lemon zest
  8. Spoon batter into slightly greased and floured mini loaf pans
  9. Bake for about 20 minutes 
  10. Cool for about 10 minutes in pans, then completely on rack 

Mini Blueberry Loaves


Roasted Beet Chocolate Brownies

I get so excited whenever I can put vegetables in my desserts. Perhaps it makes me feel healthier and less guilty?!  I picked the beautiful beets this time.  They are sweet, colourful and very nutritious.  (My batter came out purple, which is my favourite colour!  Can’t “beet” that! ) You can make them into soup, salads, desserts, even their leaves are edible !  With their sweetness, I managed to use a little less sugar.  My son doesn’t normally like sweets, but he loves my brownies. He was a little skeptical when I told him I used beets. But after he had one, he said he couldn’t even taste them!  I guess that’s a success for me! My daughter?  No problem, she eats everything I make ! 

Roasted Beet Chocolate Brownies

Makes about 16 squares 

  • 200 g beet puree (about 2 -3 medium beets)
  • 180 g all-purpose flour
  • 1 teaspoon baking powder 
  • 50 g unsweetened cocoa powder 
  • 1/2 teaspoon salt 
  • 2 eggs
  • 180 g  granulated sugar 
  • 2 teaspoons vanilla extract 
  • 120 mL melted coconut oil 
  • 180 g semi-sweet chocolate 
  1. To prepare the beet puree, preheat oven to 375°F
  2. Cut stems and roots off, leave skin on 
  3. Wrap with aluminium foil and bake for about 60 minutes until fork tender 
  4. Cool, peel skin off and puree using a blender or food processor 
  5. To make the brownies, preheat oven to 350ºF
  6. Melt chocolate in a heat proof bowl over a pot of simmering water, cool slightly 
  7. Sift together flour, baking powder, cocoa powder and salt, set aside 
  8. In a large mixing bowl , whisk together eggs and sugar until pale (you can use an electric mixer, I just hand-whisked mine)
  9. Mix in vanilla extract, coconut oil and melted chocolate
  10. Add flour mixture in 2 parts, mix until blended 
  11. Add beet puree 
  12. Bake in a square baking pan lined with parchment paper for about 30 minutes 
  13. Cool completely before cutting 

Fresh Beets

I am so glad to be part of the The Canadian Food Creatives.  This month, our topic is “Fresh from the Garden”.  Be sure to check out the links below for other great recipes. They can also be found on social media using the hashtag #CDNFoodCreatives. Many thanks to Cassie Hendry at The Crumb Kitchen for hosting.

fb_img_1468681894617.jpg

Raspberry Swiss Roll

The other night, my daughter said,”mom, I want some cake ! ” , but I didn’t have any at home and it was a little too late to bake.  So the next day, I decided to make a Swiss Roll, using some fresh raspberries that I had.  The first attempt……not so good, I put too much filling in and did a bad job in rolling, so it looked more like a Halloween cake with “blood” all over.  Lucky the cake tasted pretty good, so my daughter could at least have some tasty cake.  The second time around, much better.  I tried not to use my electric mixer and do everything by hand. It came out perfect! I actually learned that when making meringues, you can get more volume whisking it by hand. Also you don’t need to worry about overbeating, cause you sore arms will tell you to stop! I used raspberries as the filling, you can switch it up easily with other fruits, whipped cream, Nutella, even peanut butter.

Makes one log (about 6-8 slices)

For the raspberry filling

  • 350 g fresh raspberry
  • 60 g granulated sugar (adjust to your own taste)
  • 15 mL lemon juice

For the sheet cake

  • 4 eggs (separated)
  • 120 g granulated sugar (20 g is used for the meringue)
  • 75 g cake and pastry flour, sifted
  • 1 teaspoon pure vanilla extract
  • 1/4 teaspoon cream of tartar
  • icing sugar for dusting

Meringue

  1. Prepare raspberries by heating them together with sugar and lemon juice in a non-stick pot over medium heat
  2. Turn heat down to low when liquid starts to bubble
  3. Gently mash raspberries with a wooden spoon, cook until thickened
  4. Strain seeds, let cool
  5. To make the cake, preheat oven to 350ºF
  6. Lightly grease a 8″ x 10″ baking tray and line bottom with parchment paper 
  7. In a mixing bowl, beat together egg yolks and 100 g of sugar until pale
  8. Add vanilla and the flour, mix until blended
  9. In a separate bowl, whisk egg whites, and cream of tartar until frothy, then add sugar slowly, a little at a time, and whisk until medium peak is formed
  10. Gently fold meringue into batter, do not over mix 
  11. Pour into baking tray and bake for about 15 minutes until golden
  12. Let cool, but still a little warm to touch
  13. Gently invert cake and place on top of another piece of parchment paper
  14. Carefully remove top sheet of parchment and trip sides of cake
  15. Spread a very thin layer of raspberry sauce on top
  16. Gently roll cake up
  17. Dust with icing sugar

Raspberry Swiss Roll


Cherry Puff Tarts

Cherry is another fruit that we love to eat in the summer. My parents used to have 2 giant cherries at their old house. I still remember my brother and I would pick as much as we could before the birds get to them. There would be so much cherries that we would fill almost every single basket and bucket in the house….Oh, how I miss those good times.  My folks have moved and we no longer have our own cherry trees, but I can make these yummy tarts for them instead !
I always keep a box of puff pastry in the freezer. It’s really handy if you need to make something quick, both sweet and savory. I yet to try making my own puff pastry…. Well, it’s on my list! 🙂

Makes about 10-12 tarts

  • 200 g pitted fresh cherries
  • 3 tablespoons granulated sugar
  • 1/2 tablespoon lemon juice
  • 1 box puff pastry (about 400 g)
  • 1 egg, lightly beaten
  • vanilla sugar or granulated sugar for sprinkling
  • Icing sugar for dusting
  1. To prepare the fillings, heat cherries, 3 tablespoons of sugar and lemon juice in a non-stick pot over medium heat
  2. Turn heat down to low when liquid starts to bubble
  3. Cook until cherries softened, set aside to cool
  4. To make the puff pastry, preheat oven to 350°F
  5. Roll out pastry on a floured surface to about 1/8 inch in thickness
  6. Cut with a round cookie cutter into circles, about 2-3 inches in diameter
  7. Place half the number of circles on cookie sheets lined with parchment paper
  8. Dork with a fork, brush with egg wash and sprinkle with granulated or vanilla sugar 
  9. Cut out the centres of the other circles using a smaller cookie cutter, (or a bottle cap would work too) to form rings
  10. Place rings on top of the circles
  11. Brush ring tops with egg wash and sprinkle with sugar (You can collect all the dough scrapes and re-roll, but only do it once, otherwise it will lose its puffiness)
  12. Bake for about 15 minutes until golden, let cool
  13. Spoon in cherry fillings, dust with icing sugar and serve immediately

img_20160628_180422.jpg