Tag Archives: fbcigers

Orange Cranberry Scones 

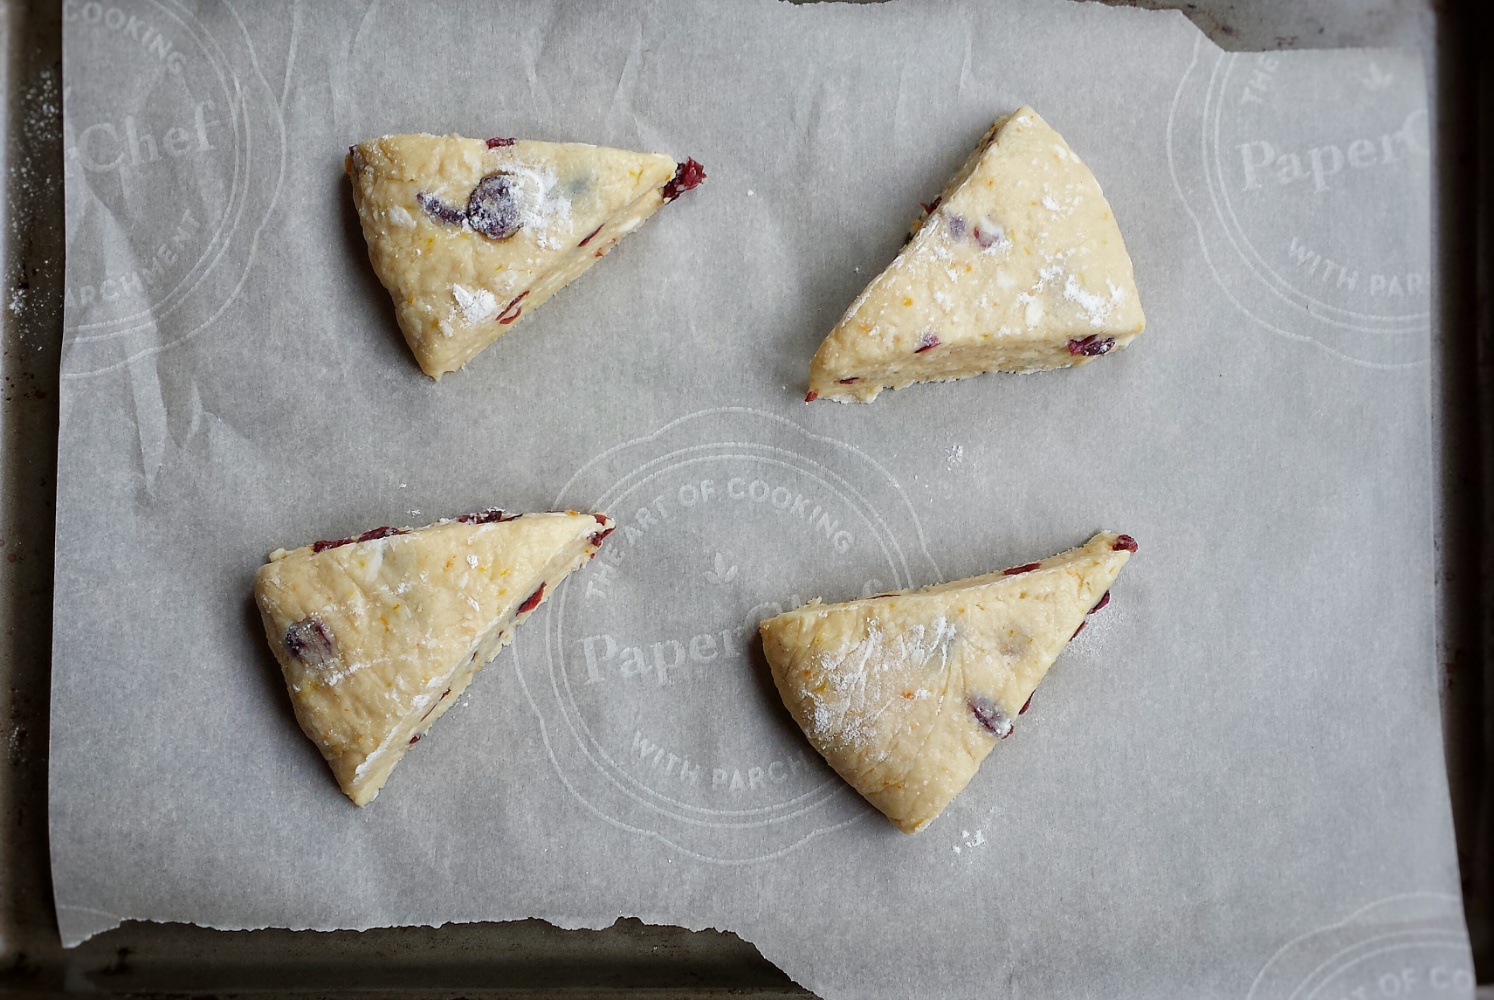
The weather here in Vancouver has been very rainy and windy lately. Often, I just feel like staying home all day. I made these scones a few days ago to warm and lift myself up.  Orange and cranberry is one of my favourites.  The two flavours just work together like magic ! With a cup of coffee….Mmmmmmmm, so comforting and delicious ! Scones are actually pretty easy to make, they freeze well too, so you can make and cut the dough ahead and bake later.  You don’t need to thaw them, just take them out when you are preheating the oven.  But keep in mind, the baking time will be slightly longer. 

Makes about 8 scones

  • 360 g all-purpose flour 
  • 1 teaspoon baking powder 
  • 1/2 teaspoon baking soda 
  • 1/4 teaspoon salt 
  • 120 g granulated sugar 
  • 120 g unsalted butter (chilled and cut into small pieces)
  • Zest of 1/2 small orange 
  • 60 g dried cranberries 
  • 1 egg
  • 1/2 cup buttermilk 
  • 30 mL orange juice 
  • 1 teaspoon pure vanilla extract 
  • 1/2 teaspoon orange extract 
  • 50 g melted dark chocolate for drizzling (optional)
  1. Preheat oven to 375ºF
  2. Sift together flour, baking powder, baking soda and salt
  3. Mix in sugar
  4. Cut in butter with a pastry cutter or rub in by hands until resembles coarse crumbs
  5. Add orange zest and cranberries 
  6. Add egg, buttermilk, orange juice and vanilla and orange extract, mix until blended
  7. Transfer dough to a floured surface, and press together to form a round disc about 1/2 inch thick
  8. Wrap with plastic wrap and refrigerate for about 1 to 2 hours
  9. Cut disc into 8 triangular wedges Orange and Cranberry Scones
  10. Bake on cookie sheet lined with parchment paper for about 20 minutes
  11. Serve warm with butter or drizzle with melted dark chocolate Orange and Cranberry SconesOrange and Cranberry Scones

Choux Pastry Puffs 

I was going to call these Cream Puffs, but my daughter insisted that these are cream sandwiches ! She said cream puffs should have a hole to fill the cream inside the puffs… OK, OK… So, now I call them Choux Pastry puffs ! Whatever it’s called, they look cute and are absolutely delicious ! (Actually I think Choux Pastry Puffs sounds fancier !) They will be a perfect dessert for your upcoming holiday dinners! 

Makes about 16 puffs 

  • 200 mL water
  • 90 g unsalted butter
  • 1/4 teaspoon salt
  • 30 g  granulated or vanilla sugar 
  • 120 g all-purpose flour
  • 3 eggs
  • 1 cup whipping cream
  • 2 tablespoons icing sugar, plus more for dusting, sifted 
  • 1/2 teaspoon pure vanilla extract 
  • 50 g semi-sweet chocolate (melted), for drizzling
    1. To prepare the whipped cream, place a mixing bowl into freezer for about 15 minutes 
    2. Using an electric mixer, whisk together whipping cream, 2 tablespoons of icing sugar and vanilla, in the cold mixing bowl, until stiff peak is formed 
    3. Refrigerate until use 
    4. To prepare the choux paste, heat together water, butter, salt and granulated or vanilla sugar in a pot over medium heat until just starting to boil
    5. Turn heat down to low, add flour all at once
    6. Stirring constantly, cook until a thin film of paste formed at the bottom of the pot, about 5 minutes
    7. Transfer paste to a heat-proofed mixing bowl and cool down
    8. Meanwhile, preheat oven to 350ºF and prepare piping bag with desired piping tip
    9. Add eggs to paste, one at a time and mix well after each addition
    10. Transfer to piping bag and pipe into rounds on baking sheets lined with parchment paper, no bigger than 2 inches in diameter Choux Pastry Puffs
    11. Bake at 350ºF  for about 12-14 minutes until starting to brown, turn heat down to 325°F and bake for another 15 minutes until golden (if puffs are under baked, they will collapse after taken out)
    12. Turn heat off, leave puffs inside oven for about 15 -20 minutes with oven door ajar
    13. Take puffs out, let cool on baking sheets, then completely on rack Choux Pastry Puffs
    14. Cut puffs in halves, fill centres with whipped cream
    15. Drizzle with melted chocolate and dust with icing sugar, serve immediately Choux Pastry Puffs

Honey Cornmeal Muffins 

My kids are growing up too fast, especially my son ! He turned 12 two months ago.  He is almost as tall and as heavy as I am, he eats twice as much and he beats me easily on arm wrestling ! I am happy but a little sad at the same time…..My baby is no longer a baby ! He is turning into a man ! I told him I have to kiss and hug him as much as I can because soon he won’t let me ! Looking after 2 active growing kids can be very busy, and often, I tend to forget about myself !  I made these little corn muffins the other day so I can just grab and eat quickly when I am in a rush.  You can have them for breakfast or serve them with a soup or a salad for lunch.   

  • 100 g cornmeal 
  • 180 g all-purpose flour, sifted 
  • 1 teaspoon baking powder 
  • 1/2 teaspoon baking soda 
  • Pinch of salt 
  • 2 teaspoons lemon juice 
  • 120 mL milk 
  • 2 eggs, slightly beaten 
  • 4 tablespoons coconut oil, melted
  • 4 tablespoons honey 

Makes about 12 muffins 

  1. Preheat oven to 350ºF
  2. Put lemon juice into milk and let sit for a few minutes 
  3. Mix together all dry ingredients 
  4. Add eggs, milk with lemon juice, coconut oil and honey, mix until blended 
  5. Pour batter into slightly greased silicon or paper muffin cups and bake for about 20 minutes 
  6. Serve warm with butter 

Honey Cornmeal Muffins


Double Chocolate Cranberry Cookies 

I was craving for some chocolate cookies yesterday. Not just a plain chocolate chip cookie. But the decadent kind that is loaded with chocolate, and all you want to say after taking a bite is Mmmmm…..Mmmmmm and Mmmmmm ! So here they are ! Rich, chocolaty and soft…. I had to quickly shoot a few photos before they were all gone !
This is my first time using coconut sugar. Its taste and sweetness are very similar to brown sugar. I do find it gives the cookies a slightly drier texture. The cranberries are optional, but I thought it’s nice to add some tanginess. I hope you enjoy them as much as we do ! 

Makes about 16 cookies

  • 150 g all-purpose flour
  • 25 g unsweetened cocoa powder
  • 1/2 teaspoon baking soda
  • 1/4 teaspoon salt
  • 100 g unsalted butter
  • 60 g coconut sugar (or brown sugar)
  • 60 g granulated sugar
  • 1 egg
  • 1 teaspoon pure vanilla extract
  • 50 g dark chocolate, 70%, (chopped into small chunks)
  • 50 g semi-sweet chocolate (chopped into small chunks)
  • 60 g dried cranberries
  1. Preheat oven to 350ºF
  2. Sift together flour,cocoa powder, baking soda and salt, set aside
  3. Cream together butter and sugars using either an electric mixer with the paddle attachment or by hand with a wooden spoon (I just did it by hand)
  4. Add egg and vanilla, mix until blended
  5. Mix in flour mixture in two parts
  6. Stir in chocolate chunks and dried cranberries
  7. Drop about 1 tablespoon each of dough onto baking sheets lined with parchment paper, about 2 inches apart
  8. Bake for about 12 minutes
  9. Cool on baking sheets for about 5 minutes, then completely on rack

Double Chocolate Cranberry Cookies

Matcha (Green Tea) Mochi 

Mochi is one of my favourite desserts ! It’s sweet, soft, chewy….. just delicious. Traditionally, it is made by steaming a short-grain rice called mochigome, then it is mashed and pounded with wooden mallets in a mortar. I saw a video on YouTube on the fastest mochi maker in Japan. Wow !  It sure takes some serious skills and labour ! (Here is the link if you are interested https://www.youtube.com/watch?v=tmSrULDVRPc).

Of course I don’t have those skills and tools. This recipe uses sweet rice flour and is very simple. The red bean paste matches so well with the green tea flavour.  With a cup of green tea, I feel like I am in Japan……I wish ! 

Makes about 8-10 pieces

  • 150 g sweet red bean paste (coarse or fine)
  • 180 g sweet rice flour (mochiko)  
  • 1 teaspoon matcha powder
  • 60 g granulated sugar 
  • 300 mL water
  • 1/4 cup potato starch (for dusting) 
  1. Scoop red bean paste with a teaspoon into small balls (about 1/2 inch) 
  2. Place in freezer for about 15 minutes 
  3. Mix together sweet rice flour, matcha powder and sugar in a large microwavable bowl 
  4. Add water, mix well 
  5. Microwave on high for 1+1/2 minutes, remove and stir, then microwave on high again for about one more minute (each microwave oven is different, you may need to adjust the time) 
  6. Cool slightly for about 5 minutes 
  7. Place a piece of parchment paper on work surface and dust generously with potato starch 
  8. When dough is still fairly warm, spoon about 1-2 tablespoons each onto dusted parchment paper (dough is very sticky)
  9. Put a red bean paste ball in the middle, wrap and seal by pinching the edges together 
  10. Dust with more potato starch if needed to prevent sticking (you can dust off the extra with a pastry brush when mochi is cooled
  11. Place seal side down on a tray lined with parchment paper  
  12. Cool and serve. You can keep them in an air-tight container for up to 2 days at room temperature 

Matcha (Green Tea) Mochi


Gingerbread Buttermilk Pancakes 

It’s not Christmas yet, but I am already craving for gingerbread cookies !  Not the overly sweet icing or the candy decorations on top, but the actual cookies.  The spices, the molasses, they just taste so good.  But it seems a little too early to make Christmas cookies ?! So, to satisfy my craving, I put these wonderful flavours into pancakes ! And of course, I have to serve them with maple syrup ! With a cup of coffee, it’s the best breakfast on a cold windy day!

img_20161016_141313.jpg

I asked my daughter to draw me a gingerbread man and this is what she came up with……
Oh No ! Mr.Gingerbread Man is getting worried that he is going to be eaten soon !

Makes about 4-6 pancakes 

  • 180 g all-purpose flour
  • 1 teaspoon baking powder 
  • 1/2 teaspoon baking soda 
  • 1/4 teaspoon salt
  • 2 teaspoons ground ginger 
  • 1 teaspoon ground cinnamon 
  • Pinch of ground cloves 
  • Pinch of ground nutmeg 
  • 1 egg
  • 1 cup buttermilk
  • 2 tablespoons unsalted butter, melted
  • 2 tablespoons fancy molasses 
  1. Sift and mix together all dry ingredients
  2. Whisk in egg and other wet ingredients, mix until blended
  3. Pour batter onto a lightly oiled non stick pan or griddle over low to medium heat
  4. Cook about 1-2 minutes until bubbles begin to form on top
  5. Flip pancake over and cook for about 1-2 more minutes until lightly brown
  6. Serve warm with butter and maple syrup 


Gingerbread Buttermilk Pancakes

Pumpkin Cheesecake with Maple Caramel Sauce 

Fall

October is a busy baking month for me. Thanksgiving, my daughter’s birthday, bake sale, Halloween…. all of them are happening this month. I am not complaining, in fact, I am enjoying it . Apples, pumpkins, corn, the spices, the Halloween decorations ….the aroma, the colours, the fun, I love them all ! For this Thanksgiving, I made a pumpkin cheesecake topped with maple caramel sauce. It is crunchy, creamy, sweet and a little spicy…..just delicious ! And it’s fairly easy to make ! It’s a great alternative to pumpkin pie.

Makes one 6-inch cake

For the crust

  • 120 g ginger snaps
  • 3 tablespoons unsalted butter, melted

For the fillings

  • 250 g soft cream cheese
  • 120 g granulated sugar
  • 1 tablespoon all-purpose flour
  • 1 teaspoon ground cinnamon
  • 1 teaspoon ground ginger
  • Pinch of ground nutmeg
  • Pinch of ground cloves
  • 1/4 teaspoon salt
  • 120 g pumpkin puree (homemade or canned)
  • 2 eggs
  • 1 teaspoon pure vanilla extract

For the maple caramel

  • 120 ml maple syrup
  • 15 g unsalted butter
  • 60 mL heavy or whipping cream

Pumpkin Cheesecake

To prepare the crust

  1. Crush ginger cookies into fine crumbs
  2. Mix crumbs with melted butter, press firmly into bottom of a spring-form pan or a cake ring (if you use a cake ring like I did, you have to wrap the bottom with parchment paper as it is bottomless)
  3. Bake for about 10 minutes, let cool

To prepare the cheesecake

  1. When crust is cooled, wrap bottom of cake pan with 2 layers of aluminium foil and place on a rimmed baking tray
  2. Turn oven down to 325ºF
  3. Using an electric mixer with the paddle attachment, beat cream cheese and sugar until smooth
  4. Add flour, spices, salt,pumpkin puree and vanilla
  5. Add eggs, one at a time, mix until just blended, do not overmix
  6. Pour batter on top of crust and place the baking tray into the oven
  7. Pour about one inch of hot water into baking tray and bake for about 40-45 minutes (the top should be a little jiggly, do not overbake)
  8. Turn oven off, leave cheesecake inside oven with door ajar for another hour to cool gradually
  9. Take cake out, let cool at room temperature completely, then refrigerate for at least 3-4 hours

To prepare maple caramel

  1. Melt butter in a non-stick pan over medium heat
  2. Add maple syrup, when boil, turn heat down and simmer for about 3 minutes until thicken
  3. Add cream, stirring occasionally and continue to simmer until thick

When cheesecake is set, serve with maple caramel and whipped cream

Pumpkin Cheesecake

Halloween Cake Pops

My daughter borrowed a book about Halloween treats from the library last week, there were so many great ideas we want to try. After looking through the book and “researching” on the internet, we decided to make cake pops !  So we went to the store and bought all we need…..cake pop sticks, chocolate, coating wafers, licorice sticks, sprinkles…..and we also picked up some sour candies, dried fruits, peppermint paddies….. oops, I guess we got a little too much ! Oh well, we had a lot of fun shopping and making them, that’s all that matters, right?! The coating wafers tend to be very sweet, so I used less sugar for the cake and dark chocolate for the frosting. They turned out really tasty and fudgy like brownies. My son, who doesn’t have a sweet tooth, said these cake pops are “boss” !

For the cake

  • 135 g self-rising flour (about 3/4 cup)
  • 25 g unsweetened cocoa powder
  • 60 g unsalted butter
  • 60 g granulated sugar
  • 1 egg
  • 1/2  teaspoon pure vanilla extract
  • 90 mL boiling water

For the chocolate frosting 

  • 60 g unsalted butter
  • 100 g icing sugar
  • 1/2 teaspoon pure vanilla extract
  • 60 g dark chocolate (70%)

For the coating

  • Chocolate or candy moulding wafers (You will need about 300 g of wafers to coat 6 cake pops)
  • Sprinkles, licorice, and or other decorations of choice 

Makes about 20 cake pops 

To make the cake

  1. Preheat oven to 350ºF
  2. Sift together self-rising flour and cocoa powder
  3. Using an electric mixer with the paddle attachment, cream butter and sugar until fluffy
  4. Add egg and vanilla
  5. Add flour mixture in 2 parts, mix until blended
  6. Gradually stir in boiling water, batter will be slightly runny
  7. Bake in a 9 inch x 5 inch loaf pan, lined with parchment paper, for about 20 minutes 
  8. Let cake cool completely

To make the frosting

  1. Melt dark chocolate in a bowl over a pan of simmering water, let cool slightly
  2. Using an electric mixer with paddle attachment, cream butter and icing sugar
  3. Add in vanilla and melted chocolate, mix until smooth

To prepare the cake balls

  1. When the cake is completely cooled, break the cake into fine crumbs with hands
  2. Gradually add frosting, a couple of tablespoons at a time, mix until you can roll mixture into balls
  3. Roll cake mixture into small balls, place on a cookie sheet lined with parchment paper, cover with plastic wrap and put in fridge for at least about 30 minutes

Halloween Cake Pops


 To assemble the cake pops

  1. Melt candy melts or chocolate in a bowl over a pot of simmering water 
  2. Dip cake pop sticks into coating about 1 inch deep
  3. Insert coated sticks into cake balls 
  4. Dip into coating, covering the whole cake pop (since it’s a chocolate cake, you may need to do 2 coatings if using white coating)
  5. Gently tap off excess coating
  6. Decorate while coating is still wet, then let dry (alternatively, you can draw on them when they are dry using edible markers)

Coconut Flour Chocolate Chip Cookies (Gluten-free)

Our family is very lucky. None of us have any food allergies, intolerance, special diet or restrictions.  I do have many friends or their kids who cannot eat nuts, shell-fish, dairy or gluten. Cooking or eating out can be very challenging for them.  These restrictions, however, have given me opportunities to try new ingredients. This is my first time using coconut flour to bake. It is gluten-free, high in fibre and protein, and low in carbohydrates. It is very absorbent, so you cannot make a cup-to-cup substitution with grain-based flour. For every cup of all-purpose flour, you only need about 1/4-1/3 cup of coconut flour. You would also need more eggs, about 2 eggs per 1/3 cup of coconut flour. These cookies are soft, chewy and much healthier than regular chocolate chip cookies. So we can eat more and feel a little less guilty! 

Makes about 12-14 cookies 

  • 40 g coconut flour (about 1/3 cup)
  • 60 g brown sugar 
  • Pinch of salt 
  • 2 eggs, lightly beaten 
  • 60 mL coconut oil, melted
  • 1 teaspoon pure vanilla extract 
  • 50 g semi-sweet chocolate chips 
  1. Preheat oven to 350ºF
  2. Mix together brown sugar, eggs, coconut oil and vanilla 
  3. Add coconut flour and salt, stir until dough is formed (Mixture may look very runny at the beginning, but as you stir, the coconut flour will absorb the liquid)
  4. Stir in chocolate chips
  5. Roll dough into one inch balls, place on baking sheets lined with parchment paper, then gently flattened each ball (these cookies don’t really spread, they remain pretty much the same shape before and after baking)
  6. Bake for about 12 minutes 

Coconut Flour Chocolate Chip Cookies


Apple Walnut Crumble

September has been pretty busy, school has started, so does hockey, piano, drawing class…..etc.  And I want to go back to my running routine…… just wish there was more time to bake and blog ! September also means it’s apple season, there are so many varieties.  My favourite kind is Gala.  They are sweet, juicy with medium firmness.  They are excellent for both eating and baking. Other good choices for baking are McIntosh, Golden Delicious and Fuji.  A lot of recipes use Granny Smith, but I found them too tart and hard.  The crumble tastes delicious on its own, I had it with yoghurt.  You can also use Vanilla Ice Cream or Creme Anglaise

Makes about 4 servings 

For the fillings

  • 2 medium-sized apples (peel, core and cut into chunks)
  • 50 g chopped walnuts 
  • 1 tablespoon lemon juice 
  • Zest of 1/2 lemon 
  • 2 tablespoons brown sugar 
  • 3 tablespoons maple syrup 
  • 1/2 teaspoon ground cinnamon 

For the toppings

  • 1/2 cup oats
  • 1/4 cup flour 
  • 3 tablespoons brown sugar 
  • 45 g unsalted butter, melted 
  1. Preheat oven to 350ºF 
  2. To prepare the fillings, mix apples with walnuts,lemon juice, lemon zest, brown sugar, maple syrup and cinnamon, set aside 
  3. Prepare crisp toppings by mixing oats, flour, brown sugar and melted butter together 
  4. Put apple mixture into 4 baking dishes, top with crust mixture
  5. Bake for about 30 minutes until top is golden and apples are soft 
  6. Serve warm with Vanilla Ice Cream, Creme Anglaise or yoghurt