Author Archives: tinysweettooth

Baked Honey Crullers

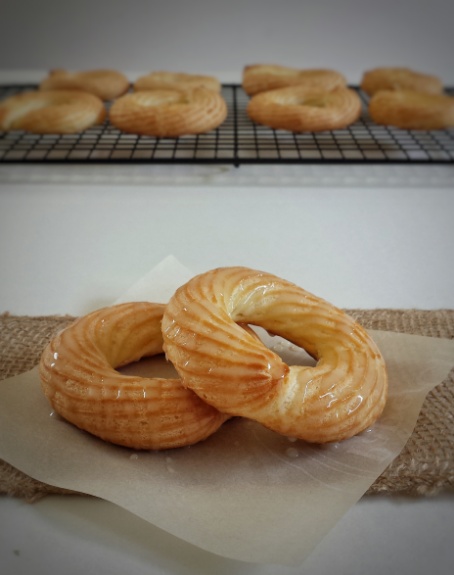
We love doughnuts! And my daughter has been asking me to make some. I tried making the fried ones a few times, but failed. So, I thought I would try some other methods. Upon some “research”, I discovered that crullers are made from choux paste…..Wait a minute…… I have a choux paste recipe from my pastry course last year! So here it is, my Baked Honey Crullers! They have a light and airy texture. You can pipe them any shapes and sizes you want, and I had so much fun making them!

Makes about 20 crullers

For the choux paste

  • 200 mL water
  • 90 g unsalted butter
  • 1/4 teaspoon salt
  • 2 tablespoons granulated or vanilla sugar 
  • 2/3 cup all-purpose flour
  • 3 eggs
  • zest of 1/2 lemon (optional)

For the honey glaze

  • 3 tablespoons honey
  • 1 cup icing sugar
  • 3-4 tablespoons milk
  1. To prepare choux paste, heat together water, butter, salt and sugar in a pot over medium heat until just starting to boil
  2. Turn heat down to low, add flour all at once
  3. Stirring constantly, cook until a thin film of paste formed at the bottom of the pot, about 5 minutes
  4. Transfer paste to a heat-proofed mixing bowl and cool paste down
  5. Meanwhile, preheat oven to 375ºF and prepare piping bag with desired piping tip
  6. Add eggs to paste, one at a time and mix well after each addition
  7. Add lemon zest
  8. Transfer to piping bag and pipe into rings on baking sheets lined with parchment paper, about 3 inches in diameter
  9. Bake at 375ºF for about 12-14 minutes until starting to brown, then turn heat down to 325°F and bake for another 6-8 minutes until golden
  10. Let cool first on baking sheets, then completely on rack
  11. Prepare glaze by whisking together honey, icing sugar and milk to desired consistency
  12. Drizzle over crullers or dip crullers into glaze (Best to serve immediately)

Original recipe of choux paste by Chef Marco Ropke at the Vancouver Pastry Training Centre

Chocolate Zucchini Cake with Chocolate Ganache Glaze

My daughter said “zucchini is my worst enemy ! ” But with this yummy cake, I have successful converted her enemy into her new friend ! Yes, zucchini is definitely chocolate cake’s best friend. It makes the cake moist and soft. And you can eat your vegetable right inside a dessert !

Makes one 9 inch round cake

For the cake

  • 200 g grated zucchini
  • 2 ounces semi-sweet chocolate, finely chopped
  • 1+3/4 cups cake and pastry flour
  • 1/4 cup unsweetened cocoa powder
  • 1 teaspoon baking powder
  • 1/2 teaspoon baking soda
  • 1/2 teaspoon salt
  • 1/2 cup vegetable oil
  • 3/4 cup demerara or brown sugar
  • 1/4 cup granulated sugar
  • 2 eggs
  • 1/4 cup milk
  • 1 teaspoon lemon juice
  • 1 teaspoon pure vanilla extract

For the ganache

  • 1 cup whipping or heavy cream
  • 8 ounces semi-sweet chocolate, finely chopped

img_20160406_222927.jpg

  1. Preheat oven to 350ºF
  2. Lightly grease 9 inch spring-form cake pan with oil, then dust with flour
  3. Sift together flour, cocoa powder, baking powder, baking soda and salt, set aside
  4. Add lemon juice into milk, let sit for a few minutes
  5. Using an electric mixer with the paddle attachment, beat oil and sugars at medium speed until blended
  6. Mix in eggs, milk with lemon juice and vanilla
  7. Add flour mixture in 2-3 portions, scraping sides and bottom of mixing bowl
  8. Add grated zucchini, mix until just blended
  9. Stir in 2 ounces of chopped chocolate 
  10. Pour batter into pan and bake for about 30 minutes (toothpick should come out clear when inserted into middle of cake)
  11. Meanwhile, prepare the ganache by heating cream in a non-stick pot over medium heat
  12. Turn heat off when cream just starting to bubble
  13. Pour over chopped chocolate, let sit for 1 minute
  14. Stir until smooth, let cool at room temperature
  15. When cake is ready, cool in pan for about 10 minutes, then completely on rack
  16. Cover cake with chocolate ganache, smooth with a spatula
  17. Let chocolate set, keep in refrigerator

img_20160408_225656.jpg

Tools I used and you may like

41rqjlmpovl._sy400_.jpg

KitchenAid K45SSWH Classic 4.5-Quart Bowl Stand Mixer, White

31fyrsctu1l._sy400_.jpg

Wilton 409-7716 Angled Icing Spatula, 13-Inch, Black

You can get these tools through the Amazon website by clicking the above link. I will receive a small compensation if you purchase the item. 

Simple Shortbread Cookies

My mom, myself and my daughter all love sweets! Since Mother’s Day is coming up, I thought I would make something that all of us would enjoy. These shortbread cookies are sweet and buttery ! Making them is, literally, as easy as 1,2,3 ! All you need to remember is, 1 part of sugar, 2 parts of butter and 3 parts of flour! I also added a touch of lemon zest.
Have a Happy Mother’s Day ! I think moms are the most wonderful people into the world….of course that includes myself !……. 🙂   And I have to thank my daughter for her wonderful drawing !

Makes about 30 cookies

  • 1/2 cup very fine sugar or vanilla sugar plus more for sprinkling
  • 1 cup unsalted butter, at room temperature
  • 1+1/2 cups cake and pastry flour, sifted
  • Zest of half a lemon (optional)
  1. Using an electric mixer with the paddle attachment, cream butter and sugar together
  2. Add lemon zest
  3. Add flour in 2 portions, mix until dough starting to form
  4. Pat dough together with hands
  5. Cut dough into 2 parts, gently shape each dough into logs, about 1+1/2 inch in diameter
  6. Wrap with plastic wrap (Believe it or not, I wrapped the dough and put them inside paper towel rolls to shape! )
  7. Refrigerate for at least 3 hours or overnight
  8. When ready to bake, preheat oven to 300°F
  9. Cut dough into discs, about 1/4 – 3/8 inch in thickness (They do flattened slightly during baking)
  10. Place on cookie sheets lined with parchment paper, about 2 inches apart
  11. Sprinkle top with more sugar
  12. Bake for 18 -20 minutes until edges just golden (You don’t want them too brown)
  13. Cool on baking sheets for 10 minutes, then completely on rack

img_20160505_173658.jpg

Homemade Vanilla Ice Cream

Our weather has been so good, warm and sunny almost everyday ! And ice cream is just the perfect treat for this nice weather ! Making vanilla ice cream is easier than you think, especially if you have an ice cream machine. The most difficult step is heating up the mixture until thickened without scrambling the egg. Just make sure you keep your heat low and keep stirring it. Pay close attention as it can thicken very quickly. Once you got this, the rest is easy. If you want a creamier ice cream, you can use a 1+1/2 cups each of milk and whipping cream. (a 1:1 ratio, instead of a 2:1 that I used)

Makes about 4 cups

  • 2 cups whole milk
  • 1 cup cold whipping cream
  • 1 vanilla bean
  • 4 egg yolks
  • 2/3 cup granulated sugar
  1. Whisk together egg yolks, sugar and 1/4 cup milk
  2. Cut and scrape vanilla bean
  3. In a non-stick pot, heat remaining milk and vanilla bean, including the pod over medium heat until just boiled
  4. Add 1/3 cup of hot milk into egg mixture to temper, then pour everything back into pot
  5. Heat over low heat, stirring constantly until just thickened. Mixture should coat back of spoon
  6. Remove from heat immediately,  strain through a fine mesh twice
  7. Let sit in an ice bath, stir in whipping cream
  8. Let cool completely, cover with plastic wrap and refrigerate for at least 3 hours or overnight 
  9. Place in ice cream machine and churn according to manufacturer’s instructions

img_20160313_171706.jpg

Tools I used and you may like 

41jgxv8adpl._sy400_.jpg

Cuisinart ICE-21C Frozen Yogurt, Ice Cream and Sorbet Maker

You can get this ice cream machine through the Amazon website by clicking the above link. I will receive a small compensation if you purchase the item. 

Strawberry Banana Quinoa Smoothie (Vegan)

Quinoa (pronounced as “keenwah”) is a seed that is harvested from the goosefoot plant. It is a great source of protein, fibre and many vitamins and minerals. You can eat it like a grain, use it in salads, stuffing, burger patties, or in this recipe, a smoothie! You have to first cook it, but it’s very easy to do.  

To cook quinoa

Makes about 2 cups

  1. Rinse 1/2 cup of quinoa under water (to remove bitter taste)
  2. Add 1 cup of water, cook on medium heat over stove
  3. Bring to boil, then turn heat down to low, cover and let simmer for about 15 minutes
  4. Remove cover, let sit for about 10 minutes
  5. Fluff with a spatula, let cool

To make smoothie

Makes about 2-3 servings

  • 2 ripe frozen bananas (cut in chunks and freeze)
  • 200 g fresh strawberries
  • 1/2 cup cooked quinoa
  • 1 cup sweetened almond milk or other non-dairy milk

Blend all ingredients together until smooth,serve immediately. Enjoy !

Butterscotch Coconut Cookies

I was cleaning up my pantry today. I found many bags and containers of leftover, soon expired ingredients. So I threw most of them together and made some granola bars. Still left with some butterscotch chips and shredded coconut, I decided to put the two together. I was never a big fan of butterscotch, but these cookies came out soft, sweet and chewy, they are super yummy ! So if you have some leftover ingredients in your pantry, don’t feel shy to experiment, you never know what you can come up with.

Makes about 40 cookies
Total time = 30 minutes

  • 2 cups all-purpose flour
  • 2 teaspoons baking powder
  • 1/2 teaspoon salt
  • 1/2 cup unsalted butter
  • 1 cup granulated sugar
  • 2 eggs
  • 1 teaspoon pure vanilla extract
  • 1/4 cup canned coconut milk
  • 1/2 cup unsweetened shredded coconut
  • 1/2 cup butterscotch chips
  1. Preheat oven to 350ºF
  2. Sift together flour, baking powder and salt, set aside
  3. Using an electric mixer with the paddle attachment, cream butter and sugar until fluffy
  4. Add eggs, vanilla and coconut milk, mix until blended, scraping sides and bottom of mixing bowl
  5. Stir in shredded coconut and butterscotch chips
  6. Drop about 1 tablespoon each of dough onto cookie sheets lined with parchment paper, spacing 2 inches apart
  7. Bake for about 12 minutes until edges are golden

img_20160419_102454.jpg


Earl Grey Orange Truffles

I am mostly a coffee drinker, but I love tea too, especially after meals. Tea contains antioxidants and has many health benefits. Studies have shown that some teas may help with cancer and heart disease. Besides drinking, tea can be used in many recipes, both savory and sweet. These Earl Grey truffles are infused with a subtle tea flavour.  They taste scrumptious and are so easy to make!

Makes about 24 

  • 2 Earl Grey tea bags
  • 3/4 cup heavy or whipping cream
  • Zest of one medium orange (about 1 teaspoon)
  • 12 ounces semi-sweet chocolate or dark chocolate
  • 1 teaspoon pure vanilla extract
  • Unsweetened cocoa powder for coating
  1. Heat cream in a non-stick pot over medium heat until just starting to bubble
  2. Remove from heat, put in tea bags and orange zest, let steep for about 1 hour (You can cover the pot with a dry tea towel but not the lid of the pot, otherwise condensations will drip into mixture)
  3. Finely chop chocolate, set aside in a large mixing bowl
  4. After 1 hour, remove tea bags, squeezing the tea out into the cream
  5. Strain out orange zest with a mesher
  6. Reheat cream mixture in a non-stick pot over medium heat until just starting to bubble
  7. Pour over chopped chocolate, let sit for 1 minute
  8. Add vanilla, stir until smooth
  9. Cool, then put in fridge for about 3 hours
  10. With the help of a melon scooper or a teaspoon, roll 2 teaspoons each into balls
  11. Roll in unsweetened cocoa powder
  12. Keep in fridge

img_20160413_141603.jpg

Dates Bars

Dates are sweet, delicious and nutritious. They are a good source of fibre, vitamin B, iron and many more. Medjool dates are of better quality but I just used regular dried dates from the bulk section of a grocery store, and it came out fine. I actually prefer eating medjool dates on their own to fully enjoy the goodness. I got a box of Trader Joe’s medjool dates for X’mas from my friend and I munched them all within a week!

Makes about 16 squares
Total time = 75 minutes

  • 1 cup rolled oats
  • 1 cup all-purpose flour
  • 1/2 cup demerara or brown sugar
  • 1/2 teaspoon baking soda
  • 1/4 teaspoon salt
  • 120 g unsalted butter, chilled and cut into small pieces
  • 400 g pitted dates, diced
  • 1 cup water
  • 1 teaspoon pure vanilla extract
  1. Preheat oven to 350ºF
  2. In a mixing bowl, mix together oats, flour, sugar, baking soda and salt 
  3. Rub in butter with hands until resembles coarse crumbs
  4. Place half of crust in a 8 inch x 10 inch baking pan (or pan of choice) lined with greased parchment paper
  5. Press firmly and evenly
  6. Bake for about 15 minutes, let cool
  7. Meanwhile, cook dates and water in a non-stick pot over medium heat about 15 minutes until thickened
  8. Turn heat off, stir in vanilla and let cool slightly
  9. Spread dates paste evenly on top of baked crust
  10. Sprinkle remaining crust mixture (just a thin and even layer)
  11. Bake for about 25 minutes until golden
  12. Cool completely before cutting into squares

Homemade Granola

Granola is so easy to make, even my eight year old daughter can almost do it all by herself (except using the oven) ! You can make it as simple as ours, or you can add more of your favourites. Eat it with milk, yoghurt and fresh fruits as a healthy breakfast or snack.

Makes about 2 cups
Total time = 30 minutes

  • 1 cup quick oats
  • 2 tablespoons demerara or brown sugar
  • 1/4 cup raisins
  • 1/4 cup blanched almond slices
  • 1 tablespoon vegetable oil
  • 2 tablespoons maple syrup
  • 1 teaspoon pure vanilla extract
  1. Preheat oven to 300°F
  2. Mix together oats, sugar, raisins and almonds
  3. Add oil, maple syrup and vanilla, mix well
  4. Place a thin and even layer on cookie sheet lined with parchment paper
  5. Bake for about 20 minutes until golden, stirring once
  6. Cool and store in air-tight container for up to 2 weeks

My Favourite Cook Books – The Baking Handbooks

These are great baking books for both beginners and more experienced bakers. They have all your bases covered.  From muffins to cakes, from breads, pizzas to French pastries,  you can for sure find something you like.

1. Robin Hood Home Baking: From Cookies and Cakes, to Pizza, Pot Pies and More
– Jill Snider

511b4n2sshl._sl1500_.jpg

This is one of my very first reference.  It may look a little outdated,  but I still like a lot of the recipes in this book. They are simple and very easy to follow. There are also specific tips on each recipe which are helpful for beginners.

2. Martha Stewart’s Baking Handbook
– Martha Stewart

51igx4qmxol._sy400_-1.jpg

This is a handbook that really has everything in it. From basic recipes like muffins, pies and cookies to more advanced projects like croissants, layered cakes, even a wedding cake ! It also has very nice photos, it’s a joy to read even if you are not baking.

3. Duff Bakes: Think and Bake Like a Pro at Home
– Duff Goldman and Sara Gonzales

516jjae6iul._sl1500_.jpg

Duff Goldman is well-known for his amazing decorated cakes. This book though, is not about cake decorating, it has many yummy goodies that we can make at home. My favourite parts, however, are the chapters about equipment, ingredients and techniques. They have very good information, and with a little Duff’s humour, I just really enjoy reading them.

You can find these great books on the Amazon website by clicking on the title of the books. I will receive a small compensation if you purchase the item.