Tag Archives: baking

Purple Yam Bread 

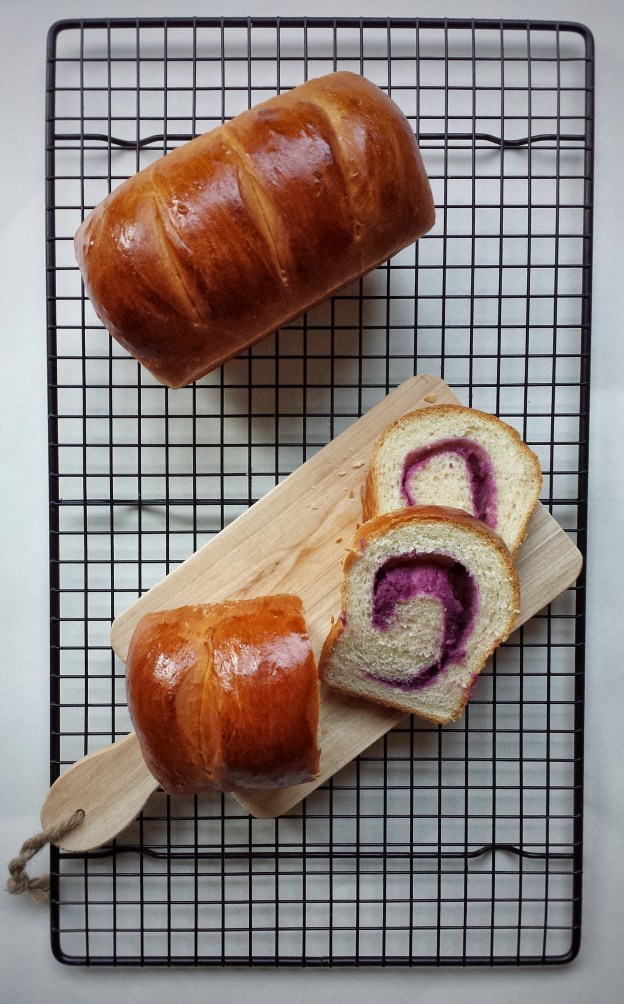
I love to make bread ! Yes, it takes time and patience, but it’s totally worth it. The smell of fresh bread is just so satisfying ! It makes your home feels……more homey ?! …..Does this even make sense?? I used to make the dough in a mixer, but not anymore. Mixing it with hand is actually easier, and your dough will be more even. I was really pleased with how this bread turned out. It’s sweet, tasty and it’s in my favourite colour… purple ! 

Two years ago, when my daughter was in grade 2, her teacher invited a chef/educator to teach the kids about food and how to make bread from scratch. I was one of the volunteer parents and that class was so fun ! The kids were super cute and hilarious. Some of them, like my daughter, jumped right into the “mess” , others were not too sure, frowning and saying “eew ! ” and “that’s gross !” the whole time. But at the end, when they tasted their own bread, they were all very delighted !  I think teaching kids about food and cooking at a young age is very important. It helps them (and ourselves) develop skills and healthy eating habits which hopefully last a lifetime. I have to admit, I am not doing enough. There were times when I should have cooked, but ended up just ordering take-out or “cooking” some frozen food. Well, as I told my kids, I am always teaching them and learning with them at the same time……So, mommy needs to do some more homework and learn how to cook healthier and more delicious meals! 

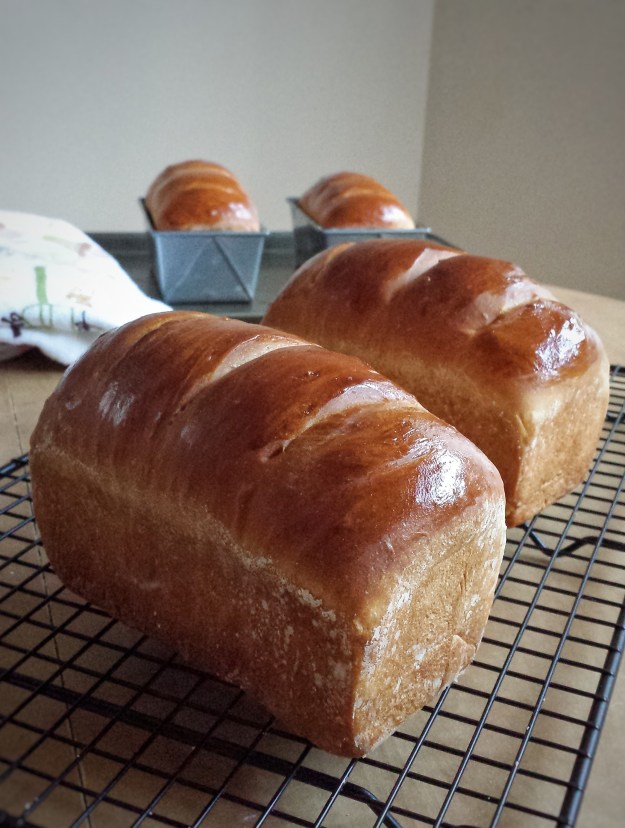
Makes 4 mini loaves (dimensions of pan: 5.75 x 3.25 x 2.25 inches)

For the yam paste

  • 4 medium purple yam
  • 60 mL milk
  • 30 mL condensed milk
  1. Preheat oven to 400°F
  2. Wash and cut yams in halves
  3. Bake on a tray lined with parchment paper for about 45 minutes until fork tender
  4. Cool and peel skin off
  5. In a food processor or blender, blend yam, milk and condensed milk into a paste
  6. Keep in fridge until ready to use

For the bread dough

  • 540 g bread flour
  • 4 g instant yeast
  • 5 g granulated sugar
  • 250 mL milk
  • 60 mL honey
  • 1 egg
  • 30 mL vegetable oil
  • 3 g salt

You will also need 1 egg for brushing top of bread

  1. Dissolve sugar in warm milk, add yeast and let sit for about 5 minutes until frothy
  2. Put flour and salt in a big mixing bowl, gradually mix in 1 egg, yeast mixture, honey and oil with hands until dough starts to form
  3. Transfer to a floured surface, knead until smooth and stretchy
  4. Cover with plastic wrap and let rise until double in size, about 1-2 hours (You can speed up the process by putting it in a not-heated oven with a small pot of hot water on the lower rack. The moist and warm environment makes the dough rise quicker)
  5. Punch air out, cut dough into 4 equal pieces (about 250g each)
  6. Roll each dough flat, spread a layer of yam paste on top 
  7. Roll doughs up with yam paste inside 
  8. Seal openings by pinching edges together 
  9. Place each dough separately in lightly greased and floured mini loaf pans
  10. Cover with plastic wrap and let rise again for another hour 
  11. Preheat oven to 350ºF
  12. Score top of doughs with knife or scissors 
  13. Brush top with egg wash
  14. Bake for about 20 – 25 minutes until golden

Tools that I used 

Chicago Metallic 59440 Commercial II Non-Stick Mini Loaf Pans, Set of 4

You can get the mini loaf pans through the Amazon website by clicking the above link. I will receive a small compensation if you purchase the item. 

Checkerboard Cookies 

Making these checkerboard cookies may seem complicated, but once you made the dough, it’s pretty easy. It’s a fun recipe to get the kids involved. They can help measure and assemble. They can also make them in other patterns, like pinwheels or stripes. It’s like playing with clay or play dough, and they can learn about math and geometry at the same time !  (Another reason for me to bake more, yeah !) You can freeze the dough logs for up to 1 month, so you can have freshly baked cookies whenever you want ! 

Makes about 16 checkerboard cookies

For the vanilla dough

  • 50 g granulated sugar
  • 100 g unsalted butter
  • 1 egg yolk
  • 150 cake and pastry flour
  • Pinch of salt
  • 1/4 teaspoon pure vanilla extract

For the chocolate dough

  • 50 g granulated sugar
  • 100 g unsalted butter
  • 1 egg yolk
  • 140 g cake and pastry flour
  • 10 g unsweetened cocoa powder
  • Pinch of salt
  • 1/4 teaspoon pure vanilla extract

You will also need 1 egg white for assembling cookies

  1. Mix together cold butter and sugar using a wooden spoon until no more lumps
  2. Add egg yolk and vanilla, mix until blended
  3. Add flour and salt (and cocoa powder for the chocolate dough) all at once, mix with the wooden spoon, then transfer onto a table or counter and gently knead dough together (just work until ingredients are mixed in)
  4. Wrap with plastic wrap, refrigerate for at least 2-3 hours or overnight
  5. Knead dough until pliable
  6. Roll out 2/3 of each dough to about 0.8-1 cm in thickness 
  7. Cut into 0.8-1 cm wide strips and assemble into checkerboard pattern, brush egg white between pieces to help sticking 
  8. Roll out remaining 1/3 of each dough to about 3 mm in thickness
  9. Brush with egg white and wrap sheets around checkerboard logs 
  10. Trim off excess dough.
  11. Wrap with plastic wrap and refrigerate for at least 2-3 hours  
  12. When ready to bake, preheat oven to 325ºF 
  13. Cut cookies and place on baking sheets lined with parchment paper
  14. Bake for 8-10 minutes 

Notes: The dough scraps can be re-rolled, but not more than twice or it may crack. You can also gather them together, roll into a log and make some marble cookies! 

Originally recipe by Chef Marco Ropke at the Vancouver Pastry Training Centre 

Matcha (Green Tea) Mousse Cake

I wish Spring is here soon ! Our winter here in the west coast has been pretty cold and snowy. Well, I guess I shouldn’t complain, the kids did have a lot of fun playing in the snow and compare to many other places in Canada, this is very mild. To welcome Spring and St. Patrick’s Day, I thought I should make something green. And of course matcha is the first thing that comes to mind. This recipe is what I call a 2-in-1. The mousse cake has two parts, but each of them can be a dessert on its own ! You can use the cake batter to make cupcakes or mini loaves.  And for the mousse, you can pour it into nice little bowls and refrigerate, which is exactly what I did with the leftover !

Matcha (Green Tea) Mousse

Matcha (Green Tea) Mousse

For the mousse cake itself, I made one layer of each, but you can definitely stack them in multiple layers if you like. I also added some chopped dark chocolate on top but it’s optional, cause I believe everything (almost everything) tastes better with chocolate ! And hopefully this Spring dessert can bring some warm weather soon ! 

Matcha (Green Tea) Mousse Cake

Makes one 6-inch cake

For the cake

  • 4 large eggs (separated)
  • 120 g granulated sugar (20 g for meringue)
  • 75 g cake and pastry flour
  • 5 g matcha (green tea) powder
  • 1 teaspoon pure vanilla extract
  • 1 teaspoon lemon juice 
  1. To make the cake, preheat oven to 350°F
  2. Lightly grease an 8″ x 10″ x 1″ baking tray and line bottom with parchment paper
  3. Sift together flour and matcha powder, set aside
  4. In a mixing bowl, beat together egg yolks and 100 g of sugar until pale
  5. Add vanilla and the flour mixture, mix until blended
  6. In a separate bowl, using an electric mixer with whisk attachment, whisk egg whites and lemon juice until frothy
  7. Increase speed to high and slowly add in 20 g of sugar
  8. Whisk until medium peak is formed
  9. Gently fold meringue into cake batter, 1/3 at a time, do not over mix
  10. Pour into baking tray and bake for about 15 minutes
  11. Let cool completely, then cut into a round disc to fit cake mould (I used a cake ring, so I just cut it with the ring)Matcha (Green Tea) Mousse Cake

For the mousse

  • 500 mL whipping cream (cold)
  • 250 mL milk (preferably whole milk)
  • 120 g granulated sugar
  • 15 g matcha powder
  • 10 g gelatin powder
  • 1 teaspoon pure vanilla extract
  1. Chill the mixing bowl in the fridge for at least 30 minutes
  2. Sprinkle gelatin over about 1/4 cup of milk and let sit for a few minutes to bloom
  3. Heat and stir remaining milk, sugar and matcha powder in a pot over medium heat until sugar melted and just starting to bubble
  4. Add gelatin mixture, stir until all dissolved
  5. Turn heat off, add vanilla 
  6. Strain mixture through a fine mesh and let cool to room temperature
  7. Using an electric mixer with the whisk attachment and the chilled mixing bowl, beat cold whipping cream until medium peak is formed
  8. Gently fold the whipped cream into milk mixture, 1/3 at a time, do not over mix

To assemble

  1. Place a lightly greased cake ring on a tray lined with parchment paper
  2. Place cake disc (smooth side down) at the bottom
  3. Pour mousse on top of cake and smooth top with a spatula 
  4. Refrigerate for at least 3-4 hours to set
  5. Sprinkle top with finely chopped dark chocolate (optional)

NotesIf you have trouble removing the ring, you can freeze the cake for about 1-2 hours, put a knife or an angled spatula in hot water, wipe dry, then run it around the cakeMatcha (Green Tea) Mousse Cake


Coconut Cream Tarts

Coconut is such a versatile fruit.  You can pretty much make use of every parts of the fruit, even the husk can be used to make flowering pots or carpets !  Coconut milk and oil are extracted from its meat and are widely used in many cuisines.  I love coconut milk. It matches really well with many ingredients, sweet or savoury. This was originally a pastry cream recipe. I substituted some of the milk with coconut milk. The shredded coconut gave the tarts extra texture and the lime zest just brighten everything up.  Don’t throw away the leftover tart shell trimmings. They make great butter cookies. Just gather the trimmings to form a dough, roll it out to 1/8 inch in thickness, cut with cookie cutters and bake for 8-10 minutes at 350°F !  It’s nice when no food is wasted ! 

Makes about three 4 inch tarts 

For the tart shells

  • 120 g cold unsalted butter (cut into small pieces)
  • 75 g granulated sugar
  • 1 egg yolk
  • 180 g cake and pastry flour, sifted
  1. Mix together cold butter and sugar using a wooden spoon until no more lumps
  2. Add egg yolk, mix until blended
  3. Add flour all at once, mix with the wooden spoon, then transfer onto a table or counter and gently knead dough together (just work until ingredients are mixed in)
  4. Wrap with plastic wrap, refrigerate for at least 2-3 hours or overnight
  5. When ready to bake, preheat oven to 350ºF
  6. Knead dough until pliable
  7. Roll dough out to about 1/8 inch in thickness on a floured surface, dock with a fork
  8. Place inside slightly greased tart molds, trim off excess dough 
  9. Bake for about 12 minutes till golden, let coolBaked Tart Shells

For the coconut cream

  • 400 mL canned coconut milk 
  • 100 mL milk 
  • 2 egg yolks
  • 75 g granulated sugar 
  • 40 g cornstarch
  • 2 tablespoons unsweetened shredded coconut 
  • Zest of 1/2 lime 
  • 1/2 teaspoon pure vanilla extract 
  1. Mix coconut milk and milk together until smooth 
  2. In a bowl, whisk egg yolks, sugar, cornstarch and 1/2 cup of the milk mixture together until no more lumps
  3. Heat remaining milk in a pot over medium heat until just boiled
  4. Whisk 1/2 of boiled milk slowly into egg mixture to temper, then pour everything back into the pot
  5. Heat until just starting to bubble and thicken, whisking constantly
  6. Remove from heat, mix in shredded coconut, lime zest and vanilla extract, let cool
  7. Spoon coconut cream into baked tart shell, spread evenly with a spatula, dust with icing sugar 
  8. You can keep them in the fridge for 2-3 daysCoconut Cream Tarts

Carrot Spelt Muffins with Maple Roasted Pecans (Vegan)

I guess by now everyone knows I love to bake.  Not only do I like to eat sweets, but I also get intrigued by how different ingredients work or not work together and the Science behind it. Yes, baking is an edible Science experiment ! And I have so much fun with these “Science projects” !  Vegan baking is even more interesting ! You don’t have your eggs to bind things together, you don’t have your dairy nor butter for nice creamy texture and rich flavours.  But there are actually many great alternatives and I realize I have a lot more to learn. This is the first time I bake with spelt flour. It can be used instead of whole wheat flour. It has a finer texture and a milder taste which I like.  For the roasted pecans, you won’t need the whole batch for the muffins, save the rest for a healthy snack !

Makes about 12 muffins

For the roasted pecans 

  • 100 g pecans
  • 1 tablespoon maple syrup 
  • 1/2 tablespoon vegetable oil
  • Pinch of salt 
  1. Preheat oven to 350°F
  2. Coat pecans with rest of ingredients 
  3. Bake for about 10 minutes, stirring once in between Maple Roasted Pecans

For the muffins

  • 225 g spelt flour
  • 1+1/2 teaspoon baking powder 
  • 1/2 teaspoon baking soda 
  • 1/4 teaspoon salt
  • 1/2 teaspoon ground cinnamon 
  • 60 g demerara or brown sugar 
  • 150 g unsweetened apple sauce 
  • 120 mL vegetable oil 
  • 60 mL unsweetened almond milk 
  • 2 tablespoons maple syrup 
  • 1 teaspoon pure vanilla extract 
  • 200 g grated carrots 
  • 30 g maple roasted pecans, crushed 
  1. Preheat oven to 350°F
  2. Sift together flour, baking powder, baking soda, salt and cinnamon 
  3. Mix in sugar 
  4. Stir in other wet ingredients
  5. Stir in grated carrots 
  6. Spoon into lightly greased paper or silicone muffin cups (you can fill them up a little fuller, as they don’t rise as much)
  7. Sprinkle crushed maple pecans on top 
  8. Bake in muffin tins for 25-30 minutes Carrot Spelt Muffins with Maple Roasted Pecans (Vegan)

White Chocolate and Lime Cookies 

I love citrus fruits ! The colours, the smell, the tanginess, they just brighten me up. I mostly bake with lemons or oranges and this is the first time I use lime. Normally I just use lime juice to make guacamole. The flavour of lime balances nicely with butter and white chocolate. This cookie dough is also very “unique” ! There are two kinds of flour, all-purpose and self-rising.  About 4 years ago, I tried to bake some shortbread cookies. The recipe called for cornstarch, but I accidentally put in self-rising flour ! To my surprise, they turned out really good ! Since then, I have used this combination many times with different variations and everyone likes it. Well, I guess I really have learned from my “mistake” …..but I don’t plan to correct it ! 🙂 Limes

Makes about 24 cookies 

  • 200 g unsalted butter, softened
  • 90 g icing sugar + more for dusting
  • 225 g all-purpose flour 
  • 45 g self-rising flour
  • 1/4 teaspoon salt
  • 1 tablespoon fresh lime juice
  • Zest of a small lime
  • 1 teaspoon pure vanilla extract
  • 50 g white chocolate chips 
  1. Preheat oven to 325°F
  2. Sift together both flours and salt, set aside
  3. Using an electric mixer with the paddle attachment, cream butter and sugar until fluffy
  4. Add lime juice, zest and vanilla extract 
  5. Add flour mixture in 2 parts, mix until just blended
  6. Stir in white chocolate chips
  7. Refrigerate dough for 1-2 hours to prevent cookies from spreading too much
  8. Shape dough into one inch balls and place on baking sheets lined with parchment paper, about 2 inches apart
  9. Bake for about 15 minutes, until edges just golden
  10. Cool on baking sheets for about 10 minutes, then completely on rack
  11. Dust with icing sugarWhite Chocolate and Lime Cookies


Tools I used and you may like

41rqjlmpovl._sy400_.jpg

KitchenAid K45SSWH Classic 4.5-Quart Bowl Stand Mixer, White


789.jpg

Microplane #40020 Classic Grater/Zester, Black

You can get these tools through the Amazon website by clicking the above link. I will receive a small compensation if you purchase the item.

Marzipan Cake

I never knew marzipan can be so tasty and so useful in baking ! My first encounter with it was eating some marzipan-filled chocolate. To be honest, I didn’t really enjoy it. Perhaps it was too sweet or perhaps I always prefer eating pure chocolate. But after I learned to make the Eisenbahner (Railroad) Cookies, I absolutely fell in love with it ! With high hopes for myself, I decided to make a cake this time…..but sadly…..I failed twice ! How frustrating ! The “failures” actually tasted pretty good. I realized the problem was the pans I used. For the first time, I used a 9 inch spring-form pan and the cake turned out too flat (It is a denser cake and it won’t rise very much). So I switched to a 9 inch x 5 inch loaf pan. But it took too long to bake through and the outside of the cake was dry and brown. So for the third time, I used an 8 inch cake ring and baked it in a hot water bath and…..Success finally ! I thought I would never make it !  Phew ! Now I get to sit down, relax and enjoy my cake after all that hard work !

Makes one 8 inch round cake 

  • 180 g unsalted butter, softened
  • 200 g marzipan, cut into small pieces and softened
  • 120 g granulated sugar
  • 4 eggs
  • 1 teaspoon pure vanilla extract
  • 1/2 teaspoon almond extract
  • 60 ml milk
  • 60 g honey
  • Zest of 1/2 orange
  • 180 g all-purpose flour
  • 2 teaspoons baking powder
  • 1/4 teaspoon salt
  • Icing sugar and almond slices for toppings
  1. Grease and flour an 8 inch cake ring  
  2. Wrap bottom with parchment paper, then 2 layers of aluminium foil and place on a rimmed baking trayCake RingCake Ring
  3. Preheat oven to 350°F
  4. Sift together flour, baking powder and salt, set aside
  5. Using an electric mixer with the paddle attachment, beat together butter, marzipan and sugar 
  6. Add eggs, one at a time
  7. Mix in vanilla and almond extract, milk, honey and orange zest 
  8. Add flour mixture in two parts, mix until blended
  9. Pour batter into cake ring (it’s ok if batter is slightly gritty) 
  10. Pour about one inch of hot water in baking tray and bake cake in hot water bath for about 60 minutes  
  11. Cool and remove cake ring
  12. Top with icing sugar and almond slicesMarzipan CakeMarzipan Cake

Eisenbahner (Railroad) Cookies 

This is a cookie that I learned at my pastry course earlier this year. It was one of my favourites. It’s beautiful, festive, delicious and has a cool name! It looks like a railroad track, hence the name Eisenbahner, which means railroad man in German. When I did a google search, almost all the recipes for this cookie are in German. So, I think it’s a great idea to share this in our Canadian Food Creatives and the Canadian Christmas Cookie Exchange round-up. There are 3 parts to this cookie, the base, the marzipan paste and the jam. Yes, it may seem a little complicated, but it’s definitely worth all the work. Hope you enjoy the ride !

Makes about 12 cookies

For the cookie base

  • 120 g cold unsalted butter
  • 60 g granulated sugar
  • 1 egg yolk
  • 170 g cake and pastry flour

For the marzipan paste and jam 

  • 200 g marzipan
  • 20 g unsalted butter, softened
  • 30 g icing sugar
  • 30 g honey
  • 1 egg white
  • 100 g raspberry jam (You want the jam to be hot and runny, so you can put it in a bowl and sit in a hot water bath for a few minutes before using)
  1. To make the cookie base, mix together cold butter and sugar using a wooden spoon until no more lumps
  2. Add egg yolk, mix until blended
  3. Add flour all at once, mix then transfer onto a table or counter and gently knead dough together (do not overmix, just work until ingredients are mixed in)
  4. Wrap with plastic wrap, refrigerate for at least 2-3 hours or overnight
  5. To make the marzipan paste, mix together marzipan, softened butter, icing sugar and honey into a thick paste (I found it easier to mix them with hands)
  6. Add egg white, mix until it has a stiff piping consistency (it looks like mash potato and you may not need the whole egg white)
  7. Put in piping bag with a star tip
  8. When ready to bake, preheat oven to 325ºF
  9. Take dough out from fridge and knead gently on a floured surface until pliable
  10. Roll it flat, about 0.3 cm in thickness (it’s OK if it cracks a little, just patch it back together)
  11. Cut into two 6 cm x 25 cm rectanglesEisenbahner (Railroad) Cookies
  12. Bake on a cookie sheet lined with parchment paper until edges just starting to brown, about 8 minutes
  13. Cool, then brush a thin layer of hot jam in between the 2 sheets 
  14. Pipe marzipan paste along edgesEisenbahner (Railroad) Cookies
  15. Turn oven up to 425-450ºF at broiler setting
  16. Bake 2-3 minutes just to caramelize the marzipan paste (watch closely, as it can burn very quickly)
  17. Cool, then fill centre with hot jamEisenbahner (Railroad) Cookies
  18. Cool completely, cut into pieces, dust with icing sugarEisenbahner (Railroad) Cookies

Original recipe by Chef Marco Ropke at the Vancouver Pastry Training Centre.

Be sure to check out the links below for more cookie recipes from other Canadian Bloggers.  You can also find them on social media using the hashtag #CDNFoodCreatives . Many thanks to Laura Irvin at The Blue Nose Baker , Kacey Joanette at The Cookie Writer and Evelyne Budkewitsch at The Cultureatz for organizing.

cookie-collage-final.jpg.jpeg

Orange Cranberry Scones 

The weather here in Vancouver has been very rainy and windy lately. Often, I just feel like staying home all day. I made these scones a few days ago to warm and lift myself up.  Orange and cranberry is one of my favourites.  The two flavours just work together like magic ! With a cup of coffee….Mmmmmmmm, so comforting and delicious ! Scones are actually pretty easy to make, they freeze well too, so you can make and cut the dough ahead and bake later.  You don’t need to thaw them, just take them out when you are preheating the oven.  But keep in mind, the baking time will be slightly longer. 

Makes about 8 scones

  • 360 g all-purpose flour 
  • 1 teaspoon baking powder 
  • 1/2 teaspoon baking soda 
  • 1/4 teaspoon salt 
  • 120 g granulated sugar 
  • 120 g unsalted butter (chilled and cut into small pieces)
  • Zest of 1/2 small orange 
  • 60 g dried cranberries 
  • 1 egg
  • 1/2 cup buttermilk 
  • 30 mL orange juice 
  • 1 teaspoon pure vanilla extract 
  • 1/2 teaspoon orange extract 
  • 50 g melted dark chocolate for drizzling (optional)
  1. Preheat oven to 375ºF
  2. Sift together flour, baking powder, baking soda and salt
  3. Mix in sugar
  4. Cut in butter with a pastry cutter or rub in by hands until resembles coarse crumbs
  5. Add orange zest and cranberries 
  6. Add egg, buttermilk, orange juice and vanilla and orange extract, mix until blended
  7. Transfer dough to a floured surface, and press together to form a round disc about 1/2 inch thick
  8. Wrap with plastic wrap and refrigerate for about 1 to 2 hours
  9. Cut disc into 8 triangular wedges Orange and Cranberry Scones
  10. Bake on cookie sheet lined with parchment paper for about 20 minutes
  11. Serve warm with butter or drizzle with melted dark chocolate Orange and Cranberry SconesOrange and Cranberry Scones

Honey Cornmeal Muffins 

My kids are growing up too fast, especially my son ! He turned 12 two months ago.  He is almost as tall and as heavy as I am, he eats twice as much and he beats me easily on arm wrestling ! I am happy but a little sad at the same time…..My baby is no longer a baby ! He is turning into a man ! I told him I have to kiss and hug him as much as I can because soon he won’t let me ! Looking after 2 active growing kids can be very busy, and often, I tend to forget about myself !  I made these little corn muffins the other day so I can just grab and eat quickly when I am in a rush.  You can have them for breakfast or serve them with a soup or a salad for lunch.   

  • 100 g cornmeal 
  • 180 g all-purpose flour, sifted 
  • 1 teaspoon baking powder 
  • 1/2 teaspoon baking soda 
  • Pinch of salt 
  • 2 teaspoons lemon juice 
  • 120 mL milk 
  • 2 eggs, slightly beaten 
  • 4 tablespoons coconut oil, melted
  • 4 tablespoons honey 

Makes about 12 muffins 

  1. Preheat oven to 350ºF
  2. Put lemon juice into milk and let sit for a few minutes 
  3. Mix together all dry ingredients 
  4. Add eggs, milk with lemon juice, coconut oil and honey, mix until blended 
  5. Pour batter into slightly greased silicon or paper muffin cups and bake for about 20 minutes 
  6. Serve warm with butter 

Honey Cornmeal Muffins