Category Archives: Other desserts and treats

Chocolate Souffle 

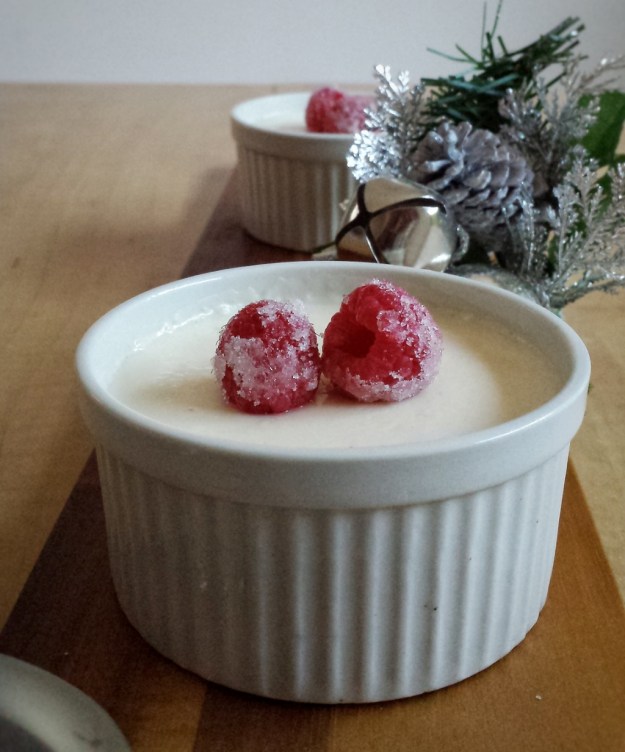
I think Valentine’s day is a perfect time to make chocolate souffle. It brings a sweet ending to your romantic dinner. I first learned it at a pastry course and it’s actually pretty easy. All souffles will rise in the oven and fall shortly after they are taken out. That doesn’t mean that you fail, it’s just the way they are. Some recipes have a higher ratio of egg whites, some add cornstarch and milk or cream. These methods may make the souffles higher and stay in shape a little longer. After trying a few recipes, I found this one, adapted from the book “How To Bake Everything” by Mark Bittman is the simplest. It uses equal parts of egg yolks and whites, so you won’t need to worry about what to do with the extra yolks and the souffles came out both rich and airy. Have a sweet Valentine’s Day!

Makes about 4-6 servings

  • Butter for greasing ramekins 
  • 80 g granulated sugar, plus more for coating
  • 90 g dark chocolate (70%), chopped 
  • 4 eggs, separated
  • 1/4 teaspoon cream of tartar 
  • Icing sugar for dusting
  1. Preheat oven to 350°F
  2. Grease ramekins with butter, then sprinkle sugar over to coat, tap off excess 
  3. Melt chocolate in a heat-proof bowl over a pot of simmering water, let cool slightly 
  4. Whisk together egg yolks and 30 g of granulated sugar using an electric mixer until light yellow and mixture falls in a ribbon over surface 
  5. Mix in melted chocolate until combined 
  6. Clean and dry the whisk
  7. In another mixing bowl using the electric mixer, whisk egg whites and cream of tartar at medium speed until frothy
  8. Increase speed to high and slowly add in 50 g of granulated sugar
  9. Whisk until a stiff peak is formed
  10. Gently fold egg whites, in 3 batches, into egg yolk mixture
  11. Pour into ramekins and place on a rimmed baking tray 
  12. Put tray into oven, pour about one inch of hot water into baking tray
  13. Bake in hot water bath for about 20 minutes (Do not open oven door during baking)
  14. Dust with icing sugar, serve immediatelyChocolate Souffle

Tools and Books 

41rqjlmpovl._sy400_.jpg

KitchenAid K45SSWH Classic 4.5-Quart Bowl Stand Mixer, White

How to Bake Everything

How to Bake Everything: Simple Recipes for the Best Baking

You can get these items through the Amazon website by clicking the above link. I will receive a small compensation if you purchase them.

Overnight Oats with Chia Seeds

After indulging myself over Christmas and New Year, I guess it’s time to make something a little healthier! Chia seed pudding has been on my “to make” list for quite a while, but I’ve been pushing it back. Somehow I associate the word “pudding” with something soft and creamy, not seedy and chewy.  So I ended up making this overnight oats.  It was really yummy, and to my surprise, my daughter loved it ! This is another recipe that can have so many variations. My ratio is roughly, 1 part oats, 2 parts milk and 1/4 part chia seeds, then add sweetener, and toppings.  It makes a great breakfast, or for me, a snack after my morning run !  

Makes 1 serving

  • 1/2 cup unsweetened milk of choice (I used almond and coconut milk)
  • 1/4 cup rolled oats
  • 1 tablespoon chia seeds
  • 1 tablespoon honey or maple syrup
  • toppings of choice, e.g. banana, berries, shredded coconut, almond slices, pumpkin seeds, sunflower seeds etc
  1. Combine milk, oats, chia seeds and sweetener in a bowl or a mason jar  
  2. Stir well, cover and refrigerate overnight
  3. Add toppings when ready to serveOvernight Oats with Chia Seeds


Espresso Truffles 

2016 has been a pretty busy blogging year for me….Trying new recipes, participating in recipe round-ups, collaborative posts, Gastroposts, etc.  I also took a few pastry courses to improve my knowledge and skills. It’s been fun and rewarding. To treat myself and write my last post for the year, I made these Espresso Truffles with two of my favourite things, coffee and chocolate ! These little balls are so yummy, just one bite can already put a smile on my face and they are surprisingly easy to make ! Looking ahead, I hope to continue to learn, create and share more recipes.  Have a Happy New Year ! Espresso Truffles

Makes about 16 truffles

    • 180 g semi-sweet chocolate (finely chopped)
    • 60 g dark chocolate (70%, finely chopped)
    • 120 mL whipping cream
    • 3 g French Vanilla or other flavoured coffee beans (coarsely crushed)
    • 1 teaspoon pure vanilla extract
    • toppings of choice : unsweetened cocoa powder, melted chocolate for dipping (about 8 oz for 16 truffles), sea salt, crushed nuts, shredded coconut, etcEspresso Truffles
  1. Pour whipping cream and crushed coffee beans in a non-stick pot over medium heat until simmering
  2. Pour hot cream through a fine mesh and over chopped chocolate, let sit for about 30 seconds, add vanilla
  3. Stir until smooth
  4. Cool, then put in fridge for about 2 hours
  5. With the help of a melon scooper or a teaspoon, shape about 2 teaspoons each into balls
  6. Roll over desired toppings or dip them in melted chocolate 
  7. Keep in fridgeEspresso Truffles

Eggnog Panna Cotta with Frozen Sugared Raspberries

We love panna gotta and we love eggnog. So Christmas seems to be a perfect time to combine them together!  It makes a great dessert for your holiday dinner.  It is super easy and you can prepare it the day before.  For the sugared raspberries, many recipes use raw egg whites which I am not comfortable with.  I think a simple syrup works just as good. I also like to freeze mine for a little crunchiness.  Have a Merry Christmas everyone !

Makes about 4 servings

For the sugared raspberries

  • 100 g raspberries (wash and dry)
  • 60 g granulated sugar
  • 1/4 cup boiling water
  • 60 g vanilla sugar (or you can just use granulated sugar)

For the panna cotta

  • 1 envelope (7g) unflavoured gelatin
  • 1/2 cup milk
  • 1 cup eggnog
  • 1/2 cup whipping cream
  • 30 g granulated sugar
  • 1/2 teaspoon pure vanilla extract
  • pinch of nutmegSugared Raspberries
  1. For the sugared raspberries, prepare a simple syrup by dissolving 60 g of granulated sugar in 1/4 cup of boiling water, then let cool
  2. Gently brush raspberries with simple syrup and roll in a dish of vanilla sugar or granulated sugar
  3. Place on a tray lined with parchment paper and freeze for 2 or more hoursSugared Raspberries
  4. For the panna cotta, sprinkle gelatin over milk and let sit for a few minutes 
  5. Heat together eggnog, whipping cream and sugar in a non-stick pot over medium heat until sugar all dissolved and just starting to bubble, turn heat down to low 
  6. Add gelatin mixture
  7. Stir until gelatin all dissolved, add pinch of nutmeg
  8. Turn heat off, add vanilla extract
  9. Strain through a fine mesh twice
  10. Pour into ramekins or desired containers
  11. Let cool and refrigerate until set, at least 3 hours or overnight
  12. Top with frozen sugared raspberries when ready to serve

Eggnog Panna Cotta

Marble Chocolate Bark 

This is probably one of the easiest homemade Christmas treats that you can give to your friends and relatives. And there are so many different ingredients you can use.  All you need are three basics :

  1. chocolate, dark, milk, white or a mix
  2. something chewy, like dried fruits
  3. something crunchy, like nuts, seeds,toffee bits, crushed candy canes

I like mine very simple because I still like to enjoy the chocolate.  So here is my creation !

  • 240 g dark chocolate
  • 120 g white chocolate 
  • 30 g pistachios (remove shells and crush into small pieces)
  • 30 g dried cranberries 
  1. Melt chocolates in a heat-proof bowl over a pot of simmering water.
  2. Pour dark chocolate on a baking tray lined with parchment paper, spread evenly with a spatula
  3. Drop spoonfuls of white chocolate over dark chocolate
  4. Swirl with a skewer or handle of a spatula to create marble effect
  5. Sprinkle dried cranberries and pistachios 
  6. Refrigerate until firm
  7. Break into pieces


Choux Pastry Puffs 

I was going to call these Cream Puffs, but my daughter insisted that these are cream sandwiches ! She said cream puffs should have a hole to fill the cream inside the puffs… OK, OK… So, now I call them Choux Pastry puffs ! Whatever it’s called, they look cute and are absolutely delicious ! (Actually I think Choux Pastry Puffs sounds fancier !) They will be a perfect dessert for your upcoming holiday dinners! 

Makes about 16 puffs 

  • 200 mL water
  • 90 g unsalted butter
  • 1/4 teaspoon salt
  • 30 g  granulated or vanilla sugar 
  • 120 g all-purpose flour
  • 3 eggs
  • 1 cup whipping cream
  • 2 tablespoons icing sugar, plus more for dusting, sifted 
  • 1/2 teaspoon pure vanilla extract 
  • 50 g semi-sweet chocolate (melted), for drizzling
    1. To prepare the whipped cream, place a mixing bowl into freezer for about 15 minutes 
    2. Using an electric mixer, whisk together whipping cream, 2 tablespoons of icing sugar and vanilla, in the cold mixing bowl, until stiff peak is formed 
    3. Refrigerate until use 
    4. To prepare the choux paste, heat together water, butter, salt and granulated or vanilla sugar in a pot over medium heat until just starting to boil
    5. Turn heat down to low, add flour all at once
    6. Stirring constantly, cook until a thin film of paste formed at the bottom of the pot, about 5 minutes
    7. Transfer paste to a heat-proofed mixing bowl and cool down
    8. Meanwhile, preheat oven to 350ºF and prepare piping bag with desired piping tip
    9. Add eggs to paste, one at a time and mix well after each addition
    10. Transfer to piping bag and pipe into rounds on baking sheets lined with parchment paper, no bigger than 2 inches in diameter Choux Pastry Puffs
    11. Bake at 350ºF  for about 12-14 minutes until starting to brown, turn heat down to 325°F and bake for another 15 minutes until golden (if puffs are under baked, they will collapse after taken out)
    12. Turn heat off, leave puffs inside oven for about 15 -20 minutes with oven door ajar
    13. Take puffs out, let cool on baking sheets, then completely on rack Choux Pastry Puffs
    14. Cut puffs in halves, fill centres with whipped cream
    15. Drizzle with melted chocolate and dust with icing sugar, serve immediately Choux Pastry Puffs

Matcha (Green Tea) Mochi 

Mochi is one of my favourite desserts ! It’s sweet, soft, chewy….. just delicious. Traditionally, it is made by steaming a short-grain rice called mochigome, then it is mashed and pounded with wooden mallets in a mortar. I saw a video on YouTube on the fastest mochi maker in Japan. Wow !  It sure takes some serious skills and labour ! (Here is the link if you are interested https://www.youtube.com/watch?v=tmSrULDVRPc).

Of course I don’t have those skills and tools. This recipe uses sweet rice flour and is very simple. The red bean paste matches so well with the green tea flavour.  With a cup of green tea, I feel like I am in Japan……I wish ! 

Makes about 8-10 pieces

  • 150 g sweet red bean paste (coarse or fine)
  • 180 g sweet rice flour (mochiko)  
  • 1 teaspoon matcha powder
  • 60 g granulated sugar 
  • 300 mL water
  • 1/4 cup potato starch (for dusting) 
  1. Scoop red bean paste with a teaspoon into small balls (about 1/2 inch) 
  2. Place in freezer for about 15 minutes 
  3. Mix together sweet rice flour, matcha powder and sugar in a large microwavable bowl 
  4. Add water, mix well 
  5. Microwave on high for 1+1/2 minutes, remove and stir, then microwave on high again for about one more minute (each microwave oven is different, you may need to adjust the time) 
  6. Cool slightly for about 5 minutes 
  7. Place a piece of parchment paper on work surface and dust generously with potato starch 
  8. When dough is still fairly warm, spoon about 1-2 tablespoons each onto dusted parchment paper (dough is very sticky)
  9. Put a red bean paste ball in the middle, wrap and seal by pinching the edges together 
  10. Dust with more potato starch if needed to prevent sticking (you can dust off the extra with a pastry brush when mochi is cooled
  11. Place seal side down on a tray lined with parchment paper  
  12. Cool and serve. You can keep them in an air-tight container for up to 2 days at room temperature 

Matcha (Green Tea) Mochi


Halloween Cake Pops

My daughter borrowed a book about Halloween treats from the library last week, there were so many great ideas we want to try. After looking through the book and “researching” on the internet, we decided to make cake pops !  So we went to the store and bought all we need…..cake pop sticks, chocolate, coating wafers, licorice sticks, sprinkles…..and we also picked up some sour candies, dried fruits, peppermint paddies….. oops, I guess we got a little too much ! Oh well, we had a lot of fun shopping and making them, that’s all that matters, right?! The coating wafers tend to be very sweet, so I used less sugar for the cake and dark chocolate for the frosting. They turned out really tasty and fudgy like brownies. My son, who doesn’t have a sweet tooth, said these cake pops are “boss” !

For the cake

  • 135 g self-rising flour (about 3/4 cup)
  • 25 g unsweetened cocoa powder
  • 60 g unsalted butter
  • 60 g granulated sugar
  • 1 egg
  • 1/2  teaspoon pure vanilla extract
  • 90 mL boiling water

For the chocolate frosting 

  • 60 g unsalted butter
  • 100 g icing sugar
  • 1/2 teaspoon pure vanilla extract
  • 60 g dark chocolate (70%)

For the coating

  • Chocolate or candy moulding wafers (You will need about 300 g of wafers to coat 6 cake pops)
  • Sprinkles, licorice, and or other decorations of choice 

Makes about 20 cake pops 

To make the cake

  1. Preheat oven to 350ºF
  2. Sift together self-rising flour and cocoa powder
  3. Using an electric mixer with the paddle attachment, cream butter and sugar until fluffy
  4. Add egg and vanilla
  5. Add flour mixture in 2 parts, mix until blended
  6. Gradually stir in boiling water, batter will be slightly runny
  7. Bake in a 9 inch x 5 inch loaf pan, lined with parchment paper, for about 20 minutes 
  8. Let cake cool completely

To make the frosting

  1. Melt dark chocolate in a bowl over a pan of simmering water, let cool slightly
  2. Using an electric mixer with paddle attachment, cream butter and icing sugar
  3. Add in vanilla and melted chocolate, mix until smooth

To prepare the cake balls

  1. When the cake is completely cooled, break the cake into fine crumbs with hands
  2. Gradually add frosting, a couple of tablespoons at a time, mix until you can roll mixture into balls
  3. Roll cake mixture into small balls, place on a cookie sheet lined with parchment paper, cover with plastic wrap and put in fridge for at least about 30 minutes

Halloween Cake Pops


 To assemble the cake pops

  1. Melt candy melts or chocolate in a bowl over a pot of simmering water 
  2. Dip cake pop sticks into coating about 1 inch deep
  3. Insert coated sticks into cake balls 
  4. Dip into coating, covering the whole cake pop (since it’s a chocolate cake, you may need to do 2 coatings if using white coating)
  5. Gently tap off excess coating
  6. Decorate while coating is still wet, then let dry (alternatively, you can draw on them when they are dry using edible markers)

Apple Walnut Crumble

September has been pretty busy, school has started, so does hockey, piano, drawing class…..etc.  And I want to go back to my running routine…… just wish there was more time to bake and blog ! September also means it’s apple season, there are so many varieties.  My favourite kind is Gala.  They are sweet, juicy with medium firmness.  They are excellent for both eating and baking. Other good choices for baking are McIntosh, Golden Delicious and Fuji.  A lot of recipes use Granny Smith, but I found them too tart and hard.  The crumble tastes delicious on its own, I had it with yoghurt.  You can also use Vanilla Ice Cream or Creme Anglaise

Makes about 4 servings 

For the fillings

  • 2 medium-sized apples (peel, core and cut into chunks)
  • 50 g chopped walnuts 
  • 1 tablespoon lemon juice 
  • Zest of 1/2 lemon 
  • 2 tablespoons brown sugar 
  • 3 tablespoons maple syrup 
  • 1/2 teaspoon ground cinnamon 

For the toppings

  • 1/2 cup oats
  • 1/4 cup flour 
  • 3 tablespoons brown sugar 
  • 45 g unsalted butter, melted 
  1. Preheat oven to 350ºF 
  2. To prepare the fillings, mix apples with walnuts,lemon juice, lemon zest, brown sugar, maple syrup and cinnamon, set aside 
  3. Prepare crisp toppings by mixing oats, flour, brown sugar and melted butter together 
  4. Put apple mixture into 4 baking dishes, top with crust mixture
  5. Bake for about 30 minutes until top is golden and apples are soft 
  6. Serve warm with Vanilla Ice Cream, Creme Anglaise or yoghurt


No Bake Nutella Bites 

Can’t believe September is here already ! Kids are back to school, routines are slowly getting back to normal, and I have to start making lunches and snacks. I made these little energy bites as an after school snack. They are like mini granola bars and are super easy to make. Keep them in the fridge and the kids can just grab them when they want. They come in handy before hockey practices too ! There can be many variations to the recipe.  I used Nutella, but you can also use peanut butter, cookie butter or sunflower butter. You can also choose other nuts, seeds and dried fruits. 

Makes about 25-30 

  • 1 cup quick oats
  • 1 cup rice crispy cereal 
  • 2 tablespoons chia seeds 
  • 2 tablespoons ground flax seed 
  • 1/4 cup unsweetened shredded coconut 
  • 1/2 cup Nutella spread 
  • 3 tablespoons melted coconut oil 
  • 2 tablespoons honey 
  1. Mix all dry ingredients together 
  2. Add Nutella, coconut oil and honey, mix until blended 
  3. With the help of a melon scooper or spoon, roll mixtures into small balls
  4. Refrigerate until firm
  5. Keep in refrigerator 

No Bake Nutella Bites