Tag Archives: food blog

Iced Coffee Popsicles 

For a lot of people, summer is a relaxing season, but if you are a mom, you would know, summer can be very busy too! For the last few weeks, I have been driving my kids to swimming and other activities almost every day, trying to keep them active and occupied….so they don’t spend too much time in front of the computer ! It’s busy, but they’ve been having a good time. For me, many days, by the afternoon, I am pooped ! And I need my afternoon “fuel” to keep me going, which is usually a light snack and a cup of iced coffee.  It was so hot the last few days, so I decided to transform my “fuel” into popsicles ! Oh, and I found a bottle of Kahlua in my fridge so I added some extra boost ! Sorry kids, you can’t have these, but you know what ?  When mom is cool, everything is cool ! 

Makes about 8-10 popsicles 

  • 1/2 cup hot brewed coffee 
  • 1/2 cup condensed milk 
  • 3/4 cup whole milk 
  • 3/4 cup half and half cream
  • 1 teaspoon pure vanilla extract 
  • 2 tablespoons coffee liqueur (optional)
  • 60 g semi-sweet or dark chocolate, melted (optional for drizzles) 
  1. Mix hot coffee and condensed milk together
  2. Add all other ingredients except the melted chocolate, stir until blended 
  3. Pour into popsicle molds and freeze until set, about 4 hours 
  4. Drizzle with melted chocolate if desired 

Iced Coffee Popsicles


Mini Blueberry Loaves

To me, the best part of summer is the large variety of fruits we get to enjoy, berries, watermelon, peaches, etc. And blueberry is our no.1 favourite ! Every summer, we can easily go through over 30 pounds of blueberries!  There are many blueberry farms in our area, fresh, local, sweet and at a very reasonable price. How can I resist ? And as a baker, how can I not bake with them ?!  Again, I tried to use less sugar. So, I used use vanilla-flavoured almond milk instead of milk and added some honey, and was very pleased with the result !
I asked my daughter, who is my “art director” for my blog, to draw me something with blueberries and here is what she came up with ! I guess she is right, blueberries made you happy and healthy rather than blue ! 

You Aren't Blue

Makes about 6-8 mini loaves

  • 150 g fresh blueberries 
  • 270 g all-purpose flour + extra for coating blueberries 
  • 1 teaspoon baking powder 
  • 1/2 teaspoon baking soda 
  • 1/4 teaspoon salt 
  • 120 g unsalted butter, at room temperature 
  • 60 g granulated sugar 
  • 2 large eggs
  • 100 mL vanilla-flavoured almond milk 
  • 60 mL honey
  • 15 mL lemon juice 
  • 5 mL pure vanilla extract 
  • zest of half a lemon
  1. Preheat oven to 350ºF
  2. Sift together flour,baking powder, baking soda and salt, set aside 
  3. Coat blueberries with about a tablespoon of flour, set aside 
  4. Using an electric mixer with the paddle attachment, cream butter and sugar until fluffy 
  5. Add eggs, honey, almond milk, lemon juice and vanilla
  6. Add flour mixture in 2 portions, mix until blended, scraping sides and bottom of mixing bowl (it’s ok if batter is slightly lumpy)
  7. Gently fold in blueberries and lemon zest
  8. Spoon batter into slightly greased and floured mini loaf pans
  9. Bake for about 20 minutes 
  10. Cool for about 10 minutes in pans, then completely on rack 

Mini Blueberry Loaves


Roasted Beet Chocolate Brownies

I get so excited whenever I can put vegetables in my desserts. Perhaps it makes me feel healthier and less guilty?!  I picked the beautiful beets this time.  They are sweet, colourful and very nutritious.  (My batter came out purple, which is my favourite colour!  Can’t “beet” that! ) You can make them into soup, salads, desserts, even their leaves are edible !  With their sweetness, I managed to use a little less sugar.  My son doesn’t normally like sweets, but he loves my brownies. He was a little skeptical when I told him I used beets. But after he had one, he said he couldn’t even taste them!  I guess that’s a success for me! My daughter?  No problem, she eats everything I make ! 

Roasted Beet Chocolate Brownies

Makes about 16 squares 

  • 200 g beet puree (about 2 -3 medium beets)
  • 180 g all-purpose flour
  • 1 teaspoon baking powder 
  • 50 g unsweetened cocoa powder 
  • 1/2 teaspoon salt 
  • 2 eggs
  • 180 g  granulated sugar 
  • 2 teaspoons vanilla extract 
  • 120 mL melted coconut oil 
  • 180 g semi-sweet chocolate 
  1. To prepare the beet puree, preheat oven to 375°F
  2. Cut stems and roots off, leave skin on 
  3. Wrap with aluminium foil and bake for about 60 minutes until fork tender 
  4. Cool, peel skin off and puree using a blender or food processor 
  5. To make the brownies, preheat oven to 350ºF
  6. Melt chocolate in a heat proof bowl over a pot of simmering water, cool slightly 
  7. Sift together flour, baking powder, cocoa powder and salt, set aside 
  8. In a large mixing bowl , whisk together eggs and sugar until pale (you can use an electric mixer, I just hand-whisked mine)
  9. Mix in vanilla extract, coconut oil and melted chocolate
  10. Add flour mixture in 2 parts, mix until blended 
  11. Add beet puree 
  12. Bake in a square baking pan lined with parchment paper for about 30 minutes 
  13. Cool completely before cutting 

Fresh Beets

I am so glad to be part of the The Canadian Food Creatives.  This month, our topic is “Fresh from the Garden”.  Be sure to check out the links below for other great recipes. They can also be found on social media using the hashtag #CDNFoodCreatives. Many thanks to Cassie Hendry at The Crumb Kitchen for hosting.

fb_img_1468681894617.jpg

Raspberry Swiss Roll

The other night, my daughter said,”mom, I want some cake ! ” , but I didn’t have any at home and it was a little too late to bake.  So the next day, I decided to make a Swiss Roll, using some fresh raspberries that I had.  The first attempt……not so good, I put too much filling in and did a bad job in rolling, so it looked more like a Halloween cake with “blood” all over.  Lucky the cake tasted pretty good, so my daughter could at least have some tasty cake.  The second time around, much better.  I tried not to use my electric mixer and do everything by hand. It came out perfect! I actually learned that when making meringues, you can get more volume whisking it by hand. Also you don’t need to worry about overbeating, cause you sore arms will tell you to stop! I used raspberries as the filling, you can switch it up easily with other fruits, whipped cream, Nutella, even peanut butter.

Makes one log (about 6-8 slices)

For the raspberry filling

  • 350 g fresh raspberry
  • 60 g granulated sugar (adjust to your own taste)
  • 15 mL lemon juice

For the sheet cake

  • 4 eggs (separated)
  • 120 g granulated sugar (20 g is used for the meringue)
  • 75 g cake and pastry flour, sifted
  • 1 teaspoon pure vanilla extract
  • 1/4 teaspoon cream of tartar
  • icing sugar for dusting

Meringue

  1. Prepare raspberries by heating them together with sugar and lemon juice in a non-stick pot over medium heat
  2. Turn heat down to low when liquid starts to bubble
  3. Gently mash raspberries with a wooden spoon, cook until thickened
  4. Strain seeds, let cool
  5. To make the cake, preheat oven to 350ºF
  6. Lightly grease a 8″ x 10″ baking tray and line bottom with parchment paper 
  7. In a mixing bowl, beat together egg yolks and 100 g of sugar until pale
  8. Add vanilla and the flour, mix until blended
  9. In a separate bowl, whisk egg whites, and cream of tartar until frothy, then add sugar slowly, a little at a time, and whisk until medium peak is formed
  10. Gently fold meringue into batter, do not over mix 
  11. Pour into baking tray and bake for about 15 minutes until golden
  12. Let cool, but still a little warm to touch
  13. Gently invert cake and place on top of another piece of parchment paper
  14. Carefully remove top sheet of parchment and trip sides of cake
  15. Spread a very thin layer of raspberry sauce on top
  16. Gently roll cake up
  17. Dust with icing sugar

Raspberry Swiss Roll


Raspberry Yoghurt Popsicles (for Canada Day)

Happy Canada Day!
Can’t believe I have been in this country for 26 years! I am so thankful that my parents made the decision to move to Canada. I love this country, the friendly people, the weather (especially for us who are in the west coast), the amazing scenery. It’s a fantastic place for my kids too, so many activities they can enjoy. (Well, only now I am worried they won’t be able to afford to have their own house when they grow up….)
Our weather has been really nice and today is a great day for a picnic or BBQ. These little popsicles make a perfect cool treat and are so easy to make.

Makes about 12 popsicles

  • 850 g vanilla flavoured Greek yoghurt
  • 1 kg fresh raspberries
  • 200 g granulated sugar (adjust to your own taste)
  • 3 tablespoons lemon juice
  1. Prepare raspberries by heating them together with sugar and lemon juice in a non-stick pot over medium heat
  2. Turn heat down to low when liquid starts to bubble
  3. Gently mesh raspberries with a wooden spoon, cook until thickened
  4. Strain seeds, let cool
  5. To make popsicles, layer yoghurt and raspberry sauce alternately in small paper cups or popsicle molds, freezing in between layers (You can also swirl them together to make a marble effect). That’s it, enjoy!

img_20160629_165520.jpg


Cherry Puff Tarts

Cherry is another fruit that we love to eat in the summer. My parents used to have 2 giant cherries at their old house. I still remember my brother and I would pick as much as we could before the birds get to them. There would be so much cherries that we would fill almost every single basket and bucket in the house….Oh, how I miss those good times.  My folks have moved and we no longer have our own cherry trees, but I can make these yummy tarts for them instead !
I always keep a box of puff pastry in the freezer. It’s really handy if you need to make something quick, both sweet and savory. I yet to try making my own puff pastry…. Well, it’s on my list! 🙂

Makes about 10-12 tarts

  • 200 g pitted fresh cherries
  • 3 tablespoons granulated sugar
  • 1/2 tablespoon lemon juice
  • 1 box puff pastry (about 400 g)
  • 1 egg, lightly beaten
  • vanilla sugar or granulated sugar for sprinkling
  • Icing sugar for dusting
  1. To prepare the fillings, heat cherries, 3 tablespoons of sugar and lemon juice in a non-stick pot over medium heat
  2. Turn heat down to low when liquid starts to bubble
  3. Cook until cherries softened, set aside to cool
  4. To make the puff pastry, preheat oven to 350°F
  5. Roll out pastry on a floured surface to about 1/8 inch in thickness
  6. Cut with a round cookie cutter into circles, about 2-3 inches in diameter
  7. Place half the number of circles on cookie sheets lined with parchment paper
  8. Dork with a fork, brush with egg wash and sprinkle with granulated or vanilla sugar 
  9. Cut out the centres of the other circles using a smaller cookie cutter, (or a bottle cap would work too) to form rings
  10. Place rings on top of the circles
  11. Brush ring tops with egg wash and sprinkle with sugar (You can collect all the dough scrapes and re-roll, but only do it once, otherwise it will lose its puffiness)
  12. Bake for about 15 minutes until golden, let cool
  13. Spoon in cherry fillings, dust with icing sugar and serve immediately

img_20160628_180422.jpg

Chocolate Ice Cream

I made this ice cream about 2 weeks ago. Since then I have been thinking what I should write about this post. I wanted to share something special other than just telling you how good this ice cream is. (It is REALLY good !) The day that I made this ice cream, I actually just finished a very good session of rock climbing. So, I decided to share the experience. I started indoor rock climbing about a year ago, and I absolutely fell in love with it. Back then, I never thought I could do it. Yes, my arms “hurt like hell” every time I finished, but I feel good, it’s a good kind of pain. For a 40 something-year old mom, who was not very active, being able to finish a 5.8 route, it’s a big achievement…..(Oh, FYI, a climbing route is graded according to its difficulty. It ranges from 5 all the way to 5.15) Through rock climbing, and also running, I have become more healthy physically and mentally. (Well, I guess that’s a good excuse to make more desserts !) I have learned to be more patient and perseverance.  As a mom, I feel it is important to teach my kids to pursue their dreams and goals no matter how hard they seem…..I have to thank my daughter too ! She likes to climb and keeps me going.  Actually she is even tougher than I am !  Well done, girl ! …. and well done mom too ! 
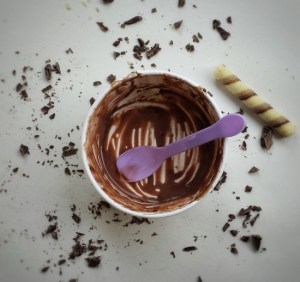
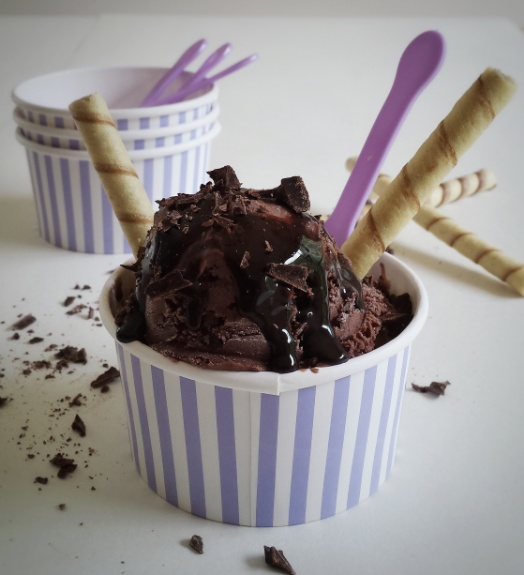
OK, back to the ice cream ! I have made chocolate ice cream before but without the ice cream machine.  Now that I own one, I thought I should make the “real” thing.  And the “real” thing does taste better !  I added some chopped chocolate for extra flavour and crunchiness, you can omit it if preferred.  

Makes about 1 L

  • 2 cups whipping cream
  • 1 cup whole milk
  • 4 egg yolks
  • 200 g granulated sugar
  • 50 g unsweetened cocoa powder
  • 1 teaspoon pure vanilla extract
  • 100 g dark or semi-sweet chocolate, finely chopped (optional) 
  • ice and water for ice bath
  1. Whisk together egg yolks, sugar and 1/4 cup milk
  2. In a non-stick pot, heat remaining milk, 1 cup of whipping cream and cocoa powder over medium heat until just boiled, stirring constantly (Keep the other cup of whipping cream in the fridge)
  3. Add 1/3 cup of hot mixture into egg mixture to temper, then pour everything back into pot
  4. Turn heat down to low, stir constantly until just thickened, mixture should coat back of spoon (You can draw a streak in the middle of the spoon with your finger, if the streak stays clear, it is ready)
  5. Remove from heat immediately, strain through a fine mesh twice
  6. Let sit in an ice bath, stir in vanilla extract and remaining cold whipping cream
  7. Let cool completely, cover with plastic wrap and refrigerate for at least 3 hours or overnight
  8. Place in ice cream machine and churn according to manufacturer’s instructions
  9. Fold in chopped chocolate
  10. Serve soft immediately or keep in freezer

img_20160614_180310.jpg

Lemon Panna Cotta with Blackberry Sauce

This is one of the desserts that my daughter and I would “fight” to have the last bite…. and of course mommy always “loses” 🙂 I love the blackberry sauce, it’s refreshing and it helps to balance the richness of the panna cotta.  If you have left over sauce, you can use it as a spread on you toast, pancakes or waffles.

Makes about 4 servings

For the panna cotta

  • 1+1/2 cups whipping cream
  • 1/2 cup milk
  • 1/3 cup granulated sugar
  • zest of 1 lemon
  • 2 tablespoons lemon juice
  • 1 envelope or tablespoon unflavoured gelatin

For the blackberry sauce

  • 12 ounces fresh blackberries
  • 4 tablespoons granulated sugar
  • 2 tablespoons water
  1. Sprinkle gelatin over lemon juice and let sit for a few minutes (it will form a block of jelly, which is fine)
  2. Heat together whipping cream, milk, sugar and lemon zest in a non-stick pot over medium heat until sugar all dissolved and just starting to bubble, turn heat down to low 
  3. Add gelatin mixture
  4. Stir until gelatin all dissolved
  5. Strain through a fine mesh twice
  6. Pour into lightly greased ramekins or desired containers
  7. Let cool and refrigerate until set, at least 3 hours or overnight
  8. Prepare blackberry sauce by heating up blackberries, sugar and water in a non-stick pot over medium heat
  9. Turn heat down to low when liquid starts to bubble
  10. Gently mash blackberries with a wooden spoon, cook until thickened
  11. Strain seeds and skin out, let cool
  12. When panna cotta is set, dip bottom of ramekins in hot water for about 10 seconds, then run a knife around ramekins, invert gently on plates (Alternatively, you can just serve them inside the ramekins)
  13. Serve with blackberry sauce

img_20160508_163931.jpg

Healthy Banana Bread

Besides a mom and a home baker, I am also a pharmacist, so whenever I bake or make desserts, I would have a dilemma in my mind. Shouldn’t I be promoting healthy eating as a health professional? But I really like to make and eat sweets ? To somewhat justify myself, I try to create more recipes that use less sugar and fat, and incorporate healthier ingredients.  It took me a few tries to make this healthy yet very delicious banana bread. It contains no butter and no refined sugar. It is moist but not too dense, which is what my family likes. You can use bread flour if you prefer a denser texture. I also added some ground flax seeds for your extra dose of fibre and omega fatty acids!

Makes one 9×5 inch loaf

  • 2 cups all-purpose flour
  • 1 teaspoon baking soda
  • 1/4 teaspoon salt
  • 1/4 cup ground flax seeds
  • 3-4 ripe bananas, meshed (about 1+1/2 cups)
  • 2 eggs, lightly beaten
  • 120 g coconut oil, melted
  • 1/4 cup organic agave syrup
  • 100 g plain Greek yoghurt
  • 1 teaspoon pure vanilla extract
  1. Preheat oven to 350ºF
  2. Sift together flour, baking soda and salt into a large mixing bowl
  3. Mix in ground flax seeds
  4. Add other wet ingredients, mix until blended
  5. Pour into a lightly greased and floured 9×5 inch loaf pan
  6. Bake for about 50-60 minutes

Simple Shortbread Cookies

My mom, myself and my daughter all love sweets! Since Mother’s Day is coming up, I thought I would make something that all of us would enjoy. These shortbread cookies are sweet and buttery ! Making them is, literally, as easy as 1,2,3 ! All you need to remember is, 1 part of sugar, 2 parts of butter and 3 parts of flour! I also added a touch of lemon zest.
Have a Happy Mother’s Day ! I think moms are the most wonderful people into the world….of course that includes myself !……. 🙂   And I have to thank my daughter for her wonderful drawing !

Makes about 30 cookies

  • 1/2 cup very fine sugar or vanilla sugar plus more for sprinkling
  • 1 cup unsalted butter, at room temperature
  • 1+1/2 cups cake and pastry flour, sifted
  • Zest of half a lemon (optional)
  1. Using an electric mixer with the paddle attachment, cream butter and sugar together
  2. Add lemon zest
  3. Add flour in 2 portions, mix until dough starting to form
  4. Pat dough together with hands
  5. Cut dough into 2 parts, gently shape each dough into logs, about 1+1/2 inch in diameter
  6. Wrap with plastic wrap (Believe it or not, I wrapped the dough and put them inside paper towel rolls to shape! )
  7. Refrigerate for at least 3 hours or overnight
  8. When ready to bake, preheat oven to 300°F
  9. Cut dough into discs, about 1/4 – 3/8 inch in thickness (They do flattened slightly during baking)
  10. Place on cookie sheets lined with parchment paper, about 2 inches apart
  11. Sprinkle top with more sugar
  12. Bake for 18 -20 minutes until edges just golden (You don’t want them too brown)
  13. Cool on baking sheets for 10 minutes, then completely on rack

img_20160505_173658.jpg