Gingerbread Eggnog Trifle

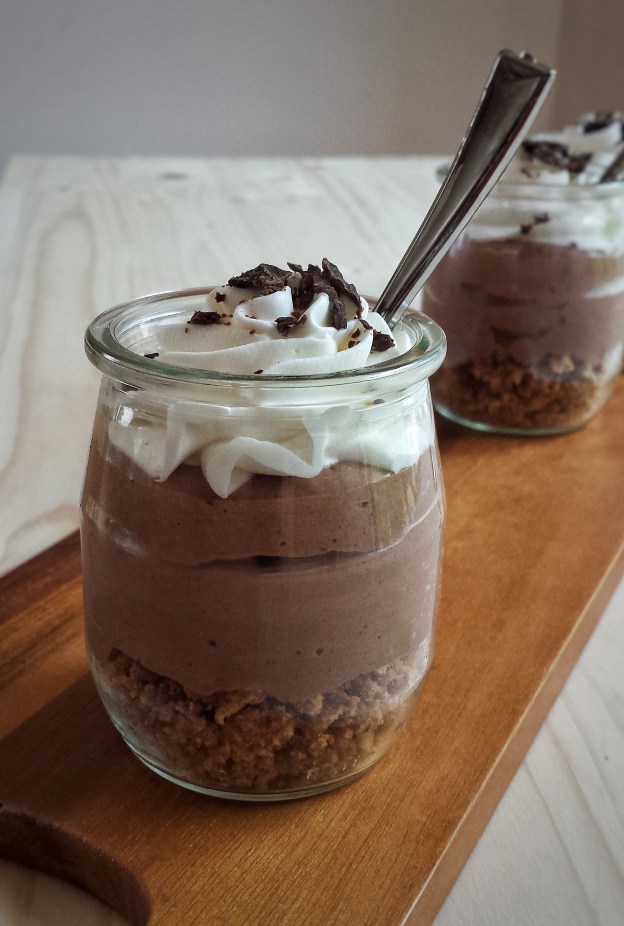
Christmas is only 2 days away ! It is the most wonderful time of the year, but it can also be the craziest time of the year ! Shopping, baking, cooking, decorating…..I think we all wish we had 48 hours in a day ! But to me, spending time with family and friends is more important and is the best Christmas gift of all ! So, I decided to make this quick dessert so I can have more time snuggling with my kids after dinner ! Gingerbread and eggnog ! Nothing says Christmas more than these two  flavours together and it’s so simple to make ! You can even get the kids to make their own dessert !  Have a very Merry Christmas everyone ! 

Makes about 6 – 8 servings

    • About 10 gingerbread cookies
    • 500 g vanilla cake, break into chunks (you can use store-bought cake or I just used mug cakes, see recipe below)
    • 1 box instant vanilla pudding mix
    • 500 mL light eggnog
    • 250 mL cold whipping cream
    1. Add eggnog to pudding mix, whisk for about 2 minutes until thick, keep in refrigerator until use
    2. In a separate bowl, using an electric mixer, beat whipping cream until stiff peak
    3. Crush gingerbread cookies into pieces 
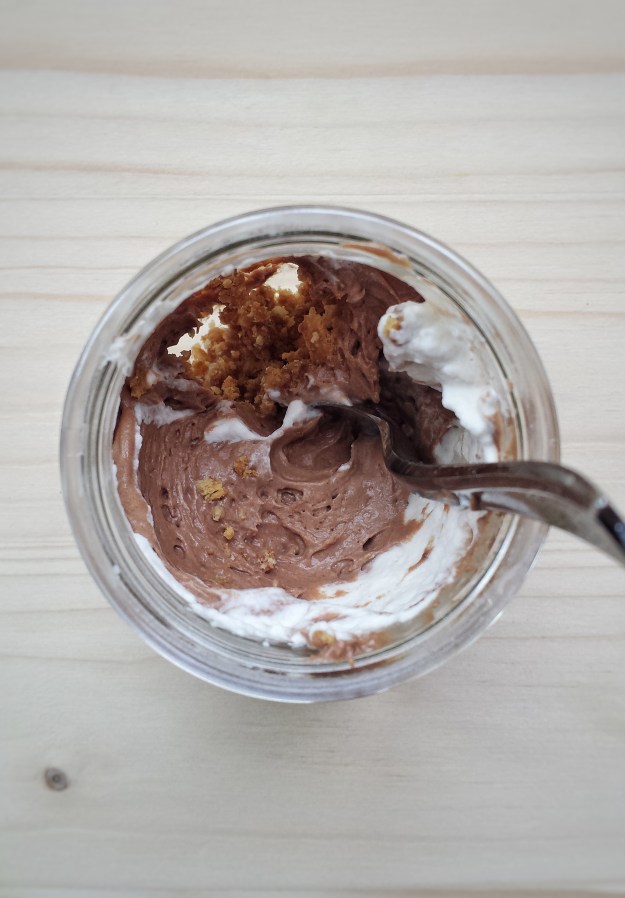
    4. To assemble, layer cookies, cake, pudding and whipped cream
    5. Sprinkle top with more cookie crumbs 

For the mug cake

  • 75 g unsalted butter, melted, cool slightly 
  • 120 g granulated sugar
  • 120 mL milk
  • 2 eggs
  • 5 mL pure vanilla extract
  • 90 g self-rising flour
  1. Coat inside of mugs with about a tablespoon of melted butter
  2. In a mixing bowl, whisk together sugar, milk, remaining melted butter, vanilla extract and eggs until blended 
  3. Add flour, whisk until smooth
  4. Pour into mugs, no more than half-full
  5. Microwave each for about 90 seconds


Gingerbread Cookies

I have to apologize ! I haven’t been able to post for a month ! I have been busy…very busy. I participated in two Christmas Fairs selling my baked goodies….for the very first time ! 

It was a lot of work, more than I anticipated, but it was well worth it ! It was a very rewarding experience. I’ve received many positive comments, from the set up of my table to how yummy my cookies were. More important, I feel so blessed to have so much support from family and friends, especially my daughter ! I couldn’t do it without her ! 

Gingerbread cookie was one of the items I sold at the fairs. I had posted a recipe before, but over the years, I have made a few changes to make it better. So here is an updated version !

For the cookies

  • 180 g all-purpose flour
  • 180 g cake and pastry flour
  • 3 g baking soda
  • 2 g salt
  • 6 g ground ginger
  • 3.5 g ground cinnamon
  • Pinch of ground cloves
  • Pinch of ground nutmeg
  • 120 g butter
  • 120 g brown sugar
  • 100 g molasses
  • 1 egg
  1. Preheat oven to 350ºF
  2. Sift together flours, baking soda, salt and spices, set aside
  3. Using an electric mixer with the paddle attachment, cream together butter and brown sugar until light
  4. Add egg and molasses
  5. Add flour mixture in 2-3 parts, mixing after each addition until just blended
  6. Refrigerate dough for about 60 minutes for easy handling, you can also freeze it for later use
  7. Roll on a lightly floured surface to about 0.5 cm in thickness
  8. Cut with cookie cutters
  9. Bake on a cookie sheet lined with parchment paper for about 8 minutes.
  10. Cool completely before decorating

For the icing 

  • 45 g meringue powder
  • 500 g icing sugar, sifted 
  • 90 – 120 mL warm water
  • 5 mL pure vanilla extract
  • 10 mL corn syrup
  • Gel food colouring
  1. Mix meringue powder with about 45 mL of water, let sit for a few minutes
  2. Stir in vanilla and corn syrup 
  3. Whisk into icing sugar using an electric mixer or a hand whisk
  4. Slowly add in more warm water until shiny and desired consistency (thicker for outlining and thinner for filling)
  5. Add food colouring

Gluten-Free Almond Thumbprint Cookies 

Halloween is over and Christmas is less than 2 months away ! Seriously ? Where did the time go ? And I am doing two Christmas Fairs in about 2 weeks ! This is my first time ever selling my cookies and baked goods ! I am super excited but nervous at the same time. How should I set up my table ? How much should I bake ? Am I going to have enough time ? Ahhhh……..My daughter told me the other day, “mom, don’t worry, just chill and do it and you will be fine ! ” OK, let’s take a deep breath and get organized, I can do this, I can do this ! Oh, and of course I can’t forget about my blog ! I wanted something that’s quick and easy…..How about thumbprint cookies ? Shortbread cookies filled with fruity jams, simple but absolutely delicious ! I made a gluten-free version this time by using ground almond. They are best to be consumed on the day you make it, so I would suggest making smaller batches. Although these cookies have less butter, they are still very rich and tasty ! Thanks to the high fat content of almonds. I totally need to eat a few of them to help me relax ! …..Wish me luck on my craft fairs ! And come visit me if you live around Richmond,B.C. ! 

Makes about 16 cookies

  • 90 g unsalted butter, soften 
  • 90 g icing sugar, plus more for dusting 
  • 240 g ground almond 
  • Pinch of salt 
  • 5 mL pure vanilla extract 
  • Jam of choice
  1. Preheat oven to 325ºF
  2. Cream butter and icing sugar with an electric mixer or wooden spoon 
  3. Add vanilla, then ground almond and salt, mix until combined
  4. Roll into one inch balls, place on baking sheet lined with parchment paper, about 2 inches apart 
  5. Make an indentation with your thumb in the middle of each ball (It’s normal for the dough to be slightly cracked)
  6. Bake for about 10 minutes 
  7. The indentations will flatten, gently press the middle again with the end of a wooden spoon while they are still fairly hot and soft 
  8. Let cool, then spoon jam in the middle. (If the jam is too cold to spread, you can warm it up in a hot water bath)
  9. Dust with icing sugar 

Halloween Monster Cupcakes 

I used to make my kids’ Halloween costumes when they were younger….fairy, witch, Thomas the Tank Engine, Ash from Pokemon, etc. Even though they don’t fit anymore, I still keep them in a box ! Maybe I am collecting too much “junk”, but they really brought back a lot of fond memories…..This year my daughter wants to be a grim reaper again, but scarier than the last two years. Yes, you read it right, it’s my daughter, not my son, and for the third time ! This was her on Halloween night two years ago ! She was only 8 ! Most 8-year-old girls would probably want to be a princess or a fairy, well….. not my girl ! 

Me? I am just going to make monster cupcakes ! These chocolate cupcakes with vanilla butter cream taste really yummy and are not scary at all ! They actually look quite adorable ! Happy Halloween ! 

Makes about 18-20 cupcakes 

For the chocolate cupcakes

  • 150 g all-purpose flour 
  • 150 g cake and pastry flour 
  • 50 g unsweetened cocoa powder 
  • 6 g baking powder 
  • 3 g baking soda 
  • 3 g salt 
  • 200 g granulated sugar 
  • 2 eggs, lightly beaten 
  • 180 mL buttermilk 
  • 60 mL vegetable oil 
  • 5 mL pure vanilla extract 
  • 180 mL boiling water 

For the butter cream frosting 

  • 240 g unsalted butter 
  • 480 g icing sugar, sifted 
  • 5 mL pure vanilla extract 
  • 30 -60 mL milk 
  • Gel food colouring 

You will also need candy melts, licorice sticks, candy eyeballs, etc for decoration

  1. To make the cupcakes, preheat oven to 350ºF
  2. In a large mixing bowl, sift together flours, cocoa powder, baking powder, baking soda and salt 
  3. Mix in sugar
  4. In another bowl, mix together eggs, buttermilk, oil and vanilla 
  5. Pour wet ingredients (except boiling water) into dry ingredients, mix until just blended 
  6. Gradually stir in boiling water, 3-4 tablespoons at a time, until just combined, batter will be runny 
  7. Pour into slightly greased cupcake cups and bake in tins for about 16-18 minutes 
  8. Cool completely before frosting 
  9. To make the frosting, use an electric mixer with the paddle attachment, start creaming butter 
  10. Gradually add in icing sugar, beat until fluffy
  11. Add vanilla, then milk, a little at a time, to desired consistency 
  12. Separate into batches, add gel food colourings
  13. Decorate cupcakes as desired 

Keep in refrigerator if not consume right away


Thanksgiving Pumpkin Cake 

For Thanksgiving this year, I want to make something that I haven’t made before and is easy to put together. So I made this Pumpkin Cake ! I kept it light by using vegetable oil in the batter and just a small amount of butter in the frosting. I figured everyone might be running out of stomach space after a hearty turkey meal ! The maple walnuts are optional, but they are REALLY good and make the cake a lot more flavourful ! My daughter is usually my taste tester, but this time I got my mom to try it …..and she ate 2 big pieces of it, I guess that means it’s approved ! Happy Thanksgiving !

Makes one 8-inch square cake

For the cake 

  • 150 g canned or homemade pumpkin puree 
  • 200 g cake and pastry flour
  • 3 g baking powder
  • 3 g baking soda
  • 2 g salt
  • 5 g ground cinnamon
  • Pinch of ground nutmeg
  • Pinch of ground cloves
  • 100 g granulated sugar
  • 2 eggs, lightly beaten
  • 90 mL vegetable oil
  • 90 mL buttermilk
  • 5 mL pure vanilla extract 

For the frosting 

  • 250 g cream cheese, softened
  • 60 g unsalted butter, softened
  • 100 g icing sugar, sifted
  • 2.5 mL pure vanilla extract 

Optional toppings

Mix about 60 g walnuts with a tablespoon of maple syrup and toast in a 350°F oven for about 8 minutes.

  1. To make the cake, preheat oven to 350ºF
  2. Line bottom of baking tray with parchment paper, lightly grease and flour the sides
  3. In a large mixing bowl, sift together flour, baking power, baking soda, salt and spices
  4. Mix in sugar
  5. In another bowl, mix together eggs, oil, buttermilk and vanilla
  6. Add wet ingredients into dry ingredients, mix until just blended
  7. Fold in pumpkin puree
  8. Pour into baking tray and bake for about 25-30 minutes, let cool 
  9. Evenly trim off top and sides with a serrated knife 
  10. To make the frosting, beat together cream cheese and butter until creamy
  11. Add icing sugar and vanilla, beat until smooth
  12. Spread over top of cake
  13. Top with toasted walnuts if desired 

Spiced Pear Tart 

My kids love to eat any kind of pears ever since they were little, Anjou, Barlett, or Asian. Pears are all very sweet and tasty no matter how you eat them. You can enjoy them raw, cook, bake, poach, etc. They are also a good source of fibre and vitamin C. It’s pretty hard not to love them ! Fall is the season for pears, so I used some Barlett pears and made this Spiced Pear Tart. I spiced up a basic short crust  for the tart shell. The dough freezes well, so you can make it ahead of time. It can also turn into yummy cookies ! So don’t throw away the trimmings after you make the tarts. Just gather them together, roll it, cut it with cookie cutters and bake for 8-10 minutes at 350°F ! I baked mine into leaves and used them as garnish ! You can adjust the amount of spices used according to your taste, both in the tart shell and the fillings. I actually would prefer a bit spicier, but my daughter said this is perfect for her palate. Well, I have to listen to my little boss ! The tarts taste delicious on their own, but my little boss likes them with vanilla ice cream, even better !  


Makes four 4-inch tarts or eight 2-inch mini tarts    

For the tart shell 

  • 120 g cold unsalted butter, cut into small pieces 
  • 75 g granulated sugar 
  • 2 egg yolks 
  • 180 g cake and pastry flour 
  • 3 g ground ginger 
  • 2 g ground cinnamon 
  • Pinch of cloves
  • Pinch of nutmeg 

For the fillings 

  • About 3-4 pears (wash, peel, core and cut into chunks)
  • 60 g brown sugar 
  • 3 g ground ginger 
  • 3 g ground cinnamon 
  • 5 mL pure vanilla extract 

For the crust 

  • 60 g quick oats 
  • 30 g all-purpose flour 
  • 30 g brown sugar 
  • 30 g unsalted butter, melted 
  1. To make the tart shells, sift together flour and spices 
  2. Mix together cold butter and sugar using a wooden spoon until blended
  3. Mix in egg yolks
  4. Add flour mixture all at once, mix, then transfer onto a surface and gently knead dough together until everything just combined
  5. Wrap with plastic wrap, refrigerate for at least 2-3 hours or overnight
  6. When ready to bake, preheat oven to 350ºF
  7. Knead dough until pliable
  8. Roll dough out to about 1/8 inch in thickness on a floured surface, dock with a fork
  9. Place inside slightly greased tart molds, trim off excess  
  10. Bake for about 8 minutes, let cool
  11. Meanwhile, prepare the fillings by mixing pear chunks with brown sugar, ginger, cinnamon and vanilla 
  12. Spoon into cooled tart shell 
  13. Mix all crust ingredients together and spoon on top of fillings
  14. Bake at 350ºF for about 25 minutes until golden 
  15. Serve warm 


Baked Cinnamon Doughnuts (with Butterscotch Glaze and Toasted Walnuts) 

Another school year has just started ! I can’t believe my son is in high school ! He is certainly excited to move on and become an official teenager, and I am happy to see him growing up and becoming more independent. But as a mom, I would never stop worrying about him ! Is he doing well at school, is he making new friends, and are they good kids, etc….Luckily, my kids and I are very close, and we would talk about almost everything…..I am sure there are things they don’t want me to know !

Since the kids are back to school, I finally have a little more time to work on my recipes. These cinnamon doughnuts are nice surprise ! I was trying to make some cinnamon apple waffles but they didn’t turn out right. So, I switched and made doughnuts instead. And I am so glad  I did ! They are so soft and tasty even without any toppings. But hey, why not kick them up 2 more notches ! The butterscotch glaze is heavenly ! No kidding, my daughter would have “drunk” the whole bowl if I didn’t stop her ! The toasted walnuts are really nice too, they add extra flavour and crunchiness. Pecans would also be a good alternative. You can refrigerate the extra butterscotch sauce for up to 1 week. Rewarm and drizzle it on some vanilla ice cream, and you’ll have another dessert !  

Makes about 12 doughnuts     

For the doughnuts

  • 300 g all-purpose flour 
  • 6 g baking powder 
  • 3 g baking soda 
  • 2 g salt 
  • 6 g ground cinnamon 
  • Pinch of nutmeg 
  • 30 g brown sugar 
  • 30 g granulated sugar 
  • 2 eggs (slightly beaten)
  • 300 mL buttermilk 
  • 60 mL vegetable oil 
  • 5 mL pure vanilla extract 

For the butterscotch glaze  

  • 60 g unsalted butter 
  • 120 mL whipping cream 
  • 120 g brown sugar
  • Pinch of salt
  • 5 mL pure vanilla extract

You will also need about 90 g walnuts 

  1. Preheat oven to 325ºF 
  2. Toast walnuts on a baking sheet lined with parchment paper for about 10 minutes, let cool and crush into small pieces
  3. Turn oven up to 350ºF
  4. In a large mixing bowl, sift together flour, baking powder, baking soda, salt, cinnamon and nutmeg, add both sugars
  5. In another bowl, mix together eggs, buttermilk, oil and vanilla extract 
  6. Add wet ingredients into dry ingredients, mix until just blended 
  7. Pour batter into lightly greased doughnut pans and bake for about 12 minutes, let cool
  8. To make the glaze, cook butter and whipping cream in a small non-stick pot over medium heat until butter melts
  9. Add sugar and salt , stir continuously until thicken and smooth  
  10. Add vanilla, let cool slightly
  11. To assemble, dip one side of doughnuts into the glaze, then the crushed walnuts, best to serve immediately


Butterscotch sauce recipe adapted from Mark Bittman, “How to Bake Everything” 


Books and Tools


How to Bake Everything: Simple Recipes for the Best Baking

Wilton Nonstick 6-Cavity Donut Pan

You can get the doughnut pans and the cookbook through the Amazon website by clicking the above link. I will receive a small compensation if you purchase the item. 

Chocolate Zucchini Loaf

I haven’t been blogging actively. It’s been such a busy summer and we were on vacation last week. I make this zucchini loaf all the time and I have been hoping to share it since May ! Somehow just never got around to it. Last week, the mom of my daughter’s best friend gave me a few gigantic zucchini fresh from her garden ! So I made this again and finally put the post together. It’s one of those sneaky recipes in which you can hide the vegetables ! My son doesn’t like sweets nor zucchini, but he would come back for more of this. I guess that means it tastes pretty good ! If you prefer, you can put them in muffin tins instead, just remember to adjust the baking time to about 20-25 minutes. 

Makes 2 mini loaves (dimensions of pan: 5.75 x 3.25 x 2.25 inches)

  • 120 g shredded zucchini
  • 180 g all-purpose flour
  • 20 g unsweetened cocoa powder
  • 1.5 g baking powder
  • 1.5 g baking soda
  • 2 g salt
  • 50 g brown sugar
  • 50 g granulated sugar
  • 1 egg
  • 180 mL buttermilk
  • 30 mL vegetable oil
  • 2.5 mL pure vanilla extract
  • 60 g semi-sweet chocolate chips 
    1. Preheat oven to 350°F
    2. In a large mixing bowl, sift together flour, cocoa powder, baking powder, baking soda and salt
    3. Add both sugars
    4. In another bowl, mix together egg, buttermilk, oil and vanilla
    5. Add wet ingredients into flour mixture, stir until just blended
    6. Fold in chocolate chips and zucchini (batter will be slightly runny)
    7. Pour into lightly greased and floured loaf pans
    8. Bake for about 40-45 minutes 

Tools that I used 

Chicago Metallic 59440 Commercial II Non-Stick Mini Loaf Pans, Set of 4

You can get the mini loaf pans through the Amazon website by clicking the above link. I will receive a small compensation if you purchase the item. 

No Bake Chocolate Cheesecake 

Baking is one of my favourite things to do. But when it’s so hot outside, even the most devoted baker needs a break ! So I made these no bake cheesecake jars the other day. They are creamy, chocolaty, yummy and super easy to do ! 

As a food blogger, I am constantly looking for props that I can use without spending too much. Plates, cups, cutlery, baking tools, towels, etc. So, kitchenware stores, thrift stores, dollar stores and garage sales have become my favourite places to hang out. And I get super excited when I can reuse or recycle ! It’s like doing a makeover ! These cute little jars were containers of some petit pot yoghurts that I bought. They are perfect for individual desserts ! My only complain…..they’re too petit ! Cause these cheesecakes are so delicious and one is not enough !  

Makes about 8 servings

  • 12-15 graham crackers (or other cookies of choice)
  • 45 g unsalted butter,melted 
  • 120 g semi-sweet or dark chocolate, plus more for garnish 
  • 200 g cream cheese 
  • 120 g icing sugar, sifted  
  • 5 mL pure vanilla extract 
  • 240 mL cold heavy whipping cream 
  1. Crush graham crackers into crumbs and mix in melted butter 
  2. Spoon into containers, press down gently and refrigerate for later use 
  3. Melt chocolate in a double boiler or the microwave, cool slightly 
  4. Place one small mixing bowl in the freezer for about 20 minutes (for making whipped cream)
  5. In another mixing bowl, using an electric mixer, beat cream cheese, icing sugar and vanilla until smooth
  6. Add in melted chocolate, set aside
  7. In the cold mixing bowl, beat 120 mL of the cream until medium peak 
  8. Gently fold into the chocolate cream cheese until just combined 
  9. Spoon or pipe on top of graham cracker base (refrigerate if not serving right away)
  10. Just before serving, whip remaining cream to garnish, top with chopped chocolate 

Blueberry Galette 

Can’t believe summer is half-way through already ! I have been really busy, driving the kids around to different activities, keeping them occupied. If you are a parent, you would know, summer is actually busier than school days ! But they are having so much fun…..swimming, trampoline park, bowling, sleep over…..Although I am exhausted at the end of the day, seeing their happy faces makes it all worth it. Hey, kids are supposed to sleep in, play lots and eat lots during the summer, right ? With all the activities, meal times for us may not always be as regular and as healthy as I’d like. To balance that out, I make sure I stock lots of fruits at home. Luckily my kids are not picky eaters and love the summer fruits…blueberries, cherries, watermelon, peaches, etc.  And of course I use them to make desserts, like this blueberry galette. It’s basically a rustic blueberry pie and you don’t need to worry about making the crust neat and tidy. It makes a perfect summer dessert with some vanilla ice cream or whipped cream !

Makes one galette

For the crust 

  • 90 g unsalted butter (cut into small pieces and chilled)
  • 100 mL ice-cold water
  • 200 g cake and pastry flour, sifted
  • 15 g granulated sugar
  • 2.5 g salt

For the filling 

  • 200 g fresh blueberries 
  • 30 g granulated sugar 
  • 7.5 mL lemon juice 
  • Zest of 1/2 small lemon 
  • 7.5 g cornstarch 
  • 10 g graham cracker crumbs 
  1. To make the crust, combine flour,sugar and salt
  2. Rub in chilled butter with hands until resemble coarse crumbs, there should be pea-sized lumps of butter
  3. Add cold water and mix until dough just starting to form
  4. Transfer to a lightly floured surface, and press dough together (Do not knead)
  5. Wrap with plastic wrap and refrigerate for at least 1 hour or overnight (I actually doubled the amount of ingredients and kept half of the dough in the freezer for later) 
  6. When ready to bake, preheat oven to 375°F 
  7. Gently mix blueberries with sugar,lemon juice, lemon zest and cornstarch 
  8. Let sit for about 10 minutes 
  9. Roll dough out to about 0.5 cm in thickness 
  10. Sprinkle with graham cracker crumbs in the middle leaving about 5 cm from the edge, the crumbs help to prevent a soggy crust 
  11. Spoon filling on top  
  12. Fold and pleat edges over part of the filling
  13. Brush edges with water and sprinkle with vanilla sugar or granulated sugar 
  14. Bake for about 60 minutes until golden and filling is bubbling (you can cover it with aluminium foil for the last 15 to 20 minutes to prevent crust from getting too brown)
  15. Serve warm with whipped cream or vanilla ice cream