Tag Archives: food blog

Baked Double Chocolate Doughnuts 

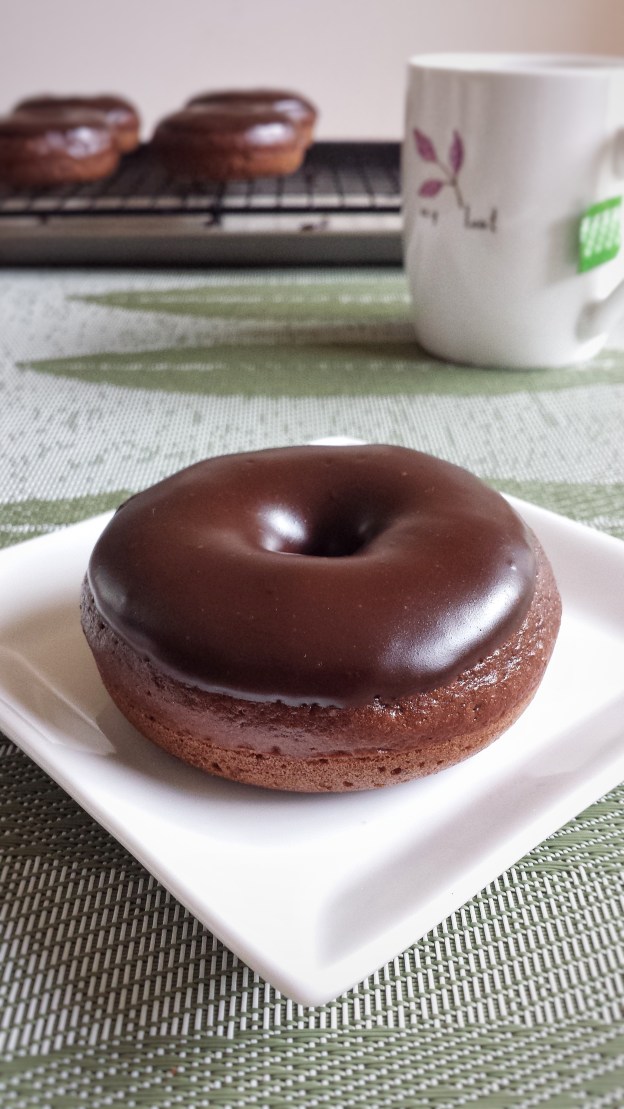
My daughter has been asking me to make doughnuts for a while. I love doughnuts,  just not too crazy about frying. I tried frying doughnut holes a couple of times, but they came out like burnt fritters. The only doughnuts I had successfully done were my Baked Honey Crullers. So this time, I decided to bake them again. I figured I would have a better chance of success. And voilà! I made it in one try ! The more exciting part is my son loves them ! He doesn’t have a sweet tooth and it’s not often that he likes my goodies (at least me and my daughter think they are !) He even asked me to make it again and I did ! It’s so easy when you have a doughnut pan. You can actually transform any of your muffin or quick bread recipes into doughnuts !  Just dress them up with a glaze or some sprinkles ! 

Makes 12 -14 doughnuts

For the doughnuts 

  • 270 g all-purpose flour
  • 40 g unsweetened cocoa powder 
  • 120 g granulated sugar 
  • 60 g demerara or brown sugar 
  • 3 g baking powder 
  • 3 g baking soda 
  • 2 g salt 
  • 2 large eggs
  • 60 mL vegetable oil 
  • 250 mL buttermilk (adjust if needed)
  • 5 mL pure vanilla extract 
  1. Preheat oven to 350°F
  2. Sift together flour,cocoa powder, baking powder, baking soda and salt
  3. Add in both sugars 
  4. In another bowl, mix together eggs, oil, buttermilk and vanilla 
  5. Add wet ingredients into dry ingredients 
  6. Mix until just blended 
  7. Spoon/pour batter into lightly greased doughnut trays 
  8. Bake for 10-12 minutes 
  9. Cool completely on rack 

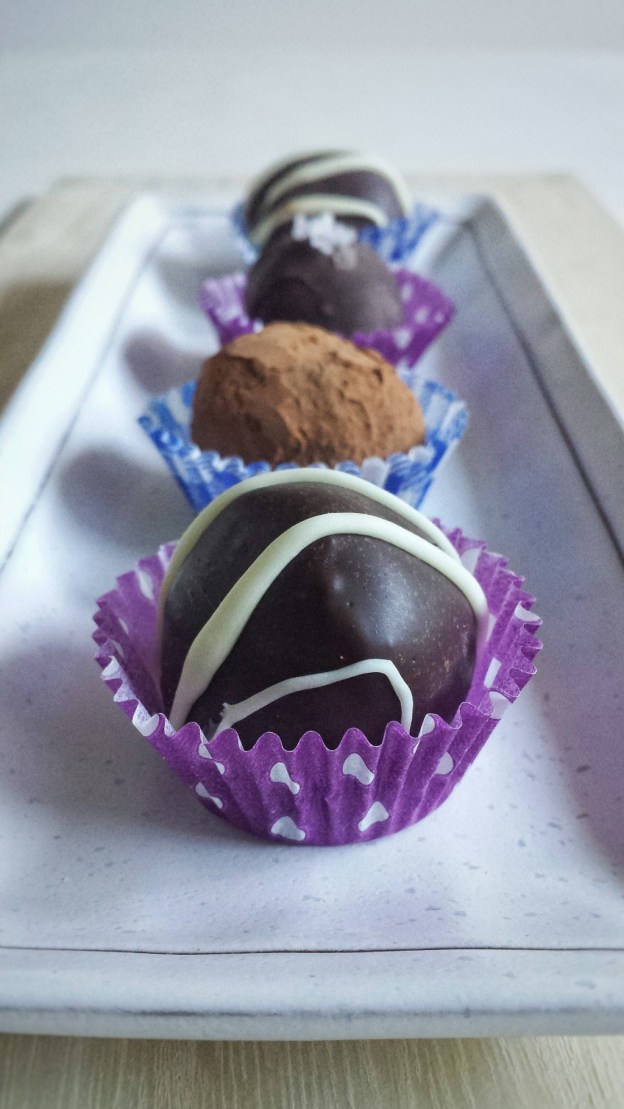
For the chocolate glaze 

  • 120 g semi-sweet or dark chocolate, finely chopped 
  • 120 mL whipping cream
  • 2.5 mL pure vanilla extract 
  1. Heat whipping cream over medium heat until just starting to boil 
  2. Pour it over chopped chocolate 
  3. Wait 30 seconds, add vanilla and stir until smooth 

When doughnuts are cooled, dip one side into chocolate glaze, place on rack to dry 
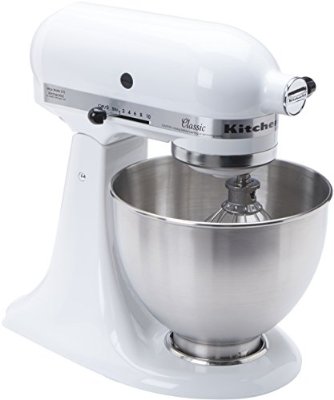
Tools that I used

Wilton Nonstick 6-Cavity Donut Pan

You can get this doughnut pan through the Amazon website by clicking the above link. I will receive a small compensation if you purchase the item. 


Chocolate Souffle 

I think Valentine’s day is a perfect time to make chocolate souffle. It brings a sweet ending to your romantic dinner. I first learned it at a pastry course and it’s actually pretty easy. All souffles will rise in the oven and fall shortly after they are taken out. That doesn’t mean that you fail, it’s just the way they are. Some recipes have a higher ratio of egg whites, some add cornstarch and milk or cream. These methods may make the souffles higher and stay in shape a little longer. After trying a few recipes, I found this one, adapted from the book “How To Bake Everything” by Mark Bittman is the simplest. It uses equal parts of egg yolks and whites, so you won’t need to worry about what to do with the extra yolks and the souffles came out both rich and airy. Have a sweet Valentine’s Day!

Makes about 4-6 servings

  • Butter for greasing ramekins 
  • 80 g granulated sugar, plus more for coating
  • 90 g dark chocolate (70%), chopped 
  • 4 eggs, separated
  • 1/4 teaspoon cream of tartar 
  • Icing sugar for dusting
  1. Preheat oven to 350°F
  2. Grease ramekins with butter, then sprinkle sugar over to coat, tap off excess 
  3. Melt chocolate in a heat-proof bowl over a pot of simmering water, let cool slightly 
  4. Whisk together egg yolks and 30 g of granulated sugar using an electric mixer until light yellow and mixture falls in a ribbon over surface 
  5. Mix in melted chocolate until combined 
  6. Clean and dry the whisk
  7. In another mixing bowl using the electric mixer, whisk egg whites and cream of tartar at medium speed until frothy
  8. Increase speed to high and slowly add in 50 g of granulated sugar
  9. Whisk until a stiff peak is formed
  10. Gently fold egg whites, in 3 batches, into egg yolk mixture
  11. Pour into ramekins and place on a rimmed baking tray 
  12. Put tray into oven, pour about one inch of hot water into baking tray
  13. Bake in hot water bath for about 20 minutes (Do not open oven door during baking)
  14. Dust with icing sugar, serve immediatelyChocolate Souffle

Tools and Books 

41rqjlmpovl._sy400_.jpg

KitchenAid K45SSWH Classic 4.5-Quart Bowl Stand Mixer, White

How to Bake Everything

How to Bake Everything: Simple Recipes for the Best Baking

You can get these items through the Amazon website by clicking the above link. I will receive a small compensation if you purchase them.

Baked Coconut Sticky Rice Cake for Lunar New Year

Lunar New Year was my favourite celebration when I was a kid in Hong Kong. I could visit and play with my cousins, get red envelopes and of course, eat lots and lots of good food ! My mom used to make all kinds of dishes and rice cakes, sweet and savoury. To be honest, I have never made them, because hers are always the best! But this year I thought…..hey, I am a baker, I should at least bake something to celebrate. Then, I remembered a recipe from my mom’s friend….Baked Coconut Sticky Rice Cake! I have modified her recipe to make it less greasy and added some shredded coconut on top. The glutinous rice flour and coconut milk should be available in any Asian market. Use the brands in the picture if you can find them, as according to the expert, aka my mom, they are better. (I am not sponsored by them, just personal preference) The cake will rise inside the oven, but then concave in a little when cooled and that’s ok. It doesn’t change the taste nor the texture of the cake. I used a round cake pan because but in Chinese, the word “round” has a meaning of being together. You can use a square pan, which probably will be easier to cut.

Wishing everyone good health and a prosperous year !

Baked Coconut Sticky Rice Cake

Makes one 8 inch round cake

  • 400 g glutinous rice flour, sifted (1 package)
  • 200 g granulated sugar
  • 5 eggs (lightly beaten)
  • 400 mL canned coconut milk (1 can)
  • 60 mL coconut oil (melted)
  • 1 teaspoon pure vanilla extract
  • 45 g unsweetened shredded coconut Baked Coconut Sticky Rice Cake
  1. Preheat oven to 350°F
  2. Line bottom of baking pan with parchment paper and lightly grease bottom and sides
  3. In a large bowl, mix together flour and sugar
  4. Stir in eggs, coconut milk, oil and vanilla until smooth using a hand whisk
  5. Strain batter through a mesh and pour into baking pan
  6. Sprinkle shredded coconut on top
  7. Bake for about 30 minutes, then reduce heat to 325ºF and bake for another 30 minutes (toothpick should come out clean when inserted into middle)
  8. Turn heat off, leave cake in oven with door ajar for about 20 minutes
  9. Take it out, cool slightly and serve warm
  10. You can store the cake in the fridge for up to 1 week. Reheat in oven before serving. Baked Coconut Sticky Rice Cake

White Chocolate and Lime Cookies 

I love citrus fruits ! The colours, the smell, the tanginess, they just brighten me up. I mostly bake with lemons or oranges and this is the first time I use lime. Normally I just use lime juice to make guacamole. The flavour of lime balances nicely with butter and white chocolate. This cookie dough is also very “unique” ! There are two kinds of flour, all-purpose and self-rising.  About 4 years ago, I tried to bake some shortbread cookies. The recipe called for cornstarch, but I accidentally put in self-rising flour ! To my surprise, they turned out really good ! Since then, I have used this combination many times with different variations and everyone likes it. Well, I guess I really have learned from my “mistake” …..but I don’t plan to correct it ! 🙂 Limes

Makes about 24 cookies 

  • 200 g unsalted butter, softened
  • 90 g icing sugar + more for dusting
  • 225 g all-purpose flour 
  • 45 g self-rising flour
  • 1/4 teaspoon salt
  • 1 tablespoon fresh lime juice
  • Zest of a small lime
  • 1 teaspoon pure vanilla extract
  • 50 g white chocolate chips 
  1. Preheat oven to 325°F
  2. Sift together both flours and salt, set aside
  3. Using an electric mixer with the paddle attachment, cream butter and sugar until fluffy
  4. Add lime juice, zest and vanilla extract 
  5. Add flour mixture in 2 parts, mix until just blended
  6. Stir in white chocolate chips
  7. Refrigerate dough for 1-2 hours to prevent cookies from spreading too much
  8. Shape dough into one inch balls and place on baking sheets lined with parchment paper, about 2 inches apart
  9. Bake for about 15 minutes, until edges just golden
  10. Cool on baking sheets for about 10 minutes, then completely on rack
  11. Dust with icing sugarWhite Chocolate and Lime Cookies


Tools I used and you may like

41rqjlmpovl._sy400_.jpg

KitchenAid K45SSWH Classic 4.5-Quart Bowl Stand Mixer, White


789.jpg

Microplane #40020 Classic Grater/Zester, Black

You can get these tools through the Amazon website by clicking the above link. I will receive a small compensation if you purchase the item.

Overnight Oats with Chia Seeds

After indulging myself over Christmas and New Year, I guess it’s time to make something a little healthier! Chia seed pudding has been on my “to make” list for quite a while, but I’ve been pushing it back. Somehow I associate the word “pudding” with something soft and creamy, not seedy and chewy.  So I ended up making this overnight oats.  It was really yummy, and to my surprise, my daughter loved it ! This is another recipe that can have so many variations. My ratio is roughly, 1 part oats, 2 parts milk and 1/4 part chia seeds, then add sweetener, and toppings.  It makes a great breakfast, or for me, a snack after my morning run !  

Makes 1 serving

  • 1/2 cup unsweetened milk of choice (I used almond and coconut milk)
  • 1/4 cup rolled oats
  • 1 tablespoon chia seeds
  • 1 tablespoon honey or maple syrup
  • toppings of choice, e.g. banana, berries, shredded coconut, almond slices, pumpkin seeds, sunflower seeds etc
  1. Combine milk, oats, chia seeds and sweetener in a bowl or a mason jar  
  2. Stir well, cover and refrigerate overnight
  3. Add toppings when ready to serveOvernight Oats with Chia Seeds


Marzipan Cake

I never knew marzipan can be so tasty and so useful in baking ! My first encounter with it was eating some marzipan-filled chocolate. To be honest, I didn’t really enjoy it. Perhaps it was too sweet or perhaps I always prefer eating pure chocolate. But after I learned to make the Eisenbahner (Railroad) Cookies, I absolutely fell in love with it ! With high hopes for myself, I decided to make a cake this time…..but sadly…..I failed twice ! How frustrating ! The “failures” actually tasted pretty good. I realized the problem was the pans I used. For the first time, I used a 9 inch spring-form pan and the cake turned out too flat (It is a denser cake and it won’t rise very much). So I switched to a 9 inch x 5 inch loaf pan. But it took too long to bake through and the outside of the cake was dry and brown. So for the third time, I used an 8 inch cake ring and baked it in a hot water bath and…..Success finally ! I thought I would never make it !  Phew ! Now I get to sit down, relax and enjoy my cake after all that hard work !

Makes one 8 inch round cake 

  • 180 g unsalted butter, softened
  • 200 g marzipan, cut into small pieces and softened
  • 120 g granulated sugar
  • 4 eggs
  • 1 teaspoon pure vanilla extract
  • 1/2 teaspoon almond extract
  • 60 ml milk
  • 60 g honey
  • Zest of 1/2 orange
  • 180 g all-purpose flour
  • 2 teaspoons baking powder
  • 1/4 teaspoon salt
  • Icing sugar and almond slices for toppings
  1. Grease and flour an 8 inch cake ring  
  2. Wrap bottom with parchment paper, then 2 layers of aluminium foil and place on a rimmed baking trayCake RingCake Ring
  3. Preheat oven to 350°F
  4. Sift together flour, baking powder and salt, set aside
  5. Using an electric mixer with the paddle attachment, beat together butter, marzipan and sugar 
  6. Add eggs, one at a time
  7. Mix in vanilla and almond extract, milk, honey and orange zest 
  8. Add flour mixture in two parts, mix until blended
  9. Pour batter into cake ring (it’s ok if batter is slightly gritty) 
  10. Pour about one inch of hot water in baking tray and bake cake in hot water bath for about 60 minutes  
  11. Cool and remove cake ring
  12. Top with icing sugar and almond slicesMarzipan CakeMarzipan Cake

Espresso Truffles 

2016 has been a pretty busy blogging year for me….Trying new recipes, participating in recipe round-ups, collaborative posts, Gastroposts, etc.  I also took a few pastry courses to improve my knowledge and skills. It’s been fun and rewarding. To treat myself and write my last post for the year, I made these Espresso Truffles with two of my favourite things, coffee and chocolate ! These little balls are so yummy, just one bite can already put a smile on my face and they are surprisingly easy to make ! Looking ahead, I hope to continue to learn, create and share more recipes.  Have a Happy New Year ! Espresso Truffles

Makes about 16 truffles

    • 180 g semi-sweet chocolate (finely chopped)
    • 60 g dark chocolate (70%, finely chopped)
    • 120 mL whipping cream
    • 3 g French Vanilla or other flavoured coffee beans (coarsely crushed)
    • 1 teaspoon pure vanilla extract
    • toppings of choice : unsweetened cocoa powder, melted chocolate for dipping (about 8 oz for 16 truffles), sea salt, crushed nuts, shredded coconut, etcEspresso Truffles
  1. Pour whipping cream and crushed coffee beans in a non-stick pot over medium heat until simmering
  2. Pour hot cream through a fine mesh and over chopped chocolate, let sit for about 30 seconds, add vanilla
  3. Stir until smooth
  4. Cool, then put in fridge for about 2 hours
  5. With the help of a melon scooper or a teaspoon, shape about 2 teaspoons each into balls
  6. Roll over desired toppings or dip them in melted chocolate 
  7. Keep in fridgeEspresso Truffles

Eggnog Panna Cotta with Frozen Sugared Raspberries

We love panna gotta and we love eggnog. So Christmas seems to be a perfect time to combine them together!  It makes a great dessert for your holiday dinner.  It is super easy and you can prepare it the day before.  For the sugared raspberries, many recipes use raw egg whites which I am not comfortable with.  I think a simple syrup works just as good. I also like to freeze mine for a little crunchiness.  Have a Merry Christmas everyone !

Makes about 4 servings

For the sugared raspberries

  • 100 g raspberries (wash and dry)
  • 60 g granulated sugar
  • 1/4 cup boiling water
  • 60 g vanilla sugar (or you can just use granulated sugar)

For the panna cotta

  • 1 envelope (7g) unflavoured gelatin
  • 1/2 cup milk
  • 1 cup eggnog
  • 1/2 cup whipping cream
  • 30 g granulated sugar
  • 1/2 teaspoon pure vanilla extract
  • pinch of nutmegSugared Raspberries
  1. For the sugared raspberries, prepare a simple syrup by dissolving 60 g of granulated sugar in 1/4 cup of boiling water, then let cool
  2. Gently brush raspberries with simple syrup and roll in a dish of vanilla sugar or granulated sugar
  3. Place on a tray lined with parchment paper and freeze for 2 or more hoursSugared Raspberries
  4. For the panna cotta, sprinkle gelatin over milk and let sit for a few minutes 
  5. Heat together eggnog, whipping cream and sugar in a non-stick pot over medium heat until sugar all dissolved and just starting to bubble, turn heat down to low 
  6. Add gelatin mixture
  7. Stir until gelatin all dissolved, add pinch of nutmeg
  8. Turn heat off, add vanilla extract
  9. Strain through a fine mesh twice
  10. Pour into ramekins or desired containers
  11. Let cool and refrigerate until set, at least 3 hours or overnight
  12. Top with frozen sugared raspberries when ready to serve

Eggnog Panna Cotta

Marble Chocolate Bark 

This is probably one of the easiest homemade Christmas treats that you can give to your friends and relatives. And there are so many different ingredients you can use.  All you need are three basics :

  1. chocolate, dark, milk, white or a mix
  2. something chewy, like dried fruits
  3. something crunchy, like nuts, seeds,toffee bits, crushed candy canes

I like mine very simple because I still like to enjoy the chocolate.  So here is my creation !

  • 240 g dark chocolate
  • 120 g white chocolate 
  • 30 g pistachios (remove shells and crush into small pieces)
  • 30 g dried cranberries 
  1. Melt chocolates in a heat-proof bowl over a pot of simmering water.
  2. Pour dark chocolate on a baking tray lined with parchment paper, spread evenly with a spatula
  3. Drop spoonfuls of white chocolate over dark chocolate
  4. Swirl with a skewer or handle of a spatula to create marble effect
  5. Sprinkle dried cranberries and pistachios 
  6. Refrigerate until firm
  7. Break into pieces


Eisenbahner (Railroad) Cookies 

This is a cookie that I learned at my pastry course earlier this year. It was one of my favourites. It’s beautiful, festive, delicious and has a cool name! It looks like a railroad track, hence the name Eisenbahner, which means railroad man in German. When I did a google search, almost all the recipes for this cookie are in German. So, I think it’s a great idea to share this in our Canadian Food Creatives and the Canadian Christmas Cookie Exchange round-up. There are 3 parts to this cookie, the base, the marzipan paste and the jam. Yes, it may seem a little complicated, but it’s definitely worth all the work. Hope you enjoy the ride !

Makes about 12 cookies

For the cookie base

  • 120 g cold unsalted butter
  • 60 g granulated sugar
  • 1 egg yolk
  • 170 g cake and pastry flour

For the marzipan paste and jam 

  • 200 g marzipan
  • 20 g unsalted butter, softened
  • 30 g icing sugar
  • 30 g honey
  • 1 egg white
  • 100 g raspberry jam (You want the jam to be hot and runny, so you can put it in a bowl and sit in a hot water bath for a few minutes before using)
  1. To make the cookie base, mix together cold butter and sugar using a wooden spoon until no more lumps
  2. Add egg yolk, mix until blended
  3. Add flour all at once, mix then transfer onto a table or counter and gently knead dough together (do not overmix, just work until ingredients are mixed in)
  4. Wrap with plastic wrap, refrigerate for at least 2-3 hours or overnight
  5. To make the marzipan paste, mix together marzipan, softened butter, icing sugar and honey into a thick paste (I found it easier to mix them with hands)
  6. Add egg white, mix until it has a stiff piping consistency (it looks like mash potato and you may not need the whole egg white)
  7. Put in piping bag with a star tip
  8. When ready to bake, preheat oven to 325ºF
  9. Take dough out from fridge and knead gently on a floured surface until pliable
  10. Roll it flat, about 0.3 cm in thickness (it’s OK if it cracks a little, just patch it back together)
  11. Cut into two 6 cm x 25 cm rectanglesEisenbahner (Railroad) Cookies
  12. Bake on a cookie sheet lined with parchment paper until edges just starting to brown, about 8 minutes
  13. Cool, then brush a thin layer of hot jam in between the 2 sheets 
  14. Pipe marzipan paste along edgesEisenbahner (Railroad) Cookies
  15. Turn oven up to 425-450ºF at broiler setting
  16. Bake 2-3 minutes just to caramelize the marzipan paste (watch closely, as it can burn very quickly)
  17. Cool, then fill centre with hot jamEisenbahner (Railroad) Cookies
  18. Cool completely, cut into pieces, dust with icing sugarEisenbahner (Railroad) Cookies

Original recipe by Chef Marco Ropke at the Vancouver Pastry Training Centre.

Be sure to check out the links below for more cookie recipes from other Canadian Bloggers.  You can also find them on social media using the hashtag #CDNFoodCreatives . Many thanks to Laura Irvin at The Blue Nose Baker , Kacey Joanette at The Cookie Writer and Evelyne Budkewitsch at The Cultureatz for organizing.

cookie-collage-final.jpg.jpeg